| Oracle® Application Express Application Builder User's Guide Release 3.2 E11947-03 |
|
|
PDF · Mobi · ePub |
| Oracle® Application Express Application Builder User's Guide Release 3.2 E11947-03 |
|
|
PDF · Mobi · ePub |
A page is the basic building block of an application. Each page has a page number, a name, and typically some text attributes such as a header, title, and footer. You add content to your page by creating page controls (regions, items, and buttons). Page templates and page region templates control the exact look and feel of each page.
Topics in this section include:
Each Page Definition is divided into three sections: Page Rendering, Page Processing, and Shared Components. Each of these sections is broken into subsections with headings that identify the type of control, component, or application logic.
You can edit all controls, components, or logic within a given subsection by clicking the Edit All icon that displays to the right of the subsection title. The Edit All icon resembles a small grid with a pencil on top of it.

Clicking the Edit All icon displays pages that enable you to edit or delete multiple controls, components, or application logic simultaneously or view a history of recent changes.
For example, selecting the Edit All icon under Regions displays a summary report of all currently defined regions on the current page. You can use this summary view to:
Edit the multiple attributes at once by making selections from the available fields and select lists.
Link to a definition page by clicking the Edit icon.
You can access similar summary views on the next or previous page by clicking the Next and Previous buttons at top of each page. To save your edits to any summary view, click Apply Changes.
You can also view the attributes of a specific control or component by selecting its name on the Page Definition. For example, suppose your Page Definition contains a region named Customers. Clicking the region name Customers would display an attributes page for that region.
You can copy or create controls or components by clicking the Copy and Create icons. The Copy icon resembles two small overlapping pages. Click the Copy icon to make a copy of an existing control or component.

The Create icon resembles a plus (+) sign overlapping a small page. Click the Create icon to create a control or component.

You can quickly change the order in which regions, button, and items display using the Reorder icon on the Page Definition. The Reorder icon displays as a light green downward arrow and upward arrow.
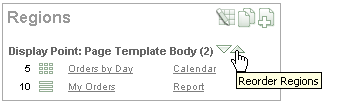
To reorder page components, click the Reorder icon. When the Reorder page appears click the up and down arrows and then click Apply Changes.
Page rendering is the process of generating a page from the database. Use the Page Rendering section to modify controls that impact the rendering of a page, including page attributes, regions, buttons, items, page rendering computations, and page processes.
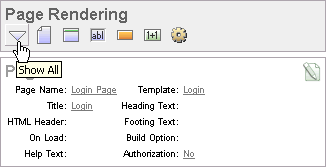
You can quickly navigate to a specific subsection by clicking the icons beneath the heading. When you select one of these icons, the subsection appears and all other subsections are temporarily hidden. To restore the view, click Show All. The Show All icon resembles an inverted triangle.
Topics in this section include:
See Also:
"About the Page Definition", "About the Edit All Icon" and "About the Copy or Create Icons"Page attributes control specific characteristics of a page such as the page name, display attributes such as the page title and the associated page template, header text, and the selected authorization scheme to name just a few. You access page attributes from the Page Definition.
See Also:
"Editing Page Attributes"A region is a area on a page that serves as a container for content. Each page can have any number of regions. The content of a region is determined by the region source. For example, a region may contain a report based on a SQL query you define, or it may contain static HTML.
You control the appearance of a region through a specific region template. You can use regions to group page controls (such as items or buttons). You can also create simple regions that do not generate additional HTML, or create elaborate regions that frame content within HTML tables or images.
See Also:
"Understanding Regions" for information about creating and editing regions
Oracle Database Advanced Application Developer's Guide for information about developing Web applications with PL/SQL
Oracle Database PL/SQL Packages and Types Reference for information about htp packages
As you design your application, you can use buttons to direct users to a specific page or URL, or to enable users to submit a page. When you submit a page, the Application Express engine posts or processes information. A button can be implemented as an HTML button, an image, or by using a template. Buttons can be placed in predefined region template positions or among items in a form.
See Also:
"Creating Buttons"Items are HTML form elements such as text fields, select lists, and check boxes with an associated session state. Item attributes affect the display and behavior of items on a page. For example, these attributes can impact where a label displays, how large an item will be, and whether the item will display next to, or below the previous item.
There are two categories of items: page items and application items. Page-level items are placed on a page and have associated user interface properties, such as Display As, Label, and Label Template. Application-level items are not associated with a page and therefore have no user interface properties. An application item can be used as a global variable.
Computations are units of logic used to assign session state to items. You can use computations to assign a value to an identified item when a page is submitted or displayed.
Application-level computations assign a value to an item each time a page is rendered. A page-level computation assigns a value to an identified item when a page is displayed or submitted (rendered and processed).
Processes are logic controls used to execute data manipulation language (DML) or PL/SQL. For example, you can use a process to populate session state at the time a page is rendered, to execute some type of logic (for example, using PL/SQL), or to make a call to the rendering engine. Typically a process performs an action. A process may be hand coded PL/SQL, or the invocation of a predefined process.
Page processing is the process of submitting a page. A page is typically submitted when a user clicks a button. Use the Page Processing section of the Page Definition to specify application logic such as computations, validations, processes, and branches. In general, the Application Express engine runs this logic in the order it appears on the Page Definition.
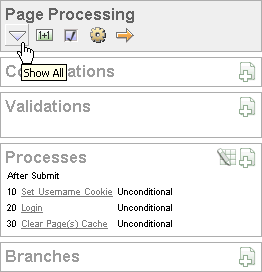
You can quickly navigate to a specific subsection by clicking the icons beneath the heading. When you select one of these icons, the subsection appears and all other subsections are temporarily hidden. To restore the view, click Show All. The Show All icon resembles an inverted triangle.
Topics in this section include:
See Also:
"About the Page Definition", "About the Edit All Icon", and "About the Copy or Create Icons"Computations are units of logic used to assign session state to items and are executed at the time the page is processed.
See Also:
"Understanding Page Computations"Validations enable you to create logic controls to verify whether user input is valid. For example, a validation can check whether a value has been entered into a mandatory field.
Processes are logic controls used to execute data manipulation language (DML) or PL/SQL. Processes are executed after the page is submitted.
See Also:
"Understanding Page Processes"The Shared Components section of the Page Definition contains common elements that can display or be applied on any page within an application.
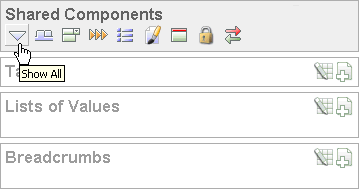
You can quickly navigate to a specific subsection by clicking the icons beneath the heading. When you select one of these icons, the subsection appears and all other subsections are temporarily hidden. To restore the view, click Show All. The Show All icon resembles an inverted triangle.
See Also:
"Working with Shared Components"Topics in this section include:
See Also:
"About the Page Definition", "About the Edit All Icon", and "About the Copy or Create Icons"Tabs are an effective way to navigate between pages of an application. Application Builder includes two types of tabs: standard tabs and parent tabs.
An application having only one level of tabs uses a standard tab set. A standard tab set is associated with a specific page. You can use standard tabs to link users to other pages within your application. A parent tab set functions as a container to hold a group of standard tabs. Parent tabs give users another level of navigation and context (or sense of place) within the application.
See Also:
"Creating Tabs"A list of values (LOV) is a static or dynamic definition used to display a specific type of page item, such as a radio group, check box, or select list. LOVs can be static (that is, based on a set of predefined display and return values) or dynamic (based on SQL queries that select values from tables). Once created, an LOV can then be referenced by one or more page items.
You define LOVs at the application level by running the LOV Wizard and adding them to the List of Values repository.
See Also:
"Creating Lists of Values"A breadcrumb is a hierarchical list of links that is rendered using a template. For example, you can display breadcrumbs as a list of links or as a breadcrumb path.
See Also:
"Creating Breadcrumbs"A list is a collection of links that is rendered using a template. For each list entry, you specify display text, a target URL, and other attributes that control when and how the list entry displays. You control the display of the list and the appearance of all list entries by linking the list to a template.
See Also:
"Creating Lists"A theme is a named collection of templates that defines the application user interface. Each theme contains templates for every type of application component and page control, including individual pages, regions, reports, lists, labels, menus, buttons, and list of values.
See Also:
"Managing Themes"Templates control the look and feel of the pages in your application. As you create your application, you specify templates for pages, regions, reports, lists, labels, menus, buttons, and popup lists of values. Groups of templates are organized into named collections called themes.
See Also:
"Customizing Templates"You can provide security for your application by specifying an authorization scheme. Authorization is a broad term for controlling access to resources based on user privileges.
Use a navigation bar to link users to various pages within an application. Typically a navigation bar is used to enable users to log in, log out, or link to Help text. The location of a navigation bar depends upon the associated page template. A navigation bar icon enables you to display a link from an image or text. When you create a navigation bar icon you can specify an image name, text, display sequence, and target location (a URL or page).
See Also:
"Creating a Navigation Bar Entry"Use page computations to assign a value to an identified item when a page is submitted or displayed. You can also use application-level computations to assign values to items. Most application-level computations are performed for every page in an application. In contrast, computations created at the page-level only execute when that page is rendered or processed.
See Also:
"Understanding Application Computations"Topics in this section include:
A page computation assigns a value to an identified item when a page is displayed or submitted (rendered and processed).You create a page computation by running the Create Page Computation Wizard. For each computation, specify the item for which you are creating the computation and a computation type.
See Also:
"Computations"To create a page computation:
Navigate to the appropriate Page Definition. See "Accessing a Page Definition".
Under Computations, click the Create icon.
For Item Location, select where the computation will execute and click Next. Location options include:
Item on this Page
Item on Another Page
Application Level Item
For Item, select the item and computation point at which you would like to perform the computation:
Compute Item - Select the item the computation will update.
Sequence - Select the order of evaluation.
Computation Point - Select the point at which the computation executes. The computation point On New Instance executes the computation when a new session (or instance) is generated.
Computation Type - Select the method of computation you want to create.
Click Next.
In Computation, enter a computation that corresponds to the selected computation type and click Next.
On Condition, you can choose to make the computation conditional. To make a computation conditional, make a selection from the Condition Type list and enter text in the expression fields.
Click Create.
A good example of using computations can be illustrated by a page containing form fields for entering phone numbers. In this example, the phone number is stored in one database column; however, the data entry form breaks the phone number into three components: area code, prefix, and line number. In this example, the page items are called P10_AREA_CODE, P10_PREFIX, and P10_LINE_NUMBER.
Next, suppose you need to combine the values stored in these items into a single string. You could accomplish this by using an After Submit computation and store the combined values in an item called P10_PHONE_NUMBER.
To create a computation to store the combined values of P10_AREA_CODE, P10_PREFIX, and P10_LINE_NUMBER in new items:
Navigate to the appropriate Page Definition. See "Accessing a Page Definition".
Create a item named P10_PHONE_NUMBER to store the combined values of P10_AREA_CODE, P10_PREFIX, and P10_LINE_NUMBER. See "Differences Between Page Items and Application Items".
Under Computations, click the Create icon.
For Item Location, select Item on this Page and click Next.
For Computation, select P10_PHONE_NUMBER.
For Sequence, select the order of evaluation.
For Computation, you have the option of creating one of the following computation types:
Static Assignment:
For Computation Type, select Static Assignment and click Next.
Enter the following computation:
(&P10_AREA_CODE.) &P10_PREFIX.-&P10_LINE_NUMBER.
Click Next.
PL/SQL Function Body:
For Computation Type, select PL/SQL Function Body and click Next.
Enter the following computation:
DECLARE
l_return_value  VARCHAR2(300) DEFAULT NULL;
BEGIN
    l_return_value :=
'('||:P10_AREA_CODE||')'||:P10_PREFIX||'-'||:P10_LINE_NUMBER;
RETURN l_return_value;
END;
Click Next.
SQL Query:
For Computation Type, select SQL Query and click Next.
Enter the following computation:
SELECT '('||:P10_AREA_CODE||')'||:P10_PREFIX||'-'||:P10_LINE_NUMBER FROM DUAL
Click Next.
PLSQL Expression:
For Computation Type, select PLSQL Expression and click Next.
Enter the following computation:
'('||:P10_AREA_CODE||')'||:P10_PREFIX||'-'||:P10_LINE_NUMBER
Click Next.
Click Create.
Once you create a computation, you can edit it on the Edit Page Computation page.
To edit a page computation:
Navigate to the appropriate Page Definition. See "Accessing a Page Definition".
Under Computations, select the computation name.
The Edit Page Computation page appears.
Edit the appropriate attributes.
Click Apply Changes.
You control when a computation executes under the Computation Point attributes by specifying a sequence and a computation point. The computation point On New Instance executes the computation when a new session (or instance) is generated.
Under Source, enter an expression or query to compute an item's value. In the event a computation fails, you can optionally define an error message in the Computation Error Message field.
You can define a validation declaratively by selecting a validation method. You enter the actual validation edit check in the Validation Messages field. Be aware that if a validation fails, subsequent page processes or computations will not occur. Also remember that the validation you enter must be consistent with the validation type you selected. For more information about validation types, see online Help.
Topics in this section include:
To create a validation:
Note:
Text entered for validations may not exceed 3,950 characters.Navigate to the appropriate Page Definition. See "Accessing a Page Definition".
Under Validations in Page Processing, click the Create icon.
Select a validation level:
Item level validations are specific to a single item.
Page level validations do not apply to any single item, but apply to an entire page.
If you selected Item level validation, select the item to be validated and click Next.
Select a validation method as described in Table 5-1.
| Validation Method | Descriptions |
|---|---|
|
SQL |
Compares item values to data in the database. For example, you can use a SQL validation to verify whether a last name typed into a field exists in the database. In the following Exists SQL validation, the field is named SELECT 1 FROM customers WHERE last_name = :P1_LAST_NAME |
|
PL/SQL |
Useful if you need complex logic to validate entered data. For example, suppose you need to create a validation for an address form that requires the user to enter a province if the address is not in the United States. You could create the validation as a Function Returning Boolean, using the following PL/SQL:
BEGIN
  IF :P1_COUNTRY = 'US' AND :P1_PROVINCE IS NULL THEN
     RETURN FALSE;
  ELSE
    RETURN TRUE;
  END IF;
END;
You could also create the same validation implemented as a PL/SQL Expression as follows: NOT (:P1_COUNTRY='US' AND :P1_PROVINCE IS NULL); |
|
Item Level Null |
Checks if an item's value in session state is null. For example, you could validate that the user enters a value in a field by creating an item validation and then selecting the validation method Item Not Null. |
|
Item String Comparison |
Compares the value of an item to a specific string. There are several string comparison validations that compare the value of an item to a literal string. For example, you select the validation type Item in Expression 1 is contained in Expression 2 to validate a user entry in a field against a list of values you provide. In Expression 1, enter the name of the item you want to validate without a colon. For example: P1_VALUE In Expression 2, enter a string of values you want to validate against. For example: ABC/DEF/GHI |
|
Regular Expression |
Regular expressions provide a method to describe text patterns. Use a Regular Expression validation to perform data validation. For example, you could use the following regular expression validation to verify that a string of entered data always consists of groups of six numbers separated by commas and followed by a comma:
î([[:digit:]]{6},)+$
This regular expression would find the following entries valid:
However, the following would not be valid:
|
For SQL, PL/SQL, and Item String Comparison validations, select the type of validation you want to create and click Next.
Specify the sequence and validation name and click Next.
Depending upon the validation method, enter the validation or message text that displays if the validation fails. Click Next.
Define conditions that apply to this validation and click Create.
See Also:
"Validating User Input in Forms"You can choose to have validation error messages display inline (that is, on the page where the validation is performed) or on a separate error page.
To define how a validation error message displays:
Navigate to the appropriate Page Definition. See "Accessing a Page Definition".
Under Validations, select the appropriate validation.
The attributes page for the validation appears.
Scroll down to Error Message.
In Error Message, enter your error message text.
From Error message display location, select a display location.
This attribute identifies where a validation error message displays. Validation error messages can display on an error page or inline within the existing page. Inline error messages can display in a notification area (defined as part of the page template) or within the field label.
To create a hard error that stops all processing (including validations), you must display the error on an error page.
If you select Inline with Field or Inline with Field and in Notification, you must associate an item with the error message. To associate an item with the error message, select the item from the Associated Item list.
Click Apply Changes.
Tip:
If you select Inline with Field or Inline with Field and in Notification, be aware that the Application Express engine does not execute computations or processes during the re-rendering of the page when the validation error messages appear.You can control when and if a validation is performed under Conditions.
To create a condition for an existing validation:
Navigate to the appropriate Page Definition. See "Accessing a Page Definition".
Under Validations, select the appropriate validation.
The attributes page for the validation appears.
Scroll down to Conditions.
To have a validation performed when a user clicks a particular button, make a selection from the When Button Pressed list.
Make a selection from the Condition Type list.
Depending upon the selected Condition Type, enter values in the Expression attributes. The validation will be rendered or processed if the specified condition is met.
Click Apply Changes.
A page process performs an action at a specified point during the rendering or submission of the page. For example, you can create a page process to execute logic or to make a call to the Application Express engine. A page process is a unit of logic that runs when a specific event occurs, such as loading or submitting a page.
From a functional perspective, there is no difference between page-level and application-level processes. The difference between these two process types is where the process is defined, that is at the page-level or at the application level.
See Also:
"Understanding Application Processes"Topics in this section include:
You create a process by running the Create Process Wizard. During the wizard, you define a process name, specify a sequence and the point at which the process will execute, and select a process category. You can change nearly all of these attributes on the Edit Page Process page.
Navigate to the appropriate Page Definition. See "Accessing a Page Definition".
Under Processes, click the Create icon.
Select a category. Table 5-2 describes available page process categories.
| Process Category | Description |
|---|---|
|
Data Manipulation |
Data Manipulation process types are frequently used by wizards to support data manipulation language (DML) actions. Application Builder supports the following declarative data manipulation processes:
|
|
Close Popup Window |
Applies to processes running within a popup window. Upon execution, this process type closes the current popup window. |
|
Form Pagination |
Implements pagination through the detail records associated with a master detail form. Most often used in master detail forms (such as in the Master Detail Wizard), this process checks the master table to determine which set of detail records you are in and determines what the next detail record should be. See Also: "Creating a Master Detail Form" |
|
On Demand |
Creates an application-level process that can only be executed when called from a specific page. When you create this process type at the page-level, you are creating reference to an existing application-level process. See Also: "About On Demand Application Processes" |
|
PL/SQL |
Runs the PL/SQL you provide. Use this process type to execute a block of PL/SQL entered directly into the process or to simply call an existing API. |
|
Reset Pagination |
In Report regions, resets pagination back to the first result set. The Application Express engine keeps track of where the user is within a given result set. This process category returns the user to the beginning result set. In other words, this category resets the counters associated with the report region to return the first part of the result set the next time the result set displays. |
|
Session State |
Sets the values of existing session state items to null. Select this process type to clear the cache for applications, sessions, or items and to clear existing user preferences. See Also: "Managing Session State Values" and "Managing User Preferences" in Oracle Application Express Administration Guide |
|
Web Services |
Implements a Web Service as a process on a page. Running the process submits a request to the service provider. See Also: "Invoking a Web Service as a Process" |
Follow the on-screen instructions.
Once you create a process, you can control when the process executes and what the process does by editing attributes on the Edit Page Process page.
To edit an existing page process:
Navigate to the appropriate Page Definition. See "Accessing a Page Definition".
Select the process name.
The Edit Page Process page appears.
You control when a process executes by specifying a sequence number and a process point under Process Point. You can prevent a process from running during subsequent visits to a page by selecting one of the following options under Run Process:
Once for each page visit
Once for each session or when reset
Enter the appropriate code for PL/SQL process types. For PL/SQL anonymous block processes, enter the appropriate code under Process. For Clear Cache processes, enter the appropriate code under Source. In the event a process fails, you can optionally define an error message in the Process Error Message field.
You can make a process conditional by selecting a condition type and entering an expression under Conditional Processing.
Additionally, you can also make a selection from the When Button Pressed attribute. When you select a button from this list, the process only executes if a user clicks the selected button.
A branch is an instruction to go to a specific page, procedure, or URL. For example, you can branch from page 1 to page 2 after page 1 is submitted.
You create a branch by running the Create Page Branch Wizard and specifying Branch Point and Branch Type. The Branch Type defines the type of branch you are creating. For more information about Branch Types, see online Help.
Topics in this section include:
When you click a standard tab in an application, the Application Express engine sets session state, executes computations, and then links you to the target page. It does not run any processes or explicitly defined branches. In cases where the page is submitted without clicking a tab, the Application Express engine explicitly defines branches to direct users to a subsequent page.
You can control when a branch executes by making a selection from the Branch Point list. Available options include:
On Submit: Before Computation - Branching occurs before computations, validations, or processing. Use this option for buttons that do not need to invoke any processing (for example, a Cancel button).
On Submit: Before Validation - Branching occurs after computations, but before validations or processing. If a validation fails, page processing stops, a rollback is issued, and the page displays the error. Because of this default behavior, you do not need to create branches to accommodate validations. However, you may want to branch based on the result of a computation (for example, to a previous branch point).
On Submit: Before Processing - Branching occurs after computations and validations, but before processing. Use this option to branch based on a validated session state, but before performing any page processing.
On Submit: After Processing - Branching occurs after computations, validations, and processing. This option branches to a URL or page after performing computations, validations, and processing. When using this option, remember to sequence your branches if you have multiple branches for a given branch point.
On Load: Before Header - Branching occurs before a page is rendered. This option displays another page instead of the current page or redirects the user to another URL or procedure.
Depending upon the Branch Type you select, you can specify the following additional information in the Action attributes:
The page number of the page to which you want to branch
PL/SQL procedure which ultimately renders a branch target page
A URL address
Like other controls, branches can be made conditional. To create a conditional branch, make a selection from the Condition Type list, and enter text in the expression fields to implement the condition type you choose.
See Also:
"Controlling Navigation Using Branches"
|
Copyright © 2003, 2013, Oracle and/or its affiliates. All rights reserved. Legal Notices |
|