| Oracle® Database 2 Day + Real Application Clusters Guide 10g Release 2 (10.2) Part Number B28759-06 |
|
|
PDF · Mobi · ePub |
| Oracle® Database 2 Day + Real Application Clusters Guide 10g Release 2 (10.2) Part Number B28759-06 |
|
|
PDF · Mobi · ePub |
Oracle issues product fixes for its software called patches. When you apply the patch to your Oracle software installation, a small collection of files are replaced to fix certain bugs. OPatch is an Oracle supplied utility that facilitates Oracle software patching.
A group of patches form a patch set. When you apply a patch set, many different files and utilities are modified. This results in a version change for your Oracle software, for example, from Oracle Database 10.2.0.1.0 to Oracle Database 10.2.0.2.0. To apply a patch set you use the Oracle Universal Installer (OUI).
This chapter describes how to manage Oracle software and apply patches in Oracle Real Application Clusters (Oracle RAC) environments using Enterprise Manager and the OPatch utility.
This chapter includes the following sections:
See Also:
Oracle Universal Installer and OPatch User's Guide for more information about using OPatch and applying patches to Oracle RACOracle Enterprise Manager Database Control enables you to find the latest patch release on the Oracle MetaLink Web site and to download it to your Oracle home. There are two steps in configuring the Enterprise Manager Patch interface:
To download patches from Oracle MetaLink using Enterprise Manager, you can give Oracle Enterprise Manager Database Control (Database Control) your login credentials so that it can log in to Oracle MetaLink automatically and search for patch releases. You must set these credentials before you can run the Patch wizard in Database Control.
Refer to Oracle Database 2 Day DBA for instructions on setting your Oracle MetaLink credentials.
After you have configured the Oracle MetaLink credentials, you can create a job to search for critical patch advisories for your installed software.
To create a job to search for critical patch advisories on Oracle MetaLink, perform the following tasks:
On the Cluster Database Home page, scroll down the section titled Critical Patch Advisories. Click the link RefreshFromMetalink.
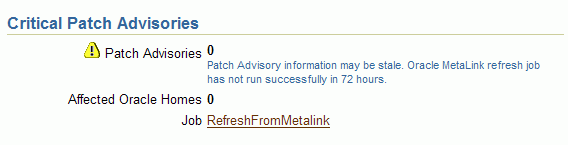
When you click this link, Enterprise Manager creates the Refresh_From_Metalink_Job job, and then displays the Job Activity page.
On the Job Activity page, click Edit and then modify the scheduled execution time of the Refresh_From_Metalink_Job job to meet your business requirements. When finished, click Save.
When returned to the Job Activity page, select the Refresh_From_Metalink_Job job and click Create Like. Change the job now to Refresh_From_Metalink_Now, then click Schedule. Select Immediately for the start time. Select One Time Only for the Repeat interval. Click Submit and Save.
When returned to the Job Activity page, click REFRESH_FROM_METALINK_NOW.
The Job Run: REFRESH_FROM_METALINK_NOW page is displayed.
Refresh this page until the job status shows Succeeded.
Click the Database tab in the upper right-hand corner to return to the Cluster Database Home page.
You obtain patches and patch sets from Oracle MetaLink, which is the Oracle Support Services Web site, at
http://metalink.oracle.com
Refer to Oracle Database 2 Day DBA for information about configuring Enterprise Manager to access OracleMetaLink for patch queries and downloads.
You can view available patch releases at Oracle MetaLink by using Enterprise Manager. Viewing these updates is the first step in the Patch wizard, which you can use to download the patch to your Oracle home.
To start the Patch wizard with Enterprise Manager:
From the Cluster Database home page, click Maintenance.
Scroll down to the list of instances. Click the link for the first instance in your cluster, for example, sales.oracle.com_sales1.
The Database Instance Home page for the sales1 instance is displayed.
Click Maintenance.
In the Database Software Patching section, click Apply Patch.
The Patch: Select Patch page appears.
Enterprise Manager automatically fills in values for Product Family, Product, Release, and Platform. The search results that match the criteria are displayed by the most recent patch (or patch set) at the top of the list.
Note:
You can limit your search by entering values for Begin Date and End Date, or by specifying a bug number, and then clicking Search.Select a patch and click View Details to view the patch details. Select a patch and click View ReadMe to view the README file for the patch, which includes a description of the bug fixes included in the patch and patch installation instructions. Return to the Patch Wizard by clicking the Patch locator link on the View Patch Details page.
Select the patch you are interested in, or select the most recent patch set if you are doing a periodic software update, then click Next.
The Patch: Select Destination page appears.
Select the targets to apply the patch to by moving the target names from the Available Targets list to the Selected Targets list, then click Next.
The Patch: Set Credentials page appears.
In the Username and Password boxes, enter the operating system user name and password to enable Enterprise Manager to stage the patch in your Oracle home directory. Enterprise Manager requires these credentials for job scheduling. After you have entered the operating system credentials for each selected node, click Next.
The Patch: Stage or Apply page appears.
Enterprise Manager downloads the patch to the directory that is listed in the main box. Typically, this location is an Oracle home subdirectory called EMStagedPatches/patchnumber.
By default, Enterprise Manager only stages the patch. You can then manually apply the patch by following the directions given in the patch README file. The directions may include shutting down the database instances and your applications, or running scripts.
You can also select the Run Script to Apply Patch option to have Enterprise Manager apply the patch for you. If you choose this option, you must modify the script displayed on this page so that it performs all the actions specified in the patch release notes. This method is only supported for databases that do not contain the Enterprise Manager repository or for patches that do not require the repository database to be shutdown. For example, if you are applying a patch that only affects SQL*Loader, then you can use Enterprise Manager to apply the patch.
When you are done, click Next. The Patch: Schedule page appears.
Specify the time when you want the patch to be downloaded from Oracle MetaLink. If you selected the option Run Script to Apply Patch, then the patch apply script will run at this time. Click Next.
The Patch: Summary page appears.
Review the summary information on this page. If you need to modify any of the information displayed, click the Back button. When you are ready to submit the job, click Finish.
Before you apply the patch to your Oracle RAC database, your Oracle ASM installation, or to your Oracle Clusterware installation, there are a few steps to perform:
OPatch verifies if the Oracle home is present. You must ensure that the ORACLE_HOME environment variable is set to the Oracle home of the product you are trying to patch. Check the respective vendor documentation for the details to set the environment variable.
It is highly recommended to back up the software directory you are patching before performing any patch operation. This applies to Oracle Database, Oracle ASM, or Oracle Clusterware software installation directories. You can back up the software installed in the specified ORACLE_HOME using any method such as zip, cp -r, tar, and cpio to compress the ORACLE_HOME.
If you use Enterprise Manager to download the patch, and you selected all the nodes in your cluster as targets for the patch, then the patch is automatically staged on those nodes. If you manually downloaded the patch from Oracle MetaLink, then you must copy the patch to each node.
The opatch binary file is located in the $ORACLE_HOME/OPatch directory. You can either specify this path when executing OPatch, or you can update the PATH environment variable to include the OPatch directory. For example, on RedHat Linux systems you would use a shell command similar to the following:
$ export PATH=$PATH:/opt/oracle/10gR2/db_1/OPatch
You could also modify the shell profile script to have this variable configured every time you log in.
Before you patch a system, make sure the user equivalency is working. You can use the following command to test user equivalency:
[oracle@docrac1] $ ssh docrac2 date
If the date is returned, then user equivalency between the source and destination node has been configured. If you see output similar to the following, then SSH user equivalency is not enabled:
Enter passphrase for key '/home/oracle/.ssh/id_rsa':
To enable SSH User Equivalency:
On the system where you want to run OPatch, log in as the oracle user.
Start the SSH agent and load the SSH keys into memory using the following commands:
$ /usr/bin/ssh-agent $SHELL
$ /usr/bin/ssh-add
At the prompt, enter the pass phrase for each key that you generated when configuring Secure Shell, for example:
[oracle@docrac1 .ssh]$ exec /usr/bin/ssh-agent $SHELL
[oracle@docrac1 .ssh]$ /usr/bin/ssh-add
Enter passphrase for /home/oracle/.ssh/id_rsa
Identity added: /home/oracle/.ssh/id_rsa (/home/oracle/.ssh/id_rsa)
Identity added: /home/oracle/.ssh/id_dsa (/home/oracle/.ssh/id_dsa)
These commands start the ssh-agent on the local node, and load the RSA and DSA keys into the current session's memory so that you are not prompted to use pass phrases when issuing SSH commands. Refer to "Configuring SSH User Equivalency" for more information about configuring SSH user equivalency.
To test if you have configured SSH correctly, see if you can run the following command without being prompted for a password or a pass phrase:
[oracle@docrac1] $ ssh docrac2 date
Note:
Do not close this terminal window until you have completed the patch installation. If you must close this terminal window before the patch installation is complete, repeat step 1 and step 2 before starting the patch installation.Patching in an Oracle RAC environment is slightly different compared to patching a single node. If OPatch detects a cluster, it uses Oracle Universal Installer to query the software inventory to find the local node name and node list.
Before you install a patch, you must stop all the applications running from the software directory that is being patched. In an Oracle RAC cluster, you may have to shut down additional applications, depending upon which software is being patched. The following table lists the applications to stop when patching Oracle software.
Table 10-1 Patching Oracle Home Directories
| Oracle Home Directory | Applications to Stop |
|---|---|
|
Oracle RAC Database |
Oracle RAC database, Enterprise Manager Database Control, Listener, and any other applications that are running from the Oracle RAC home directory |
|
Oracle ASM |
Oracle RAC database, any single-instance databases that use the same Oracle ASM instance as the cluster database, Listener (if running from the Oracle ASM home directory), Oracle ASM, and any other applications that are running from the Oracle ASM home directory |
|
Oracle Clusterware |
Oracle RAC database, any single-instance databases that use the same Oracle ASM instance as the cluster database, Oracle ASM, all node applications, Oracle Clusterware, and any other applications that are running from the Oracle Clusterware home directory |
You can patch Oracle RAC in three different ways:
In all node patching, all the nodes in the cluster are initially shut down and the patch is applied on all the nodes. After all the nodes have been patched, then all the nodeapps on the nodes are restarted. This method is typically used for very critical patches and it leads to maximum downtime. OPatch uses this method if the patch cannot be applied in a rolling fashion and you did not specify the minimize_downtime option.
To implement all node patching:
Stop all user applications that use the Oracle RAC home directory.
If you are patching only the Oracle RAC home directory, shut down all Oracle RAC instances on all nodes in the cluster. To shut down all Oracle RAC instances for a cluster database, enter the following command where ORA_CRS_HOME is the location of the Oracle Clusterware home directory and sales is the name of the database:
$ $ORA_CRS_HOME/bin/srvctl stop database -d sales
If you are patching the Oracle ASM or Oracle Clusterware home directory, stop all single-instance databases that are running on the group of nodes being patched if they use the Oracle ASM installation that you are patching.
If you are patching the Oracle ASM home directory, stop all user applications that use the Oracle ASM home directory on the group of nodes being patched.
If you are patching the Oracle ASM or Oracle Clusterware home directory, you can use a single command to stop all the node applications on each node in the group. This command shuts down the Oracle RAC instances, the Listener, the Oracle ASM instances, and the Oracle Clusterware node applications for the specified node. Use a command similar to the following, where ORA_CRS_HOME is the home directory of your Oracle Clusterware installation and node_name is the name of the node:
$ $ORA_CRS_HOME/crs/bin/srvctl stop nodeapps -n node_name
Repeat the above command for each node in the cluster.
After you have stopped the nodeapps on each node in the cluster, use the crs_stat utility to verify that all the nodeapps were stopped on each node.
$ $ORA_CRS_HOME/bin/crs_stat -t
If you are patching the Oracle Clusterware home directory, shut down the CRS daemons for all the nodes in the cluster by issuing the following command as the root user on each node, where ORA_CRS_HOME is the home directory of your Oracle Clusterware installation:
# $ORA_CRS_HOME/bin/crsctl stop crs
Repeat this command on each node.
Set your current directory to the directory where the patch is located, for example:
$ cd $ORACLE_HOME/EMStagedPatches/4519934/4519934
Make sure the ORACLE_HOME environment variable points to the software directory you want to patch, for example:
$ echo $ORACLE_HOME
/opt/oracle/10gR2/db_1
Run OPatch by entering the following command:
opatch apply
If you applied the patch to the Oracle Clusterware home directory, restart the CRS daemons on all nodes by issuing the following command as the root user on each node, where ORA_CRS_HOME is the home directory of your Oracle Clusterware installation:
# $ORA_CRS_HOME/bin/crsctl start crs
Repeat this command on each node in the cluster.
If you stopped the nodeapps on each node, after the patch has been applied, restart the nodeapps on all nodes. To start the nodeapps, enter a command similar to the following where ORA_CRS_HOME is the home directory of your Oracle Clusterware installation and docrac1 is one of the nodes in your cluster:
$ $ORA_CRS_HOME/bin/srvctl start nodeapps -n docrac1
Repeat the above command for each node in the group.
After you have restarted the nodeapps on all nodes, use the crs_stat utility to verify that the nodeapps were restarted on each node.
$ $ORA_CRS_HOME/bin/crs_stat -t
If any of the node applications did not restart, use the SRVCTL utility to restart them. For example, you can use commands similar the following to restart various nodeapps, where ORA_CRS_HOME is the home directory of your Oracle Clusterware installation:
$ $ORA_CRS_HOME/bin/srvctl start instance -d sales -i "sales1"
$ $ORA_CRS_HOME/bin/srvctl start listener -n docrac1
$ $ORA_CRS_HOME/bin/srvctl start asm -n docrac1
Run any post-patch scripts that are mentioned in the patch instructions, for example:
$ sqlplus /nolog
SQL> connect sys/password@sales1 AS SYSDBA
SQL> @$ORACLE_HOME/cpu/CPUOct2006/catcpu.sql
SQL> @$ORACLE_HOME/rdbms/admin/utlrp.sql
SQL> exit
In rolling patching, one group of nodes is shut down, the patch is applied to those nodes, and the nodes are brought back up. This is performed group by group, separately, until all the nodes in the cluster are patched. This is the most efficient means of applying an interim patch to an Oracle RAC, Oracle ASM, or Oracle Clusterware installation. By patching groups of nodes individually, there is zero downtime for the cluster database because at least one instance is available at all times on a different node.
While most patches can be applied in a rolling fashion some patches can not be applied in this fashion. The README file for the patch indicates whether or not you can apply the patch using the rolling patch method. If the patch cannot be applied using the rolling patch method, then you must use either "Minimum Downtime Patching" or "All Node Patching" to apply the patch.
To apply a patch using the rolling patch method:
Change to the directory where the unzipped patch is staged on disk, for example:
$ cd $ORACLE_HOME/EMStagedPatches/4519934/4519934
Stop all user applications that use the Oracle RAC home directory for the group of nodes being patched. For example, to stop Enterprise Manager Database Control on the local node, use the following command, where ORACLE_HOME is the home directory for your Oracle RAC installation:
$ $ORACLE_HOME/bin/emctl stop dbconsole
If you are patching the Oracle ASM or Oracle Clusterware home directory, stop all single-instance databases that are running on the group of nodes being patched if they use the Oracle ASM software you are patching.
If you are patching the Oracle ASM home directory, stop all user applications that use the Oracle ASM home directory on the group of nodes being patched.
If you are patching only the Oracle RAC home directory, shut down all Oracle RAC instances in the group of nodes being patched. To shut down an instance for an Oracle RAC database, enter a command similar to the following example, where ORA_CRS_HOME is the home directory for your Oracle Clusterware installation, sales is the name of the database and sales1 is the name of the instance:
$ $ORA_CRS_HOME/bin/srvctl stop instance -d sales -i "sales1"
Repeat the above command for each node in the group of nodes being patched.
If you are patching the Oracle ASM or Oracle Clusterware home directory, you can use a single command to stop all the node applications on each node in the group. This command shuts down the Oracle RAC instances, the Listener, the Oracle ASM instances, and the Oracle Clusterware node applications for the specified node. Use a command similar to the following, where ORA_CRS_HOME is the home directory of your Oracle Clusterware installation and docrac1 is one of the nodes in the group:
$ $ORA_CRS_HOME/crs/bin/srvctl stop nodeapps -n docrac1
Repeat the above command for each node in the group of nodes being patched.
After you have stopped the nodeapps on each node in the group, use the crs_stat utility to verify that all the nodeapps were stopped on the group of nodes being patched.
$ $ORA_CRS_HOME/bin/crs_stat -t
If you are patching the Oracle Clusterware home directory, shut down the CRS daemons for the nodes in the group by issuing the following command as the root user on each node in the group, where ORA_CRS_HOME is the home directory of your Oracle Clusterware installation:
# $ORA_CRS_HOME/bin/crsctl stop crs
Repeat this command on each node in the first group.
Make sure the ORACLE_HOME environment variable points to the software directory you want to patch, for example:
$ echo $ORACLE_HOME
/opt/oracle/10gR2/db_1
If you are patching nodes individually, use the following command to instruct OPatch to apply the patch to only the local node. If you run this command from the directory where the patch is located, you do not need to specify the patch ID.
$ opatch apply -local
If you are using a group of nodes, use a command similar to the following to instruct OPatch to apply the patch to the group of nodes being patched:
$ opatch apply -local_node docrac1 -remote_nodes docrac2,docrac3
If you applied the patch to the Oracle Clusterware home directory, restart the CRS daemons for the nodes in the first group by issuing the following command as the root user on each node in the group, where ORA_CRS_HOME is the home directory of your Oracle Clusterware installation:
# $ORA_CRS_HOME/bin/crsctl start crs
Repeat this command on each node in the group.
If you stopped the nodeapps for the group of nodes, after the patch has been applied, restart the nodeapps on those nodes. To start the nodeapps, enter a command similar to the following where ORA_CRS_HOME is the home directory of your Oracle Clusterware installation and docrac1 is one of the nodes in the group of nodes you recently patched:
$ $ORA_CRS_HOME/bin/srvctl start nodeapps -n docrac1
Repeat the above command for each node in the group.
After you have restarted the nodeapps on each node in the group, use the crs_stat utility to verify that the nodeapps were restarted on each node in the group.
$ $ORA_CRS_HOME/bin/crs_stat -t
If any of the node applications did not restart, use the SRVCTL utility to restart them. For example, you can use the following command to restart the sales1 instance for the sales cluster database:
$ $ORA_CRS_HOME/bin/srvctl start instance -d sales -i "sales1"
Restart all single-instance databases that use the Oracle ASM software and all user applications that use the Oracle RAC or Oracle ASM home on each node in the group of nodes you recently patched.
Repeat steps 2 through 8 for the next group of nodes.
If you are patching nodes individually, use a command similar to the following to instruct OPatch to apply the patch to only the next node to be patched. If you run this command from the directory where the patch is located, you do not need to specify the patch ID.
$ opatch apply -remote_nodes docrac2
If you are patching a group of nodes, use a command similar to the following to instruct OPatch to apply the patch to the group of nodes being patched:
$ opatch apply -remote_nodes docrac4,docrac5,docrac6
If you applied the patch to the Oracle Clusterware home directory, restart the CRS daemons for the nodes in the group you recently patched by issuing the following command as the root user on each node in the group, where ORA_CRS_HOME is the home directory of your Oracle Clusterware installation:
# $ORA_CRS_HOME/bin/crsctl start crs
Repeat this command on each node in the group.
If you stopped the nodeapps for the group of nodes, after the patch has been applied, restart the nodeapps on those nodes. To start the nodeapps, enter a command similar to the following where ORA_CRS_HOME is the home directory of your Oracle Clusterware installation and docrac1 is one of the nodes in the group of nodes you recently patched:
$ $ORA_CRS_HOME/bin/srvctl start nodeapps -n docrac1
Repeat the above command for each node in the group.
After you have restarted the nodeapps on each node in the group, use the crs_stat utility to verify that the nodeapps were restarted on each node in the group.
$ $ORA_CRS_HOME/bin/crs_stat -t
If any of the node applications did not restart, use the SRVCTL utility to restart them. For example, you can use the following command to restart the sales2 instance for the sales cluster database:
$ $ORA_CRS_HOME/bin/srvctl start instance -d sales -i "sales2"
Restart all single-instance databases that use the Oracle ASM software and all user applications that use the Oracle RAC or Oracle ASM home on each node in the group of nodes you recently patched.
If you have more than two groups of nodes to be patched, repeat steps 13 through 17 for each group of nodes until all the nodes in the cluster have been patched.
Run any post-patch scripts that are mentioned in the patch instructions, for example:
$ sqlplus /nolog
SQL> connect sys/password@sales1 AS SYSDBA
SQL> @$ORACLE_HOME/cpu/CPUOct2006/catcpu.sql
SQL> @$ORACLE_HOME/rdbms/admin/utlrp.sql
SQL> exit
In minimum downtime patching, one set of nodes is shut down and the patch is applied to those nodes. After the first set of nodes has been patched, the second set of nodes is shut down. The first set of nodes is then restarted and the patch is applied to the second set of nodes. After the patch has been applied to the second set of nodes, those nodes are restarted. This method leads to less downtime for Oracle RAC, compared to having all the nodes shut down at the same time.
When you use the minimum downtime patching method, the following actions occur:
The local node is always patched first.
The local node is used as a base to patch the other nodes.
The user is prompted for the set of nodes to patch first from the remaining nodes.
For each node in this first set, the user is asked to stop the instance and then the patch is propagated to that node before continuing to the next node. When the initial set of nodes has been patched, the user is asked to shut down the remaining nodes.
After the local node is patched, the patch is propagated to the last set of nodes and the inventory is updated. The last instances are stopped on the remote nodes. You can then start up the patched nodes (the first set of nodes) before patching the remaining nodes.
To apply a patch to your cluster database using the minimum downtime method:
Change to the directory where the unzipped patch is staged on disk, for example:
$ cd $ORACLE_HOME/EMStagedPatches/4519934/4519934
Stop all user applications that use the Oracle RAC home directory for the group of nodes being patched. For example, to stop Enterprise Manager Database Control on the local node, use the following command, where ORACLE_HOME is the home directory for your Oracle RAC installation:
$ $ORACLE_HOME/bin/emctl stop dbconsole
Shut down all Oracle RAC instances on the local node. To shut down an instance for an Oracle RAC database, enter a command similar to the following example, where ORA_CRS_HOME is the home directory for your Oracle Clusterware installation, sales is the name of the database and sales1 is the name of the instance:
$ $ORA_CRS_HOME/bin/srvctl stop instance -d sales -i "sales1"
Make sure the ORACLE_HOME environment variable points to the software directory you want to patch, for example:
$ echo $ORACLE_HOME
/opt/oracle/10gR2/db_1
Use the following command from within the patch directory:
$ opatch apply -minimize_downtime
If you run the OPatch command from the directory where the patch is staged on disk, you do not need to specify the patch ID.
OPatch asks if you are ready to patch the local node. After you confirm that the Oracle RAC instances on the local node have been shut down, OPatch applies the patch to the Oracle RAC home directory on the local node. You are then asked to select the next nodes to be patched.
After you shut down the Oracle RAC instances on the other nodes in the cluster you can restart the Oracle RAC instance on the local node. Then instruct OPatch that you are ready to patch the remaining nodes.
After all the nodes have been patched, restart the Oracle RAC instances on the other nodes in the cluster. The following command shows how to start the sales2 instance for the Oracle RAC database named sales:
$ $ORA_CRS_HOME/bin/srvctl start instance -d sales -i "sales1"
Verify that all the nodeapps were restarted on the nodes in the cluster.
$ crs_stat -t
If any of the node applications did not restart, use the SRVCTL utility to restart them. For example, you can use commands similar the following to restart the listener on the docrac1 node, where ORA_CRS_HOME is the home directory of your Oracle Clusterware installation:
$ $ORA_CRS_HOME/bin/srvctl start listener -n docrac1
Run any post-patch scripts that are mentioned in the patch instructions, for example:
$ sqlplus /nolog
SQL> connect sys/password@sales1 AS SYSDBA
SQL> @$ORACLE_HOME/cpu/CPUOct2006/catcpu.sql
SQL> @$ORACLE_HOME/rdbms/admin/utlrp.sql
SQL> exit
Patch sets are a mechanism for delivering fully tested and integrated product fixes. All of the fixes in a patch set have been tested and are certified to work with each other. Because a patch set includes only low impact patches, it does not require you to certify applications or tools against the server.
For instructions on applying the 10.2.0.2.0 patch set to your Oracle RAC database and Oracle Clusterware installations on Red Hat Linux, refer to document 316900.1, "ALERT: Oracle 10g release 2 (10.2) Support Status and Alerts" on the Oracle Metalink Web site.
This document provides a summary of the patch sets available for Oracle 10g Release 2. Using this document, you can easily locate and view the Patch Set Notes for your platform. For example, you can use a link to access document 368732.1, "Oracle Database Patch Set Notes 10g Release 2 (10.2.0.2) Patch Set for Linux x86". The Oracle Database Patch Set Notes document contains the following information:
System requirements and information about how to install or reinstall the patch set
A list of all bugs fixed to date that are specific to Oracle Database for Linux x86
A list of known issues relating to Oracle Database on Linux x86
To locate and review the Oracle Database 10g Release 2 (10.2) patch set information in document 316900.1:
Log on to Oracle Metalink at http://metalink.oracle.com
Click Advanced at the top of the Oracle Metalink page.
Enter 316900.1 in the Document ID field, then click Submit.
This section covers the following topics regarding troubleshooting patch deployment:
If you have problems applying a patch to your Oracle RAC database, review these solutions to common problems. If the problem you encountered is not listed, review the log and trace files, and refer to Oracle Universal Installer and OPatch User's Guide.
If OPatch does not automatically detect Oracle RAC or its nodes, investigate the contents of the inventory and ensure they are complete.
If your node list is not complete, you can update it by using the -updateNodeList flag of Oracle Universal Installer, as demonstrated in the following example:
$ORACLE_HOME/oui/bin/runInstaller -updateNodeList
ORACLE_ HOME=/opt/oracle/10gR2/db_1
CLUSTER_NODES=docrac1,docrac2,docrac3 -noClusterEnabled
Logging and tracing is a common aid for debugging. OPatch maintains logs for all apply, rollback, and lsinventory operations. The log files are located in the $ORACLE_HOME/cfgtoollogs/opatch directory. Each log file will be tagged with the time stamp of the operation. Log files are named as opatch_mm-dd-yyyy_hh-mm-ss.log, where mm-dd-yyyy is the current date and hh-mm-ss is the current time. Each time OPatch is executed, a new log file is created.
For example, if a log file is created on May 17, 2005 at 11:55 PM, then it will be named as follows:
opatch_05-17-2005_23-55-00.log
OPatch also maintains an index of the commands executed with OPatch and the log files associated with it in the history.txt file located in the $ORACLE_HOME/cfgtoollogs/opatch directory. A sample of the history.txt file is as follows:
Date & Time : Tue Apr 26 23:00:55 PDT 2005
Oracle Home : /opt/oracle/10gR2/db_1/
OPatch Ver. : 10.2.0.0.0
Current Dir : /scratch/oui/OPatch
Command     : lsinventory
Log File    :
/opt/oracle/10gR2/db_1/cfgtoollogs/opatch/opatch-2005_Apr_26_23-00-55-PDT_Tue.log
You might get this error if the directory that the OPatch utility is using to do the patch does not match the template for what it is checking, or if the OPatch utility is run from an invalid directory.
To correct the problem, start the OPatch utility from the directory where the patch to be installed has been unzipped and staged on disk. Or, you can use the following command when starting OPatch:
opatch apply /Patch_Shiphome
The Patch_Shiphome directory should have the following structure:
An etc directory that has the metadata files
A files directory that has the patch files
The etc/config/inventory file and the actions file under the same directory
If the patching process is interrupted, you might get the "Unable to remove a partially installed interim patch" when you try to install the patch a second time.
To resolve the partially-installed patch error:
Ensure that the environment variable ORACLE_HOME is set to the Oracle home directory you are attempting to patch.
Go to the $ORACLE_HOME/.patch_storage/patch-id_timestamp directory and execute the restore command as follows:
$ORACLE_HOME/.patch_storage/patch-id_timestamp/restore.sh
Use the $ORACLE_HOME/.patch_storage/patch-id_timestamp/make.txt file (if available) to modify your operating system environment, as follows:
/bin/sh make.txt
Attempt to apply the patch again.
|
Copyright © 2006, 2012, Oracle and/or its affiliates. All rights reserved. Legal Notices |
|