Table of Contents
- 2.1 General Installation Guidance
- 2.2 Installing MySQL on Unix/Linux Using Generic Binaries
- 2.3 Installing MySQL on Microsoft Windows
- 2.3.1 MySQL Installation Layout on Microsoft Windows
- 2.3.2 Choosing An Installation Package
- 2.3.3 Installing MySQL on Microsoft Windows Using MySQL Installer
- 2.3.4 MySQL Notifier
- 2.3.5 Installing MySQL on Microsoft Windows Using a noinstall Zip Archive
- 2.3.6 Troubleshooting a Microsoft Windows MySQL Server Installation
- 2.3.7 Windows Postinstallation Procedures
- 2.3.8 Upgrading MySQL on Windows
- 2.4 Installing MySQL on OS X
- 2.5 Installing MySQL on Linux
- 2.5.1 Installing MySQL on Linux Using the MySQL Yum Repository
- 2.5.2 Replacing a Third-Party Distribution of MySQL Using the MySQL Yum Repository
- 2.5.3 Installing MySQL on Linux Using the MySQL APT Repository
- 2.5.4 Installing MySQL on Linux Using the MySQL SLES Repository
- 2.5.5 Installing MySQL on Linux Using RPM Packages from Oracle
- 2.5.6 Installing MySQL on Linux Using Debian Packages from Oracle
- 2.5.7 Installing MySQL on Linux from the Native Software Repositories
- 2.5.8 Installing MySQL on Linux with docker
- 2.5.9 Installing MySQL on Linux with juju
- 2.5.10 Managing MySQL Server with systemd
- 2.6 Installing MySQL Using Unbreakable Linux Network (ULN)
- 2.7 Installing MySQL on Solaris and OpenSolaris
- 2.8 Installing MySQL on FreeBSD
- 2.9 Installing MySQL from Source
- 2.10 Postinstallation Setup and Testing
- 2.11 Upgrading or Downgrading MySQL
- 2.12 Environment Variables
- 2.13 Perl Installation Notes
This chapter describes how to obtain and install MySQL. A summary of the procedure follows and later sections provide the details. If you plan to upgrade an existing version of MySQL to a newer version rather than install MySQL for the first time, see Section 2.11.1, “Upgrading MySQL”, for information about upgrade procedures and about issues that you should consider before upgrading.
If you are interested in migrating to MySQL from another database system, see Section A.8, “MySQL 5.7 FAQ: Migration”, which contains answers to some common questions concerning migration issues.
Installation of MySQL generally follows the steps outlined here:
Determine whether MySQL runs and is supported on your platform.
Please note that not all platforms are equally suitable for running MySQL, and that not all platforms on which MySQL is known to run are officially supported by Oracle Corporation.
Choose which distribution to install.
Several versions of MySQL are available, and most are available in several distribution formats. You can choose from pre-packaged distributions containing binary (precompiled) programs or source code. When in doubt, use a binary distribution. Oracle also provides access to the MySQL source code for those who want to see recent developments and test new code. To determine which version and type of distribution you should use, see Section 2.1.1, “Which MySQL Version and Distribution to Install”.
Download the distribution that you want to install.
For instructions, see Section 2.1.2, “How to Get MySQL”. To verify the integrity of the distribution, use the instructions in Section 2.1.3, “Verifying Package Integrity Using MD5 Checksums or GnuPG”.
Install the distribution.
To install MySQL from a binary distribution, use the instructions in Section 2.2, “Installing MySQL on Unix/Linux Using Generic Binaries”.
To install MySQL from a source distribution or from the current development source tree, use the instructions in Section 2.9, “Installing MySQL from Source”.
Perform any necessary postinstallation setup.
After installing MySQL, see Section 2.10, “Postinstallation Setup and Testing” for information about making sure the MySQL server is working properly. Also refer to the information provided in Section 2.10.4, “Securing the Initial MySQL Accounts”. This section describes how to secure the initial MySQL
rootuser account, which has no password until you assign one. The section applies whether you install MySQL using a binary or source distribution.If you want to run the MySQL benchmark scripts, Perl support for MySQL must be available. See Section 2.13, “Perl Installation Notes”.
Instructions for installing MySQL on different platforms and environments is available on a platform by platform basis:
Unix, Linux, FreeBSD
For instructions on installing MySQL on most Linux and Unix platforms using a generic binary (for example, a
.tar.gzpackage), see Section 2.2, “Installing MySQL on Unix/Linux Using Generic Binaries”.For information on building MySQL entirely from the source code distributions or the source code repositories, see Section 2.9, “Installing MySQL from Source”
For specific platform help on installation, configuration, and building from source see the corresponding platform section:
Linux, including notes on distribution specific methods, see Section 2.5, “Installing MySQL on Linux”.
Solaris and OpenSolaris, including PKG and IPS formats, see Section 2.7, “Installing MySQL on Solaris and OpenSolaris”.
IBM AIX, see Section 2.7, “Installing MySQL on Solaris and OpenSolaris”.
FreeBSD, see Section 2.8, “Installing MySQL on FreeBSD”.
Microsoft Windows
For instructions on installing MySQL on Microsoft Windows, using either the MySQL Installer or Zipped binary, see Section 2.3, “Installing MySQL on Microsoft Windows”.
For information about managing MySQL instances, see Section 2.3.4, “MySQL Notifier”.
For details and instructions on building MySQL from source code using Microsoft Visual Studio, see Section 2.9, “Installing MySQL from Source”.
OS X
For installation on OS X, including using both the binary package and native PKG formats, see Section 2.4, “Installing MySQL on OS X”.
For information on making use of an OS X Launch Daemon to automatically start and stop MySQL, see Section 2.4.3, “Installing a MySQL Launch Daemon”.
For information on the MySQL Preference Pane, see Section 2.4.4, “Installing and Using the MySQL Preference Pane”.
The immediately following sections contain the information necessary to choose, download, and verify your distribution. The instructions in later sections of the chapter describe how to install the distribution that you choose. For binary distributions, see the instructions at Section 2.2, “Installing MySQL on Unix/Linux Using Generic Binaries” or the corresponding section for your platform if available. To build MySQL from source, use the instructions in Section 2.9, “Installing MySQL from Source”.
MySQL is available on a number of operating systems and platforms. For information about those platforms that are officially supported, see http://www.mysql.com/support/supportedplatforms/database.html on the MySQL Web site.
MySQL is available on many operating systems and platforms. For information about platforms supported by GA releases of MySQL, see http://www.mysql.com/support/supportedplatforms/database.html. For development versions of MySQL, builds are available for a number of platforms at http://dev.mysql.com/downloads/mysql/5.7.html. To learn more about MySQL Support, see http://www.mysql.com/support/.
When preparing to install MySQL, decide which version and distribution format (binary or source) to use.
First, decide whether to install a development release or a General Availability (GA) release. Development releases have the newest features, but are not recommended for production use. GA releases, also called production or stable releases, are meant for production use. We recommend using the most recent GA release.
The naming scheme in MySQL 5.7 uses release names that consist of three numbers and an optional suffix; for example, mysql-5.7.1-m1. The numbers within the release name are interpreted as follows:
The first number (5) is the major version number.
The second number (7) is the minor version number. Taken together, the major and minor numbers constitute the release series number. The series number describes the stable feature set.
The third number (1) is the version number within the release series. This is incremented for each new bugfix release. In most cases, the most recent version within a series is the best choice.
Release names can also include a suffix to indicate the stability level of the release. Releases within a series progress through a set of suffixes to indicate how the stability level improves. The possible suffixes are:
mN (for example, m1, m2, m3, ...) indicates a milestone number. MySQL development uses a milestone model, in which each milestone introduces a small subset of thoroughly tested features. From one milestone to the next, feature interfaces may change or features may even be removed, based on feedback provided by community members who try these earily releases. Features within milestone releases may be considered to be of pre-production quality.
rc indicates a Release Candidate (RC). Release candidates are believed to be stable, having passed all of MySQL's internal testing. New features may still be introduced in RC releases, but the focus shifts to fixing bugs to stabilize features introduced earlier within the series.
Absence of a suffix indicates a General Availability (GA) or Production release. GA releases are stable, having successfully passed through the earlier release stages, and are believed to be reliable, free of serious bugs, and suitable for use in production systems.
Development within a series begins with milestone releases, followed by RC releases, and finally reaches GA status releases.
After choosing which MySQL version to install, decide which distribution format to install for your operating system. For most use cases, a binary distribution is the right choice. Binary distributions are available in native format for many platforms, such as RPM packages for Linux or DMG packages for OS X. Distributions are also available in more generic formats such as Zip archives or compressed tar files. On Windows, you can use the MySQL Installer to install a binary distribution.
Under some circumstances, it may be preferable to install MySQL from a source distribution:
You want to install MySQL at some explicit location. The standard binary distributions are ready to run at any installation location, but you might require even more flexibility to place MySQL components where you want.
You want to configure mysqld with features that might not be included in the standard binary distributions. Here is a list of the most common extra options used to ensure feature availability:
-DWITH_LIBWRAP=1for TCP wrappers support.-DWITH_ZLIB={system|bundled}for features that depend on compression-DWITH_DEBUG=1for debugging support
For additional information, see Section 2.9.4, “MySQL Source-Configuration Options”.
You want to configure mysqld without some features that are included in the standard binary distributions. For example, distributions normally are compiled with support for all character sets. If you want a smaller MySQL server, you can recompile it with support for only the character sets you need.
You want to read or modify the C and C++ code that makes up MySQL. For this purpose, obtain a source distribution.
Source distributions contain more tests and examples than binary distributions.
Check our downloads page at http://dev.mysql.com/downloads/ for information about the current version of MySQL and for downloading instructions. For a complete up-to-date list of MySQL download mirror sites, see http://dev.mysql.com/downloads/mirrors.html. You can also find information there about becoming a MySQL mirror site and how to report a bad or out-of-date mirror.
For RPM-based Linux platforms that use Yum as their package management system, MySQL can be installed using the MySQL Yum Repository. See Section 2.5.1, “Installing MySQL on Linux Using the MySQL Yum Repository” for details.
For a number of Debian-based Linux platforms, such as Ubuntu, MySQL can be installed using the MySQL APT Repository. See Section 2.5.3, “Installing MySQL on Linux Using the MySQL APT Repository” for details.
For SUSE Linux Enterprise Server (SLES) platforms, MySQL can be installed using the MySQL SLES Repository. See Section 2.5.4, “Installing MySQL on Linux Using the MySQL SLES Repository” for details.
To obtain the latest development source, see Section 2.9.3, “Installing MySQL Using a Development Source Tree”.
After downloading the MySQL package that suits your needs and before attempting to install it, make sure that it is intact and has not been tampered with. There are three means of integrity checking:
MD5 checksums
Cryptographic signatures using
GnuPG, the GNU Privacy GuardFor RPM packages, the built-in RPM integrity verification mechanism
The following sections describe how to use these methods.
If you notice that the MD5 checksum or GPG signatures do not match, first try to download the respective package one more time, perhaps from another mirror site.
After you have downloaded a MySQL package, you should make sure that its MD5 checksum matches the one provided on the MySQL download pages. Each package has an individual checksum that you can verify against the package that you downloaded. The correct MD5 checksum is listed on the downloads page for each MySQL product, and you will compare it against the MD5 checksum of the file (product) that you download.
Each operating system and setup offers its own version of tools
for checking the MD5 checksum. Typically the command is named
md5sum, or it may be named
md5, and some operating systems do not ship
it at all. On Linux, it is part of the GNU
Text Utilities package, which is available for a wide
range of platforms. You can also download the source code from
http://www.gnu.org/software/textutils/. If you
have OpenSSL installed, you can use the command openssl
md5 package_name instead. A
Windows implementation of the md5 command
line utility is available from
http://www.fourmilab.ch/md5/.
winMd5Sum is a graphical MD5 checking tool
that can be obtained from
http://www.nullriver.com/index/products/winmd5sum.
Our Microsoft Windows examples will assume the name
md5.exe.
Linux and Microsoft Windows examples:
shell> md5sum mysql-standard-5.7.13-linux-i686.tar.gz
aaab65abbec64d5e907dcd41b8699945  mysql-standard-5.7.13-linux-i686.tar.gz
shell> md5.exe mysql-installer-community-5.7.13.msi
aaab65abbec64d5e907dcd41b8699945  mysql-installer-community-5.7.13.msi
You should verify that the resulting checksum (the string of hexadecimal digits) matches the one displayed on the download page immediately below the respective package.
Make sure to verify the checksum of the archive
file (for example, the .zip,
.tar.gz, or .msi
file) and not of the files that are contained inside of the
archive. In other words, verify the file before extracting its
contents.
Another method of verifying the integrity and authenticity of a package is to use cryptographic signatures. This is more reliable than using MD5 checksums, but requires more work.
We sign MySQL downloadable packages with GnuPG (GNU Privacy Guard). GnuPG is an Open Source alternative to the well-known Pretty Good Privacy (PGP) by Phil Zimmermann. See http://www.gnupg.org/ for more information about GnuPG and how to obtain and install it on your system. Most Linux distributions ship with GnuPG installed by default. For more information about GnuPG, see http://www.openpgp.org/.
To verify the signature for a specific package, you first need
to obtain a copy of our public GPG build key, which you can
download from http://pgp.mit.edu/. The key that
you want to obtain is named
mysql-build@oss.oracle.com. Alternatively,
you can cut and paste the key directly from the following text:
-----BEGIN PGP PUBLIC KEY BLOCK-----
Version: GnuPG v1.4.9 (SunOS)

mQGiBD4+owwRBAC14GIfUfCyEDSIePvEW3SAFUdJBtoQHH/nJKZyQT7h9bPlUWC3
RODjQReyCITRrdwyrKUGku2FmeVGwn2u2WmDMNABLnpprWPkBdCk96+OmSLN9brZ
fw2vOUgCmYv2hW0hyDHuvYlQA/BThQoADgj8AW6/0Lo7V1W9/8VuHP0gQwCgvzV3
BqOxRznNCRCRxAuAuVztHRcEAJooQK1+iSiunZMYD1WufeXfshc57S/+yeJkegNW
hxwR9pRWVArNYJdDRT+rf2RUe3vpquKNQU/hnEIUHJRQqYHo8gTxvxXNQc7fJYLV
K2HtkrPbP72vwsEKMYhhr0eKCbtLGfls9krjJ6sBgACyP/Vb7hiPwxh6rDZ7ITnE
kYpXBACmWpP8NJTkamEnPCia2ZoOHODANwpUkP43I7jsDmgtobZX9qnrAXw+uNDI
QJEXM6FSbi0LLtZciNlYsafwAPEOMDKpMqAK6IyisNtPvaLd8lH0bPAnWqcyefep
rv0sxxqUEMcM3o7wwgfN83POkDasDbs3pjwPhxvhz6//62zQJ7Q2TXlTUUwgUmVs
ZWFzZSBFbmdpbmVlcmluZyA8bXlzcWwtYnVpbGRAb3NzLm9yYWNsZS5jb20+iGkE
ExECACkCGyMGCwkIBwMCBBUCCAMEFgIDAQIeAQIXgAIZAQUCUwHUZgUJGmbLywAK
CRCMcY07UHLh9V+DAKCjS1gGwgVI/eut+5L+l2v3ybl+ZgCcD7ZoA341HtoroV3U
6xRD09fUgeq0O015U1FMIFBhY2thZ2Ugc2lnbmluZyBrZXkgKHd3dy5teXNxbC5j
b20pIDxidWlsZEBteXNxbC5jb20+iG8EMBECAC8FAk53Pa0oHSBidWlsZEBteXNx
bC5jb20gd2lsbCBzdG9wIHdvcmtpbmcgc29vbgAKCRCMcY07UHLh9bU9AJ9xDK0o
xJFL9vTl9OSZC4lX0K9AzwCcCrS9cnJyz79eaRjL0s2r/CcljdyIZQQTEQIAHQUC
R6yUtAUJDTBYqAULBwoDBAMVAwIDFgIBAheAABIJEIxxjTtQcuH1B2VHUEcAAQGu
kgCffz4GUEjzXkOi71VcwgCxASTgbe0An34LPr1j9fCbrXWXO14msIADfb5piEwE
ExECAAwFAj4+o9EFgwlmALsACgkQSVDhKrJykfIk4QCfWbEeKN+3TRspe+5xKj+k
QJSammIAnjUz0xFWPlVx0f8o38qNG1bq0cU9iEwEExECAAwFAj5CggMFgwliIokA
CgkQtvXNTca6JD+WkQCgiGmnoGjMojynp5ppvMXkyUkfnykAoK79E6h8rwkSDZou
iz7nMRisH8uyiEYEEBECAAYFAj+s468ACgkQr8UjSHiDdA/2lgCg21IhIMMABTYd
p/IBiUsP/JQLiEoAnRzMywEtujQz/E9ono7H1DkebDa4iEYEEBECAAYFAj+0Q3cA
CgkQhZavqzBzTmbGwwCdFqD1frViC7WRt8GKoOS7hzNN32kAnirlbwpnT7a6NOsQ
83nk11a2dePhiEYEEBECAAYFAkNbs+oACgkQi9gubzC5S1x/dACdELKoXQKkwJN0
gZztsM7kjsIgyFMAnRRMbHQ7V39XC90OIpaPjk3a01tgiEYEExECAAYFAkTxMyYA
CgkQ9knE9GCTUwwKcQCgibak/SwhxWH1ijRhgYCo5GtM4vcAnAhtzL57wcw1Kg1X
m7nVGetUqJ7fiEwEEBECAAwFAkGBywEFgwYi2YsACgkQGFnQH2d7oexCjQCcD8sJ
NDc/mS8m8OGDUOx9VMWcnGkAnj1YWOD+Qhxo3mI/Ul9oEAhNkjcfiEwEEBECAAwF
AkGByzQFgwYi2VgACgkQgcL36+ITtpIiIwCdFVNVUB8xe8mFXoPm4d9Z54PTjpMA
niSPA/ZsfJ3oOMLKar4F0QPPrdrGiEwEEBECAAwFAkGBy2IFgwYi2SoACgkQa3Ds
2V3D9HMJqgCbBYzr5GPXOXgP88jKzmdbjweqXeEAnRss4G2G/3qD7uhTL1SPT1SH
jWUXiEwEEBECAAwFAkHQkyQFgwXUEWgACgkQfSXKCsEpp8JiVQCghvWvkPqowsw8
w7WSseTcw1tflvkAni+vLHl/DqIly0LkZYn5jzK1dpvfiEwEEBECAAwFAkIrW7oF
gwV5SNIACgkQ5hukiRXruavzEwCgkzL5QkLSypcw9LGHcFSx1ya0VL4An35nXkum
g6cCJ1NP8r2I4NcZWIrqiEwEEhECAAwFAkAqWToFgwd6S1IACgkQPKEfNJT6+GEm
XACcD+A53A5OGM7w750W11ukq4iZ9ckAnRMvndAqn3YTOxxlLPj2UPZiSgSqiEwE
EhECAAwFAkA9+roFgwdmqdIACgkQ8tdcY+OcZZyy3wCgtDcwlaq20w0cNuXFLLNe
EUaFFTwAni6RHN80moSVAdDTRkzZacJU3M5QiEwEEhECAAwFAkEOCoQFgwaWmggA
CgkQOcor9D1qil/83QCeITZ9wIo7XAMjC6y4ZWUL4m+edZsAoMOhRIRi42fmrNFu
vNZbnMGej81viEwEEhECAAwFAkKApTQFgwUj/1gACgkQBA3AhXyDn6jjJACcD1A4
UtXk84J13JQyoH9+dy24714Aniwlsso/9ndICJOkqs2j5dlHFq6oiEwEExECAAwF
Aj5NTYQFgwlXVwgACgkQLbt2v63UyTMFDACglT5G5NVKf5Mj65bFSlPzb92zk2QA
n1uc2h19/IwwrsbIyK/9POJ+JMP7iEwEExECAAwFAkHXgHYFgwXNJBYACgkQZu/b
yM2C/T4/vACfXe67xiSHB80wkmFZ2krb+oz/gBAAnjR2ucpbaonkQQgnC3GnBqmC
vNaJiEwEExECAAwFAkIYgQ4FgwWMI34ACgkQdsEDHKIxbqGg7gCfQi2HcrHn+yLF
uNlH1oSOh48ZM0oAn3hKV0uIRJphonHaUYiUP1ttWgdBiGUEExECAB0FCwcKAwQD
FQMCAxYCAQIXgAUCS3AvygUJEPPzpwASB2VHUEcAAQEJEIxxjTtQcuH1sNsAniYp
YBGqy/HhMnw3WE8kXahOOR5KAJ4xUmWPGYP4l3hKxyNK9OAUbpDVYIh7BDARAgA7
BQJCdzX1NB0AT29wcy4uLiBzaG91bGQgaGF2ZSBiZWVuIGxvY2FsISBJJ20gKnNv
KiBzdHVwaWQuLi4ACgkQOcor9D1qil/vRwCdFo08f66oKLiuEAqzlf9iDlPozEEA
n2EgvCYLCCHjfGosrkrU3WK5NFVgiI8EMBECAE8FAkVvAL9IHQBTaG91bGQgaGF2
ZSBiZWVuIGEgbG9jYWwgc2lnbmF0dXJlLCBvciBzb21ldGhpbmcgLSBXVEYgd2Fz
IEkgdGhpbmtpbmc/AAoJEDnKK/Q9aopfoPsAn3BVqKOalJeF0xPSvLR90PsRlnmG
AJ44oisY7Tl3NJbPgZal8W32fbqgbIkCIgQQAQIADAUCQYHLhQWDBiLZBwAKCRCq
4+bOZqFEaKgvEACCErnaHGyUYa0wETjj6DLEXsqeOiXad4i9aBQxnD35GUgcFofC
/nCY4XcnCMMEnmdQ9ofUuU3OBJ6BNJIbEusAabgLooebP/3KEaiCIiyhHYU5jarp
ZAh+Zopgs3Oc11mQ1tIaS69iJxrGTLodkAsAJAeEUwTPq9fHFFzC1eGBysoyFWg4
bIjz/zClI+qyTbFA5g6tRoiXTo8ko7QhY2AA5UGEg+83Hdb6akC04Z2QRErxKAqr
phHzj8XpjVOsQAdAi/qVKQeNKROlJ+iq6+YesmcWGfzeb87dGNweVFDJIGA0qY27
pTb2lExYjsRFN4Cb13NfodAbMTOxcAWZ7jAPCxAPlHUG++mHMrhQXEToZnBFE4nb
nC7vOBNgWdjUgXcpkUCkop4b17BFpR+k8ZtYLSS8p2LLz4uAeCcSm2/msJxT7rC/
FvoH8428oHincqs2ICo9zO/Ud4HmmO0O+SsZdVKIIjinGyOVWb4OOzkAlnnhEZ3o
6hAHcREIsBgPwEYVTj/9ZdC0AO44Nj9cU7awaqgtrnwwfr/o4V2gl8bLSkltZU27
/29HeuOeFGjlFe0YrDd/aRNsxbyb2O28H4sG1CVZmC5uK1iQBDiSyA7Q0bbdofCW
oQzm5twlpKWnY8Oe0ub9XP5p/sVfck4FceWFHwv+/PC9RzSl33lQ6vM2wIkCIgQT
AQIADAUCQp8KHAWDBQWacAAKCRDYwgoJWiRXzyE+D/9uc7z6fIsalfOYoLN60ajA
bQbI/uRKBFugyZ5RoaItusn9Z2rAtn61WrFhu4uCSJtFN1ny2RERg40f56pTghKr
D+YEt+Nze6+FKQ5AbGIdFsR/2bUk+ZZRSt83e14Lcb6ii/fJfzkoIox9ltkifQxq
Y7Tvk4noKu4oLSc8O1Wsfc/y0B9sYUUCmUfcnq58DEmGie9ovUslmyt5NPnveXxp
5UeaRc5Rqt9tK2B4A+7/cqENrdZJbAMSunt2+2fkYiRunAFPKPBdJBsY1sxeL/A9
aKe0viKEXQdAWqdNZKNCi8rd/oOP99/9lMbFudAbX6nL2DSb1OG2Z7NWEqgIAzjm
pwYYPCKeVz5Q8R+if9/fe5+STY/55OaI33fJ2H3v+U435VjYqbrerWe36xJItcJe
qUzW71fQtXi1CTEl3w2ch7VF5oj/QyjabLnAlHgSlkSi6p7By5C2MnbCHlCfPnIi
nPhFoRcRGPjJe9nFwGs+QblvS/Chzc2WX3s/2SWm4gEUKRX4zsAJ5ocyfa/vkxCk
SxK/erWlCPf/J1T70+i5waXDN/E3enSet/WL7h94pQKpjz8OdGL4JSBHuAVGA+a+
dknqnPF0KMKLhjrgV+L7O84FhbmAP7PXm3xmiMPriXf+el5fZZequQoIagf8rdRH
HhRJxQgI0HNknkaOqs8dtrkCDQQ+PqMdEAgA7+GJfxbMdY4wslPnjH9rF4N2qfWs
EN/lxaZoJYc3a6M02WCnHl6ahT2/tBK2w1QI4YFteR47gCvtgb6O1JHffOo2HfLm
RDRiRjd1DTCHqeyX7CHhcghj/dNRlW2Z0l5QFEcmV9U0Vhp3aFfWC4Ujfs3LU+hk
AWzE7zaD5cH9J7yv/6xuZVw411x0h4UqsTcWMu0iM1BzELqX1DY7LwoPEb/O9Rkb
f4fmLe11EzIaCa4PqARXQZc4dhSinMt6K3X4BrRsKTfozBu74F47D8Ilbf5vSYHb
uE5p/1oIDznkg/p8kW+3FxuWrycciqFTcNz215yyX39LXFnlLzKUb/F5GwADBQf+
Lwqqa8CGrRfsOAJxim63CHfty5mUc5rUSnTslGYEIOCR1BeQauyPZbPDsDD9MZ1Z
aSafanFvwFG6Llx9xkU7tzq+vKLoWkm4u5xf3vn55VjnSd1aQ9eQnUcXiL4cnBGo
TbOWI39EcyzgslzBdC++MPjcQTcA7p6JUVsP6oAB3FQWg54tuUo0Ec8bsM8b3Ev4
2LmuQT5NdKHGwHsXTPtl0klk4bQk4OajHsiy1BMahpT27jWjJlMiJc+IWJ0mghkK
Ht926s/ymfdf5HkdQ1cyvsz5tryVI3Fx78XeSYfQvuuwqp2H139pXGEkg0n6KdUO
etdZWhe70YGNPw1yjWJT1IhUBBgRAgAMBQJOdz3tBQkT+wG4ABIHZUdQRwABAQkQ
jHGNO1By4fUUmwCbBYr2+bBEn/L2BOcnw9Z/QFWuhRMAoKVgCFm5fadQ3Afi+UQl
AcOphrnJ
=443I
-----END PGP PUBLIC KEY BLOCK-----
To import the build key into your personal public GPG keyring,
use gpg --import. For example, if you have
saved the key in a file named
mysql_pubkey.asc, the import command looks
like this:
shell> gpg --import mysql_pubkey.asc
gpg: key 5072E1F5: public key "MySQL Release Engineering
<mysql-build@oss.oracle.com>" imported
gpg: Total number processed: 1
gpg:               imported: 1
gpg: no ultimately trusted keys found
You can also download the key from the public keyserver using
the public key id, 5072E1F5:
shell> gpg --recv-keys 5072E1F5
gpg: requesting key 5072E1F5 from hkp server keys.gnupg.net
gpg: key 5072E1F5: "MySQL Release Engineering <mysql-build@oss.oracle.com>"
1 new user ID
gpg: key 5072E1F5: "MySQL Release Engineering <mysql-build@oss.oracle.com>"
53 new signatures
gpg: no ultimately trusted keys found
gpg: Total number processed: 1
gpg:           new user IDs: 1
gpg:         new signatures: 53
If you want to import the key into your RPM configuration to validate RPM install packages, you should be able to import the key directly:
shell> rpm --import mysql_pubkey.asc
If you experience problems or require RPM specific information, see Section 2.1.3.4, “Signature Checking Using RPM”.
After you have downloaded and imported the public build key,
download your desired MySQL package and the corresponding
signature, which also is available from the download page. The
signature file has the same name as the distribution file with
an .asc extension, as shown by the examples
in the following table.
Table 2.1 MySQL Package and Signature Files for Source files
| File Type | File Name |
|---|---|
| Distribution file | mysql-standard-5.7.13-linux-i686.tar.gz |
| Signature file | mysql-standard-5.7.13-linux-i686.tar.gz.asc |
Make sure that both files are stored in the same directory and then run the following command to verify the signature for the distribution file:
shell> gpg --verify package_name.asc
If the downloaded package is valid, you will see a "Good signature" similar to:
shell> gpg --verify mysql-standard-5.7.13-linux-i686.tar.gz.asc
gpg: Signature made Tue 01 Feb 2011 02:38:30 AM CST using DSA key ID 5072E1F5
gpg: Good signature from "MySQL Release Engineering <mysql-build@oss.oracle.com>"
The Good signature message indicates that the
file signature is valid, when compared to the signature listed
on our site. But you might also see warnings, like so:
shell> gpg --verify mysql-standard-5.7.13-linux-i686.tar.gz.asc
gpg: Signature made Wed 23 Jan 2013 02:25:45 AM PST using DSA key ID 5072E1F5
gpg: checking the trustdb
gpg: no ultimately trusted keys found
gpg: Good signature from "MySQL Release Engineering <mysql-build@oss.oracle.com>"
gpg: WARNING: This key is not certified with a trusted signature!
gpg:          There is no indication that the signature belongs to the owner.
Primary key fingerprint: A4A9 4068 76FC BD3C 4567  70C8 8C71 8D3B 5072 E1F5
That is normal, as they depend on your setup and configuration. Here are explanations for these warnings:
gpg: no ultimately trusted keys found: This means that the specific key is not "ultimately trusted" by you or your web of trust, which is okay for the purposes of verifying file signatures.
WARNING: This key is not certified with a trusted signature! There is no indication that the signature belongs to the owner.: This refers to your level of trust in your belief that you possess our real public key. This is a personal decision. Ideally, a MySQL developer would hand you the key in person, but more commonly, you downloaded it. Was the download tampered with? Probably not, but this decision is up to you. Setting up a web of trust is one method for trusting them.
See the GPG documentation for more information on how to work with public keys.
The Section 2.1.3.2, “Signature Checking Using GnuPG” section describes
how to verify MySQL downloads using GPG. That guide also applies
to Microsoft Windows, but another option is to use a GUI tool
like Gpg4win. You
may use a different tool but our examples are based on Gpg4win,
and utilize its bundled Kleopatra GUI.
Download and install Gpg4win, and then load Kleopatra. The dialog should look similar to:
Next, add the MySQL Release Engineering certificate. Do this by clicking , . Type "Mysql Release Engineering" into the search box and press .
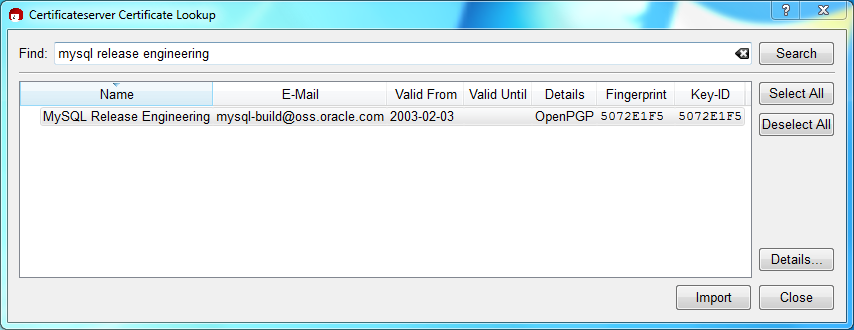
Select the "MySQL Release Engineering" certificate. The Fingerprint and Key-ID must be "5072E1F5", or choose to confirm the certificate is valid. Now, import it by clicking . An import dialog will be displayed, choose , and this certificate will now be listed under the Imported Certificates tab.
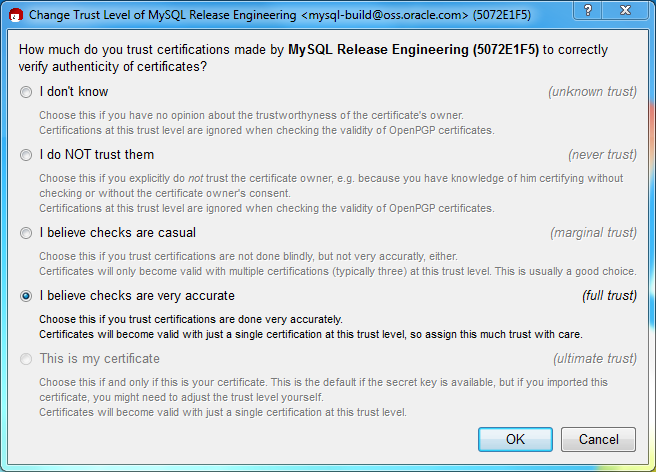
Next, configure the trust level for our certificate. Select our certificate, then from the main menu select , . We suggest choosing I believe checks are very accurate for our certificate, as otherwise you might not be able to verify our signature. Select I believe checks are very accurate and then press .
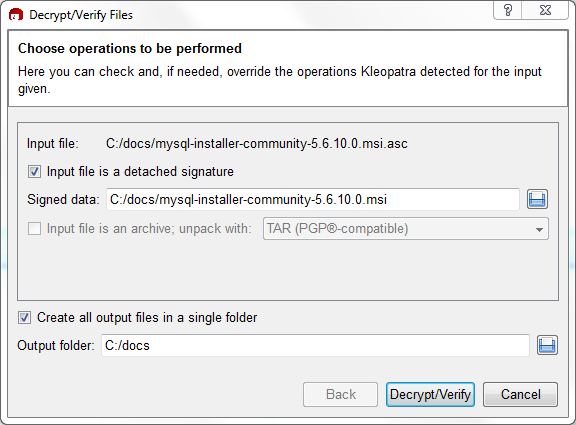
Next, verify the downloaded MySQL package file. This requires
files for both the packaged file, and the signature. The
signature file must have the same name as the packaged file but
with an appended .asc extension, as shown
by the example in the following table. The signature is linked
to on the downloads page for each MySQL product. You must create
the .asc file with this signature.
Table 2.2 MySQL Package and Signature Files for MySQL Installer for Microsoft Windows
| File Type | File Name |
|---|---|
| Distribution file | mysql-installer-community-5.7.13.msi |
| Signature file | mysql-installer-community-5.7.13.msi.asc |
Make sure that both files are stored in the same directory and
then run the following command to verify the signature for the
distribution file. Either drag and drop the signature
(.asc) file into Kleopatra, or load the
dialog from , , and then choose either the
.msi or .asc file.
Click to check the file. The two most common results will look like the following, and although the yellow warning looks problematic, the following means that the file check passed with success. You may now run this installer.
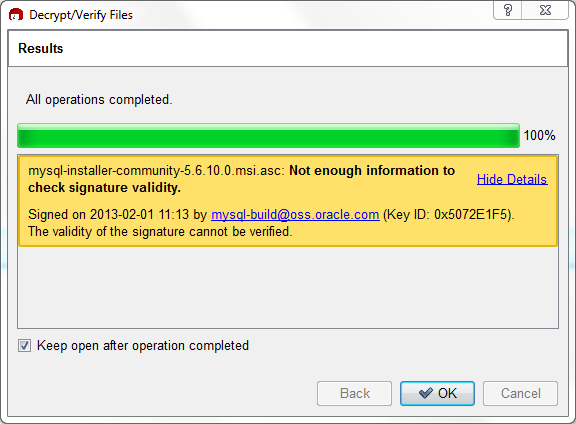
Seeing a red "The signature is bad" error means the file is invalid. Do not execute the MSI file if you see this error.
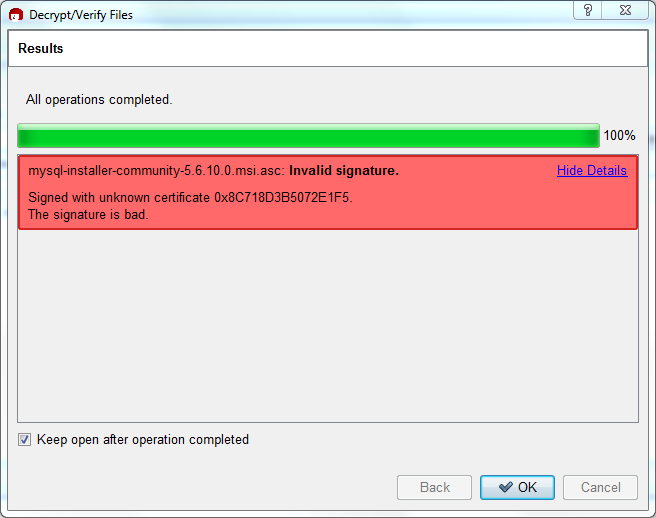
The Section 2.1.3.2, “Signature Checking Using GnuPG” section explains
why you probably don't see a green Good
signature result.
For RPM packages, there is no separate signature. RPM packages have a built-in GPG signature and MD5 checksum. You can verify a package by running the following command:
shell> rpm --checksig package_name.rpm
Example:
shell> rpm --checksig MySQL-server-5.7.13-0.linux_glibc2.5.i386.rpm
MySQL-server-5.7.13-0.linux_glibc2.5.i386.rpm: md5 gpg OK
If you are using RPM 4.1 and it complains about (GPG)
NOT OK (MISSING KEYS: GPG#5072e1f5), even though you
have imported the MySQL public build key into your own GPG
keyring, you need to import the key into the RPM keyring
first. RPM 4.1 no longer uses your personal GPG keyring (or
GPG itself). Rather, RPM maintains a separate keyring because
it is a system-wide application and a user's GPG public
keyring is a user-specific file. To import the MySQL public
key into the RPM keyring, first obtain the key, then use
rpm --import to import the key. For
example:
shell> gpg --export -a 5072e1f5 > 5072e1f5.asc
shell> rpm --import 5072e1f5.asc
Alternatively, rpm also supports loading the key directly from a URL, and you can use this manual page:
shell> rpm --import http://dev.mysql.com/doc/refman/5.7/en/checking-gpg-signature.html
If you need to obtain the MySQL public key, see Section 2.1.3.2, “Signature Checking Using GnuPG”.
The installation layout differs for different installation types (for example, native packages, binary tarballs, and source tarballs), which can lead to confusion when managing different systems or using different installation sources. The individual layouts are given in the corresponding installation type or platform chapter, as described following. Note that the layout of installations from vendors other than Oracle may differ from these layouts.
In some cases, the compiler used to build MySQL affects the features available for use. The notes in this section apply for binary distributions provided by Oracle Corporation or that you compile yourself from source.
icc (Intel C++ Compiler) Builds
A server built with icc has these characteristics:
SSL support is not included.
Oracle provides a set of binary distributions of MySQL. These
include generic binary distributions in the form of compressed
tar files (files with a
.tar.gz extension) for a number of platforms,
and binaries in platform-specific package formats for selected
platforms.
This section covers the installation of MySQL from a compressed tar file binary distribution. For other platform-specific package formats, see the other platform-specific sections. For example, for Windows distributions, see Section 2.3, “Installing MySQL on Microsoft Windows”.
To obtain MySQL, see Section 2.1.2, “How to Get MySQL”.
MySQL compressed tar file binary distributions
have names of the form
mysql-,
where VERSION-OS.tar.gzVERSION5.7.13), and
OS indicates the type of operating system
for which the distribution is intended (for example,
pc-linux-i686 or winx64).
If you have previously installed MySQL using your operating system
native package management system, such as yum
or apt-get, you may experience problems
installing using a native binary. Make sure your previous MySQL
installation has been removed entirely (using your package
management system), and that any additional files, such as old
versions of your data files, have also been removed. You should
also check for configuration files such as
/etc/my.cnf or the
/etc/mysql directory and delete them.
For information about replacing third-party packages with official MySQL packages, see the related Apt guide or Yum guide.
MySQL has a dependency on the libaio library.
Data directory initialization and subsequent server startup steps
will fail if this library is not installed locally. If necessary,
install it using the appropriate package manager. For example, on
Yum-based systems:
shell>yum search libaio# search for info shell>yum install libaio# install library
Or, on APT-based systems:
shell>apt-cache search libaio# search for info shell>apt-get install libaio1# install library
If you run into problems and need to file a bug report, please use the instructions in Section 1.7, “How to Report Bugs or Problems”.
On Unix, to install a compressed tar file binary
distribution, unpack it at the installation location you choose
(typically /usr/local/mysql). This creates the
directories shown in the following table.
Table 2.3 MySQL Installation Layout for Generic Unix/Linux Binary Package
| Directory | Contents of Directory |
|---|---|
bin, scripts | mysqld server, client and utility programs |
data | Log files, databases |
docs | MySQL manual in Info format |
man | Unix manual pages |
include | Include (header) files |
lib | Libraries |
share | Miscellaneous support files, including error messages, sample configuration files, SQL for database installation |
Debug versions of the mysqld binary are available as mysqld-debug. To compile your own debug version of MySQL from a source distribution, use the appropriate configuration options to enable debugging support. See Section 2.9, “Installing MySQL from Source”.
To install and use a MySQL binary distribution, the command sequence looks like this:
shell>groupadd mysqlshell>useradd -r -g mysql -s /bin/false mysqlshell>cd /usr/localshell>tar zxvfshell>/path/to/mysql-VERSION-OS.tar.gzln -sshell>full-path-to-mysql-VERSION-OSmysqlcd mysqlshell>mkdir mysql-filesshell>chmod 750 mysql-filesshell>chown -R mysql .shell>chgrp -R mysql .shell>bin/mysql_install_db --user=mysql# Before MySQL 5.7.6 shell>bin/mysqld --initialize --user=mysql# MySQL 5.7.6 and up shell>bin/mysql_ssl_rsa_setup# MySQL 5.7.6 and up shell>chown -R root .shell>chown -R mysql data mysql-filesshell>bin/mysqld_safe --user=mysql &# Next command is optional shell>cp support-files/mysql.server /etc/init.d/mysql.server
This procedure assumes that you have root
(administrator) access to your system. Alternatively, you can
prefix each command using the sudo (Linux) or
pfexec (OpenSolaris) command.
Before MySQL 5.7.4, the procedure does not assign passwords to MySQL accounts. To do so, use the instructions in Section 2.10.4, “Securing the Initial MySQL Accounts”.
The mysql-files directory provides a convenient
location to use as the value of the
secure_file_priv system variable that limits
import/export operations to a specific directory. See
Section 5.1.4, “Server System Variables”.
Before MySQL 5.7.5, mysql_install_db creates a
default option file named my.cnf in the base
installation directory. This file is created from a template
included in the distribution package named
my-default.cnf. For more information, see
Section 5.1.2, “Server Configuration Defaults”.
A more detailed version of the preceding description for installing a binary distribution follows.
Create a mysql User and Group
If your system does not already have a user and group to use for
running mysqld, you may need to create one. The
following commands add the mysql group and the
mysql user. You might want to call the user and
group something else instead of mysql. If so,
substitute the appropriate name in the following instructions. The
syntax for useradd and
groupadd may differ slightly on different
versions of Unix, or they may have different names such as
adduser and addgroup.
shell>groupadd mysqlshell>useradd -r -g mysql -s /bin/false mysql
Because the user is required only for ownership purposes, not
login purposes, the useradd command uses the
-r and -s /bin/false options to
create a user that does not have login permissions to your server
host. Omit these options if your useradd does
not support them.
Obtain and Unpack the Distribution
Pick the directory under which you want to unpack the distribution
and change location into it. The example here unpacks the
distribution under /usr/local. The
instructions, therefore, assume that you have permission to create
files and directories in /usr/local. If that
directory is protected, you must perform the installation as
root.
shell> cd /usr/local
Obtain a distribution file using the instructions in Section 2.1.2, “How to Get MySQL”. For a given release, binary distributions for all platforms are built from the same MySQL source distribution.
Unpack the distribution, which creates the installation directory.
Then create a symbolic link to that directory.
tar can uncompress and unpack the distribution if
it has z option support:
shell>tar zxvfshell>/path/to/mysql-VERSION-OS.tar.gzln -sfull-path-to-mysql-VERSION-OSmysql
The tar command creates a directory named
mysql-.
The VERSION-OSln command makes a symbolic link to that
directory. This enables you to refer more easily to the installation
directory as /usr/local/mysql.
To install MySQL from a compressed tar file
binary distribution, your system must have GNU
gunzip to uncompress the distribution and a
reasonable tar to unpack it. If your
tar program supports the z
option, it can both uncompress and unpack the file.
GNU tar is known to work. The standard
tar provided with some operating systems is not
able to unpack the long file names in the MySQL distribution. You
should download and install GNU tar, or if
available, use a preinstalled version of GNU tar. Usually this is
available as gnutar, gtar, or
as tar within a GNU or Free Software directory,
such as /usr/sfw/bin or
/usr/local/bin. GNU tar is
available from http://www.gnu.org/software/tar/.
If your tar does not have z
option support, use gunzip to unpack the
distribution and tar to unpack it. Replace the
preceding tar command with the following
alternative command to uncompress and extract the distribution:
shell> gunzip < /path/to/mysql-VERSION-OS.tar.gz | tar xvf -
Perform Postinstallation Setup
The remainder of the installation process involves setting distribution ownership and access permissions, initializing the data directory, starting the MySQL server, and setting up the configuration file. For instructions, see Section 2.10, “Postinstallation Setup and Testing”.
- 2.3.1 MySQL Installation Layout on Microsoft Windows
- 2.3.2 Choosing An Installation Package
- 2.3.3 Installing MySQL on Microsoft Windows Using MySQL Installer
- 2.3.4 MySQL Notifier
- 2.3.5 Installing MySQL on Microsoft Windows Using a noinstall Zip Archive
- 2.3.6 Troubleshooting a Microsoft Windows MySQL Server Installation
- 2.3.7 Windows Postinstallation Procedures
- 2.3.8 Upgrading MySQL on Windows
There are several different methods to install MySQL on Microsoft Windows.
Simple Installation Method
The simplest and recommended method is to download MySQL Installer (for Windows) and let it install and configure all of the MySQL products on your system. Here is how:
Download MySQL Installer from http://dev.mysql.com/downloads/installer/ and execute it.
NoteUnlike the standard MySQL Installer, the smaller "web-community" version does not bundle any MySQL applications but it will download the MySQL products you choose to install.
Choose the appropriate Setup Type for your system. Typically you will choose Developer Default to install MySQL server and other MySQL tools related to MySQL development, helpful tools like MySQL Workbench. Or, choose the Custom setup type to manually select your desired MySQL products.
NoteMultiple versions of MySQL server can exist on a single system. You can choose one or multiple versions.
Complete the installation process by following the MySQL Installation wizard's instructions. This will install several MySQL products and start the MySQL server.
MySQL is now installed. You probably configured MySQL as a service that will automatically start MySQL server every time you restart your system.
You probably also installed other helpful MySQL products like MySQL Workbench and MySQL Notifier on your system. Consider loading Chapter 27, MySQL Workbench to check your new MySQL server connection, and Section 2.3.4, “MySQL Notifier” to view the connection's status. By default, these two programs automatically start after installing MySQL.
This process also installs the MySQL Installer application on your system, and later you can use MySQL Installer to upgrade or reconfigure your MySQL products.
Additional Installation Information
MySQL is available for Microsoft Windows, for both 32-bit and 64-bit versions. For supported Windows platform information, see http://www.mysql.com/support/supportedplatforms/database.html.
It is possible to run MySQL as a standard application or as a Windows service. By using a service, you can monitor and control the operation of the server through the standard Windows service management tools. For more information, see Section 2.3.5.8, “Starting MySQL as a Windows Service”.
Generally, you should install MySQL on Windows using an account that
has administrator rights. Otherwise, you may encounter problems with
certain operations such as editing the PATH
environment variable or accessing the Service Control
Manager. Once installed, MySQL does not need to be
executed using a user with Administrator privileges.
For a list of limitations on the use of MySQL on the Windows platform, see Section C.10.6, “Windows Platform Limitations”.
In addition to the MySQL Server package, you may need or want additional components to use MySQL with your application or development environment. These include, but are not limited to:
To connect to the MySQL server using ODBC, you must have a Connector/ODBC driver. For more information, including installation and configuration instructions, see MySQL Connector/ODBC Developer Guide.
NoteMySQL Installer will install and configure Connector/ODBC for you.
To use MySQL server with .NET applications, you must have the Connector/Net driver. For more information, including installation and configuration instructions, see MySQL Connector/Net Developer Guide.
NoteMySQL Installer will install and configure Connector/NET for you.
MySQL distributions for Windows can be downloaded from http://dev.mysql.com/downloads/. See Section 2.1.2, “How to Get MySQL”.
MySQL for Windows is available in several distribution formats, detailed here. Generally speaking, you should use MySQL Installer. It contains more features and MySQL products than the older MSI, is simpler to use than the Zip file, and you need no additional tools to get MySQL up and running. MySQL Installer automatically installs MySQL Server and additional MySQL products, creates an options file, starts the server, and enables you to create default user accounts. For more information on choosing a package, see Section 2.3.2, “Choosing An Installation Package”.
A MySQL Installer distribution includes MySQL Server and additional MySQL products including MySQL Workbench, MySQL Notifier, and MySQL for Excel. MySQL Installer can also be used to upgrade these products in the future.
For instructions on installing MySQL using MySQL Installer, see Section 2.3.3, “Installing MySQL on Microsoft Windows Using MySQL Installer”.
The standard binary distribution (packaged as a Zip file) contains all of the necessary files that you unpack into your chosen location. This package contains all of the files in the full Windows MSI Installer package, but does not include an installation program.
For instructions on installing MySQL using the Zip file, see Section 2.3.5, “Installing MySQL on Microsoft Windows Using a noinstall Zip Archive”.
The source distribution format contains all the code and support files for building the executables using the Visual Studio compiler system.
For instructions on building MySQL from source on Windows, see Section 2.9, “Installing MySQL from Source”.
MySQL on Windows considerations:
Large Table Support
If you need tables with a size larger than 4GB, install MySQL on an NTFS or newer file system. Do not forget to use
MAX_ROWSandAVG_ROW_LENGTHwhen you create tables. See Section 13.1.18, “CREATE TABLE Syntax”.MySQL and Virus Checking Software
Virus-scanning software such as Norton/Symantec Anti-Virus on directories containing MySQL data and temporary tables can cause issues, both in terms of the performance of MySQL and the virus-scanning software misidentifying the contents of the files as containing spam. This is due to the fingerprinting mechanism used by the virus-scanning software, and the way in which MySQL rapidly updates different files, which may be identified as a potential security risk.
After installing MySQL Server, it is recommended that you disable virus scanning on the main directory (
datadir) used to store your MySQL table data. There is usually a system built into the virus-scanning software to enable specific directories to be ignored.In addition, by default, MySQL creates temporary files in the standard Windows temporary directory. To prevent the temporary files also being scanned, configure a separate temporary directory for MySQL temporary files and add this directory to the virus scanning exclusion list. To do this, add a configuration option for the
tmpdirparameter to yourmy.iniconfiguration file. For more information, see Section 2.3.5.2, “Creating an Option File”.
For MySQL 5.7 on Windows, the default installation
directory is C:\Program Files\MySQL\MySQL Server
5.7. Some Windows users prefer to install
in C:\mysql, the directory that formerly was
used as the default. However, the layout of the subdirectories
remains the same.
All of the files are located within this parent directory, using the structure shown in the following table.
Table 2.4 Default MySQL Installation Layout for Microsoft Windows
| Directory | Contents of Directory | Notes |
|---|---|---|
bin, scripts | mysqld server, client and utility programs | |
%ALLUSERSPROFILE%\MySQL\MySQL Server
5.7\ | Log files, databases (Windows XP, Windows Server 2003) | The Windows system variable %ALLUSERSPROFILE%
defaults to C:\Documents and Settings\All
Users\Application Data |
%PROGRAMDATA%\MySQL\MySQL Server 5.7\ | Log files, databases (Vista, Windows 7, Windows Server 2008, and newer) | The Windows system variable %PROGRAMDATA% defaults to
C:\ProgramData |
examples | Example programs and scripts | |
include | Include (header) files | |
lib | Libraries | |
share | Miscellaneous support files, including error messages, character set files, sample configuration files, SQL for database installation |
If you install MySQL using the MySQL Installer, this package creates and sets
up the data directory that the installed server will use, and also
creates a pristine “template” data directory named
data under the installation directory. After
an installation has been performed using this package, the
template data directory can be copied to set up additional MySQL
instances. See Section 5.3, “Running Multiple MySQL Instances on One Machine”.
For MySQL 5.7, there are multiple installation package formats to choose from when installing MySQL on Windows.
Program Database (PDB) files (with file name extension
pdb) provide information for debugging your
MySQL installation in the event of a problem. These files are
included in ZIP Archive distributions (but not MSI
distributions) of MySQL.
MySQL Installer: This package has a file name similar to
mysql-installer-community-5.7.13.0.msiormysql-installer-commercial-5.7.13.0.msi, and utilizes MSIs to automatically install MySQL server and other products. It will download and apply updates to itself, and for each of the installed products. It also configures the additional non-server products.The installed products are configurable, and this includes: documentation with samples and examples, connectors (such as C, C++, J, NET, and ODBC), MySQL Workbench, MySQL Notifier, MySQL for Excel, and the MySQL Server with its components.
NoteAs of MySQL 5.7.8, MySQL Installer no longer includes debugging binaries/information components (including PDB files). These are available in a separate Zip archive named
mysql-for 64-bit andVERSION-winx64-debug-test.zipmysql-for 32-bit.VERSION-win32-debug-test.zipMySQL Installer operates on all MySQL supported versions of Windows (see http://www.mysql.com/support/supportedplatforms/database.html).
NoteBecause MySQL Installer is not a native component of Microsoft Windows and depends on .NET, it will not work on minimal installation options like the "Server Core" version of Windows Server 2008.
For instructions on installing MySQL using MySQL Installer, see Section 2.3.3, “Installing MySQL on Microsoft Windows Using MySQL Installer”.
The Noinstall Archives: These packages contain the files found in the complete installation package, with the exception of the GUI. This format does not include an automated installer, and must be manually installed and configured.
NoteAs of MySQL 5.7.6, noinstall archives are split into two separate Zip files. The main package is named
mysql-for 64-bit andVERSION-winx64.zipmysql-for 32-bit. This contains the components needed to use MySQL on your system. The optional MySQL test suite, MySQL benchmark suite, and debugging binaries/information components (including PDB files) are in a separate Zip file namedVERSION-win32.zipmysql-for 64-bit andVERSION-winx64-debug-test.zipmysql-for 32-bit.VERSION-win32-debug-test.zipBefore MySQL 5.7.6, a single noinstall archive contained both the main and debugging files.
MySQL Installer is recommended for most users.
Your choice of install package affects the installation process you must follow. If you choose to use MySQL Installer, see Section 2.3.3, “Installing MySQL on Microsoft Windows Using MySQL Installer”. If you choose to install a Noinstall archive, see Section 2.3.5, “Installing MySQL on Microsoft Windows Using a noinstall Zip Archive”.
MySQL Installer is an application that manages MySQL products on Microsoft Windows. It installs, updates, removes, and configures MySQL products, and remains on the system as its own application. MySQL Installer is only available for Microsoft Windows, and includes both GUI and command-line interfaces.
The supported MySQL products include:
MySQL Server (one or multiple versions on the same system)
MySQL Connectors (.Net / Python / ODBC / Java / C / C++)
MySQL Samples and Examples
MySQL Documentation
MySQL Installer is also installed and remains on the system as its own application, that is used to install additional MySQL products, and also to update and configure existing MySQL products
The Enterprise edition installs the Enterprise versions of the above products, and also includes MySQL Enterprise Backup and MySQL Enterprise Firewall
Installer package types
Full:Bundles all of the MySQL products (including the MySQL server). The file size is over 300MB, and its name has the formmysql-installer-community-whereVERSION.N.msiVERSIONis the MySQL Server version number such as 5.7 andNis the package number, which begins at 0.Web:Only contains the Installer and configuration files, and it downloads the MySQL products you choose to install. The size of this file is about 2MB; the name of the file has the formmysql-installer-community-whereweb-VERSION.N.msiVERSIONis the MySQL Server version number such as 5.7 andNis the package number, which begins at 0.Updates:MySQL Installer can upgrade itself, so an additional download is not requires to update MySQL Installer.
Installer editions
Community edition:Downloadable at http://dev.mysql.com/downloads/installer/. It installs the community edition of all MySQL products.Commercial edition:Downloadable at either My Oracle Support (MOS) or https://edelivery.oracle.com/. It installs the commercial version of all MySQL products, including Workbench SE/EE, MySQL Enterprise Backup, and MySQL Enterprise Firewall. It also integrates with your MOS account.NoteEntering your MOS credentials is optional when installing bundled MySQL products, but your credentials are required when choosing non-bundled MySQL products that MySQL Installer must download.
For notes detailing the changes in each release of MySQL Installer, see MySQL Installer Release Notes.
MySQL Installer is compatible with pre-existing installations, and adds them to its list of installed components. While the standard MySQL Installer is bundled with a specific version of MySQL server, a single MySQL Installer instance can install and manage multiple MySQL server versions. For example, a single MySQL Installer instance can install (and update) versions 5.5, 5.6, and 5.7 on the same host.
A single host can not have both community and commercial editions of MySQL server installed. For example, if you want both MySQL Server 5.6 and 5.7 installed on a single host, both must be the same edition.
MySQL Installer handles the initial configuration and set up of the applications. For example:
It creates the configuration file (
my.ini) that is used to configure the MySQL Server. The values written to this file are influenced by choices you make during the installation process.NoteSome definitions are host dependent. For example, query_cache is enabled if the host has fewer than three cores.
It can optionally import example databases.
By default, a Windows service for the MySQL server is added.
It can optionally create MySQL Server user accounts with configurable permissions based on general roles, such as DB Administrator, DB Designer, and Backup Admin. It optionally creates a Windows user named
MysqlSyswith limited privileges, which would then run the MySQL Server.User accounts may also be added and configured in MySQL Workbench.
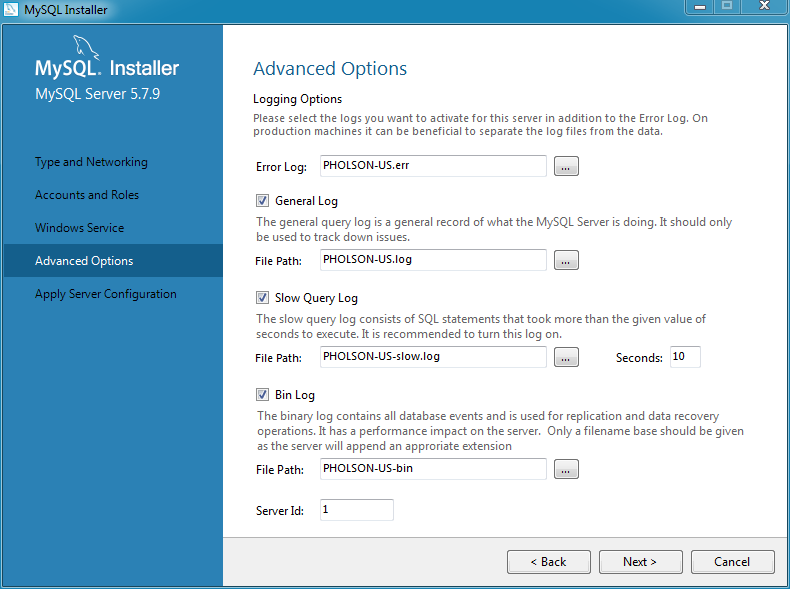
Checking Show Advanced Options allows additional Logging Options to be set. This includes defining custom file paths for the error log, general log, slow query log (including the configuration of seconds it requires to execute a query), and the binary log.
MySQL Installer can optionally check for updated components and download them for you.
Installing MySQL Installer adds a link to the Start menu under the group. Click , , to reload the MySQL Installer GUI.
Full permissions are granted to the user executing MySQL Installer to all
generated files, such as my.ini. This does
not apply to files and directories for specific products, such
as the MySQL server data directory in
%ProgramData% that is owned by
SYSTEM.
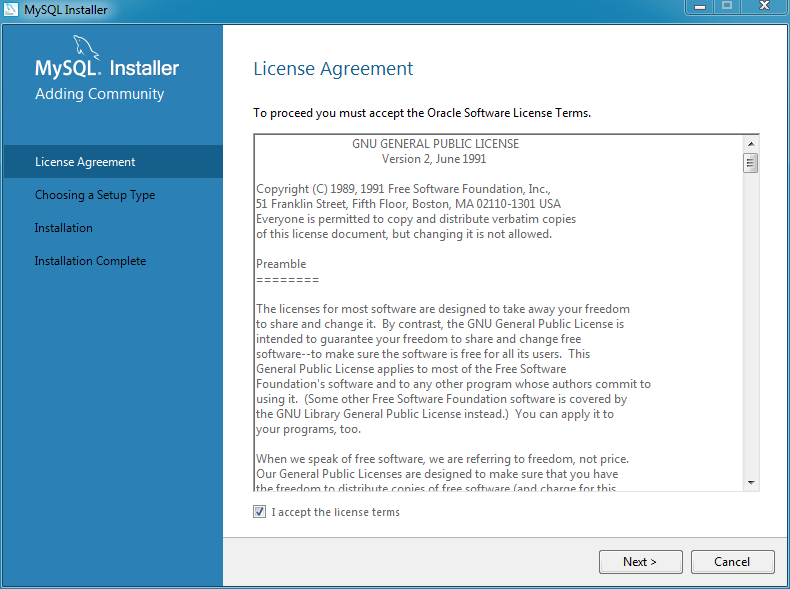
MySQL Installer requires you to accept the license agreement before it will install MySQL products.
Installing New Packages
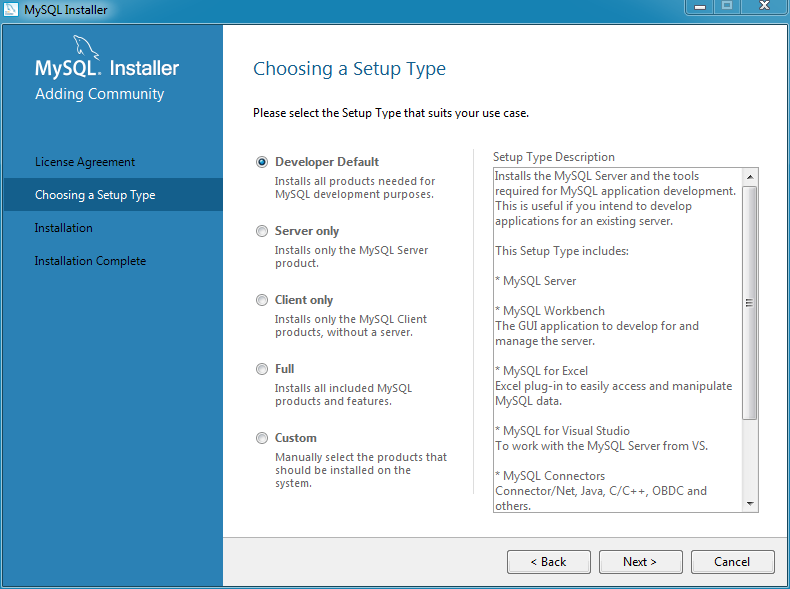
Choose the appropriate Setup Type for your system. This type determines which MySQL products are initially installed on your system, or select Custom to manually choose the products.
Developer: Install all products needed to develop applications with MySQL. This is the default option.
Server only: Only install the MySQL server.
Client only: Only install the MySQL client products, such as MySQL Workbench. This does not include the MySQL server.
Full: Install all available MySQL products.
Custom: Manually select the MySQL products to install, and optionally configure custom MySQL data and installation paths.
NoteAfter the initial installation, you may use MySQL Installer to manually select MySQL products to install or remove. In other words, MySQL Installer becomes a MySQL product management system.
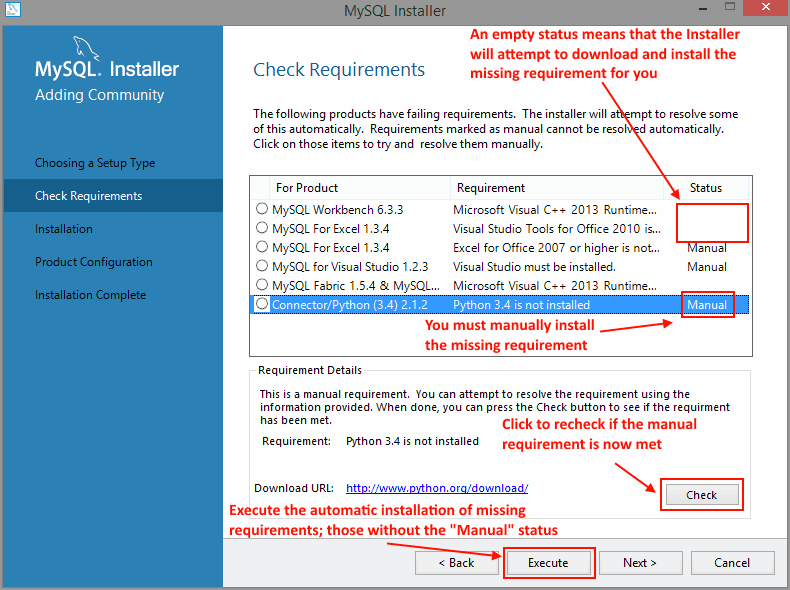
MySQL Installer checks your system for the external requirements (pre-requisites) required to install the selected MySQL products. MySQL Installer can download and install some prerequisites, but others require manual intervention. Download and install all prerequisites that have Status set to "Manual". Click to recheck if a manual prerequisite was installed. After manually installing those requirements, click to download and install the other prerequisites. Once finished, click to continue.
The next window lists the MySQL products that are scheduled for installation:
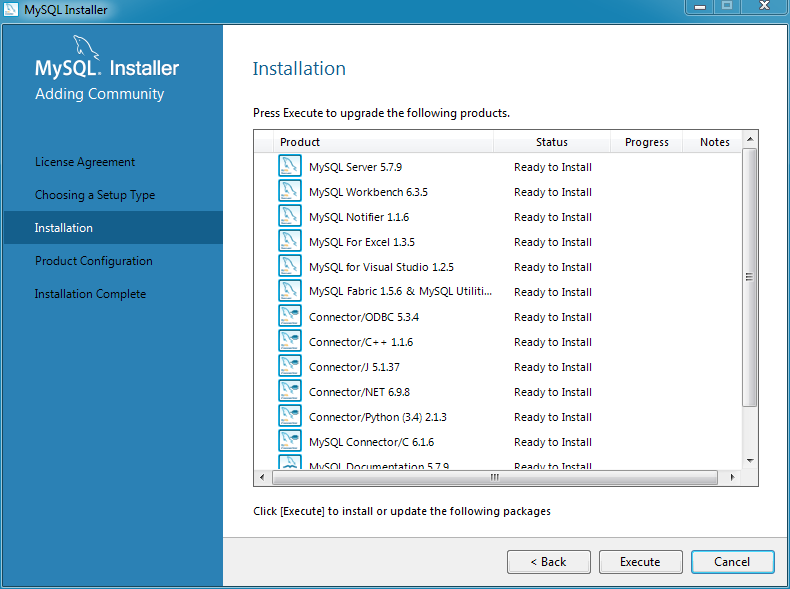
As components are installed, their Status changes from a progress percentage to "Complete".
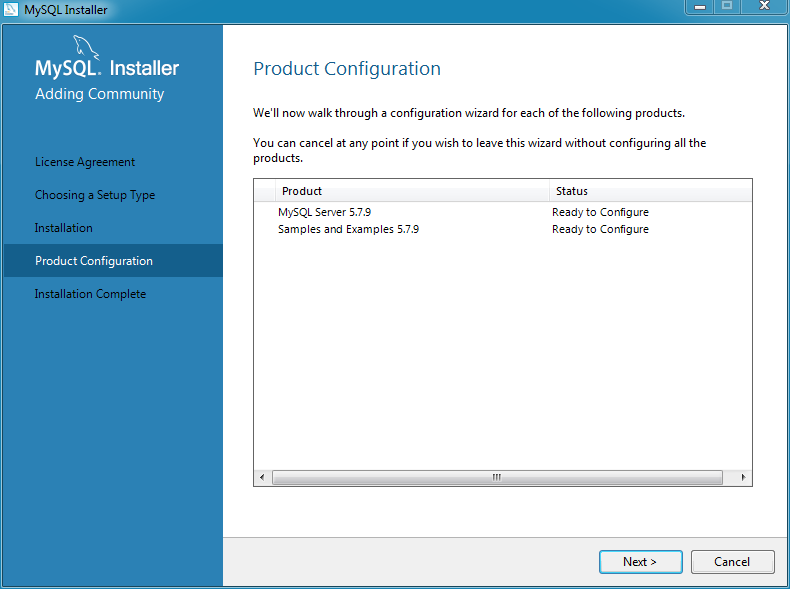
After all components are installed, the next step configures some
of the recently installed MySQL products. The
Configuration Overview window displays the
progress and then loads a configuration window, if required. Our
example configures MySQL Server 5.6.x.
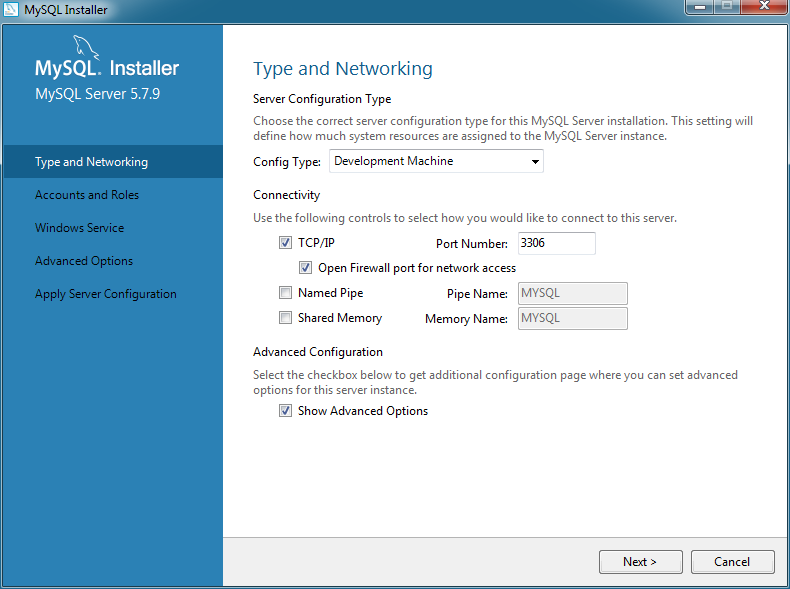
Configuring MySQL Server
Configuring the MySQL server begins with defining several Type and Networking options.
Server Configuration Type
Choose the MySQL server configuration type that describes your setup. This setting defines the amount of system resources (memory) that will be assigned to your MySQL server instance.
Developer: A machine that will host many other applications, and typically this is your personal workstation. This option configures MySQL to use the least amount of memory.
Server: Several other applications will be running on this machine, such as a web server. This option configures MySQL to use a medium amount of memory.
Dedicated: A machine that is dedicated to running the MySQL server. Because no other major applications will run on this server, such as a web server, this option configures MySQL to use the majority of available memory.
Connectivity
Connectivity options control how the connection to MySQL is made. Options include:
TCP/IP: You may enable TCP/IP Networking here as otherwise only localhost connections are allowed. Also define the Port Number and whether to open the firewall port for network access.
Named Pipe: Enable and define the pipe name, similar to using the
--enable-named-pipeoption.Shared Memory: Enable and then define the memory name, similar to using the
--shared-memoryoption.
Advanced Configuration
Check Show Advanced Options to set additional Logging Options. This includes defining custom file paths for the error log, general log, slow query log (including the configuration of seconds it requires to execute a query), and the binary log.
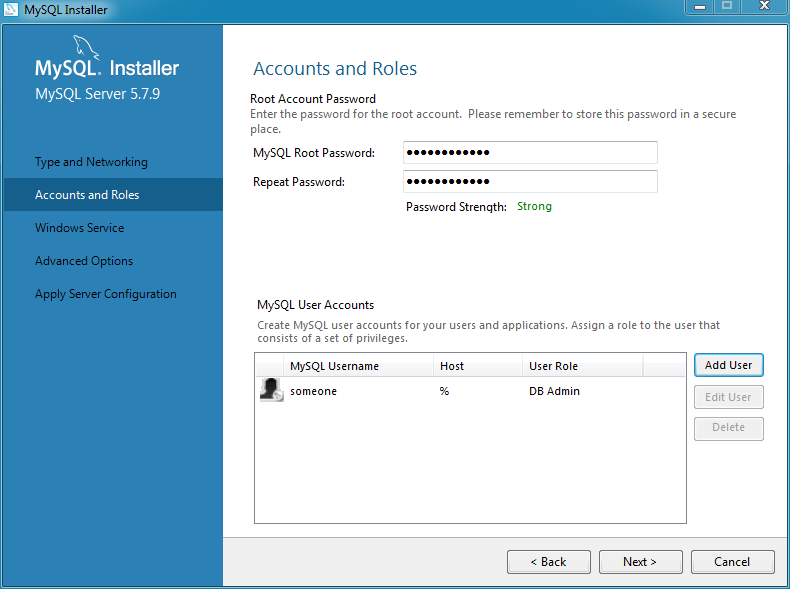
Accounts and Roles
Next, define your MySQL account information. Assigning a root password is required.
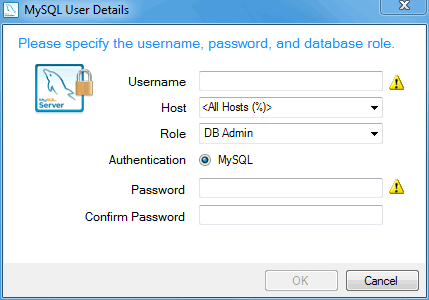
Optionally, you can add additional MySQL user accounts with predefined user roles. Each predefined role, such as "DB Admin", are configured with their own set of privileges. For example, the "DB Admin" role has more privileges than the "DB Designer" role. Click the Role dropdown for a list of role descriptions.
If the MySQL Server is already installed, then you must also
enter the Current Root Password.
Windows Service
Next, configure the Windows Service details. This includes the service name, whether the MySQL server should be loaded at startup, and how the MySQL server Windows service is executed.
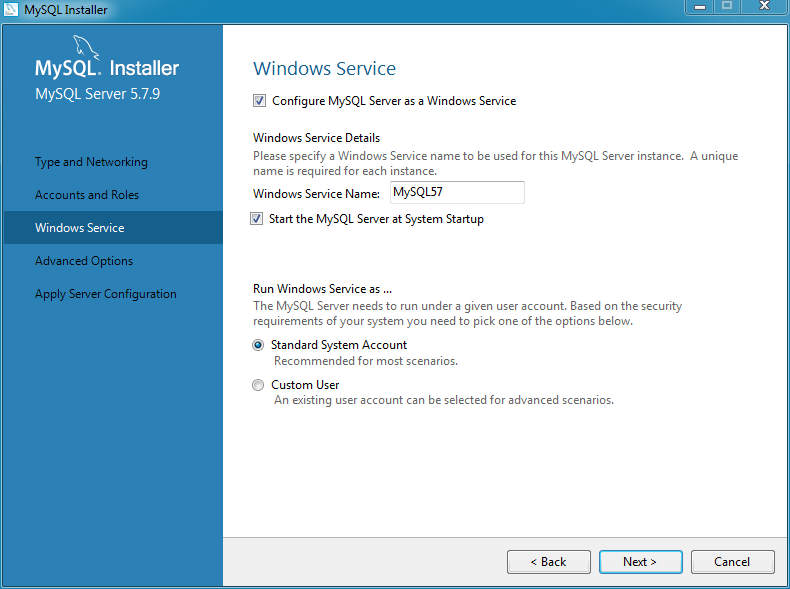
When configuring Run Windows Services as ... using a Custom User, the custom user must have privileges to log on to Microsoft Windows as a service. The button will be disabled until this user is configured with the required privileges.
On Microsoft Windows 7, this is configured by loading the
Start Menu, Control Panel,
Administrative Tools, Local Security
Policy, Local Policies,
User Rights Assignment, then Log On
As A Service. Choose Add User or
Group here to add the custom user, and then
, to save.
Advanced Options
The next configuration step is available if the Advanced Configuration option was checked. This section includes options that are related to the MySQL log files:
Click to continue on to the final page before all of the requested changes are applied. This Apply Server Configuration page details the configuration steps that will be performed.
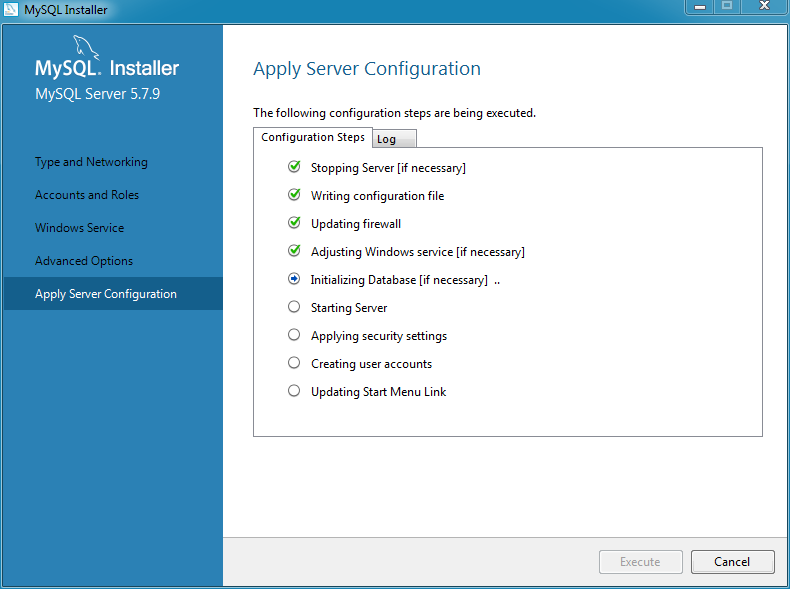
Click to execute the configuration steps. The icon for each step toggles from white to green on success, or the process stops on failure. Click the tab to view the log.
After the MySQL Installer configuration process is finished, MySQL Installer reloads the opening page where you can execute other installation and configuration related actions.
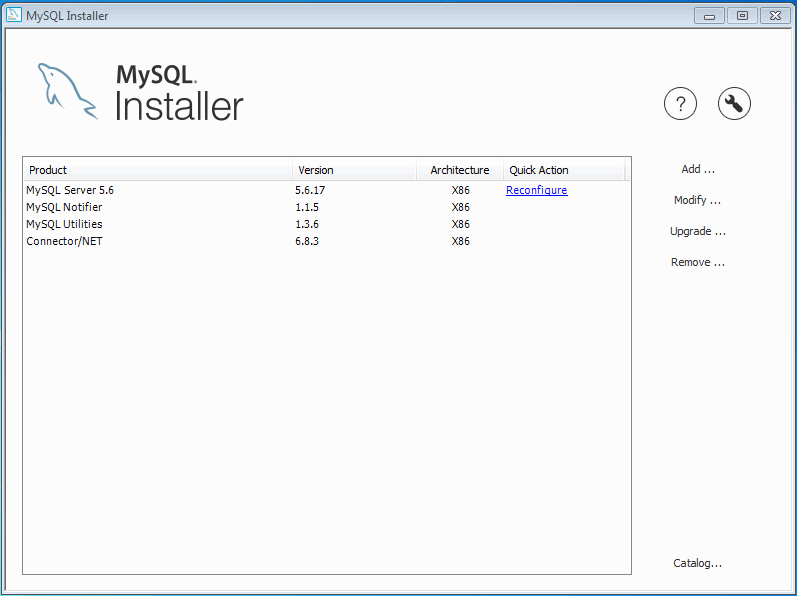
MySQL Installer is added to the Microsoft Windows Start menu under the
MySQL group. Opening MySQL Installer loads its dashboard
where installed MySQL products are listed, and other MySQL Installer actions
are available:
Adding MySQL Products
Click to add new products. This loads the Select Products and Features page:
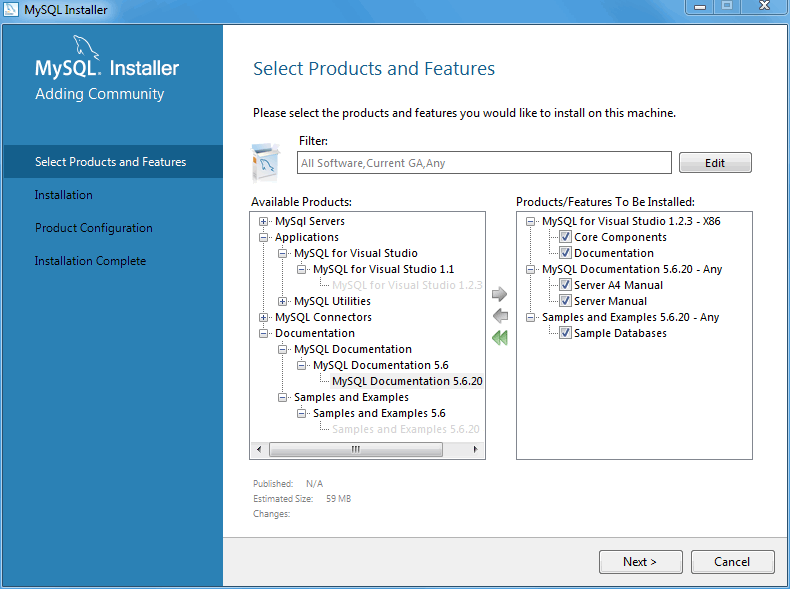
From here, choose the MySQL products you want to install from the left Available Products pane, and then click the green right arrow to queue products for installation.
Optionally, click to open the product and features search filter:
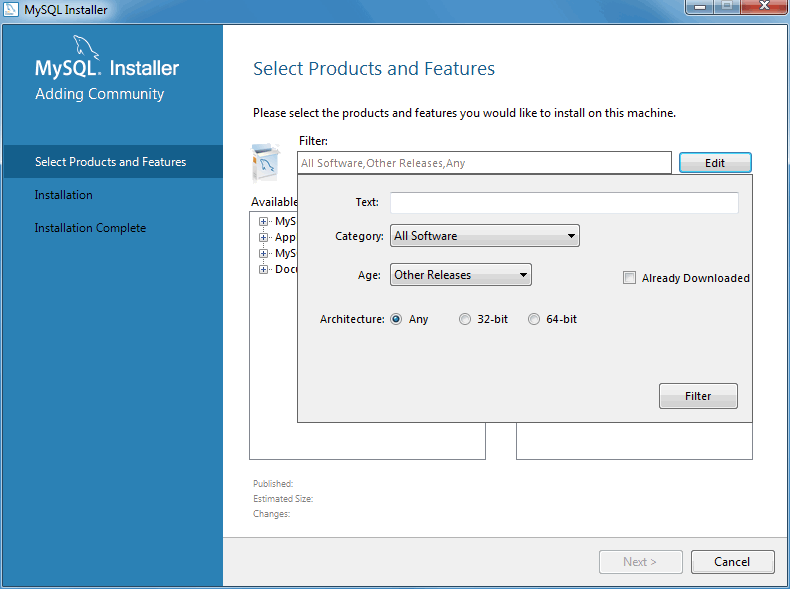
For example, you might choose to include Pre-Release products in your selections, such as a Beta product that has not yet reached General Availability (GA) status.
Select all of the MySQL products you want to install, then click to continue using the defaults, or highlight a selected product and click Advanced Options to optionally alter options such as the MySQL server data and installation paths. Click to execute the installation process to install all of the selected products.
MySQL Installer stores a MySQL product catalog. The catalog can be updated either manually or automatically, and the catalog change history is also available. The automatic update is enabled by default.
The product catalog update also checks for a newer version of MySQL Installer, and prompts for an update if one is present.
Manual updates
You can update the MySQL product catalog at any time by clicking Catalog on the Installer dashboard.
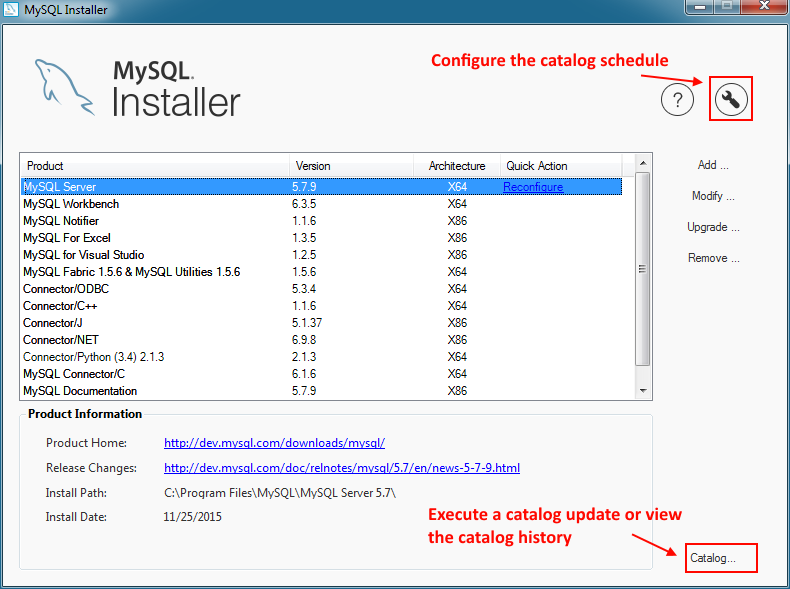
From there, click to update the product catalog.
Automatic updates
MySQL Installer can automatically update the MySQL product catalog. By default, this feature is enabled to execute each day at 12:00 AM. To configure this feature, click the wrench icon on the Installer dashboard.
The next window configures the Automatic Catalog Update. Enable or disable this feature, and also set the hour.
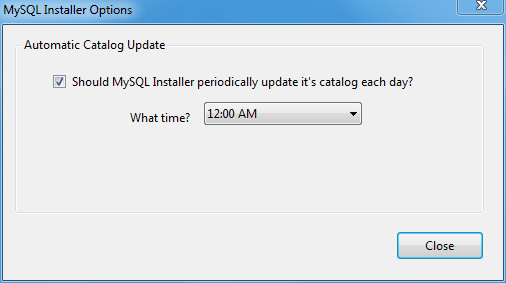
This option uses the Windows Task Scheduler to schedule a task named "ManifestUpdate".
Change History
MySQL Installer tracks the change history for all of the MySQL products. Click Catalog from the dashboard, optionally update the catalog (or, toggle the Do not update at this time checkbox), click /, and then view the change history.

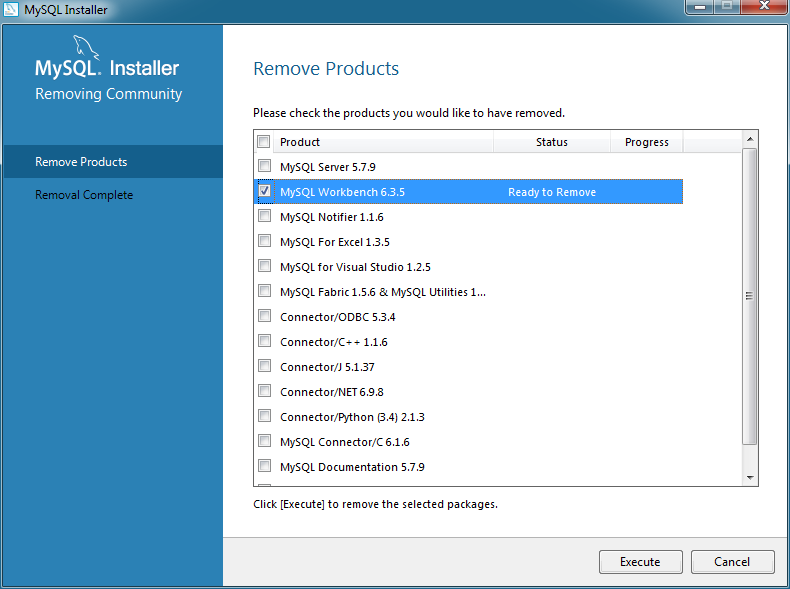
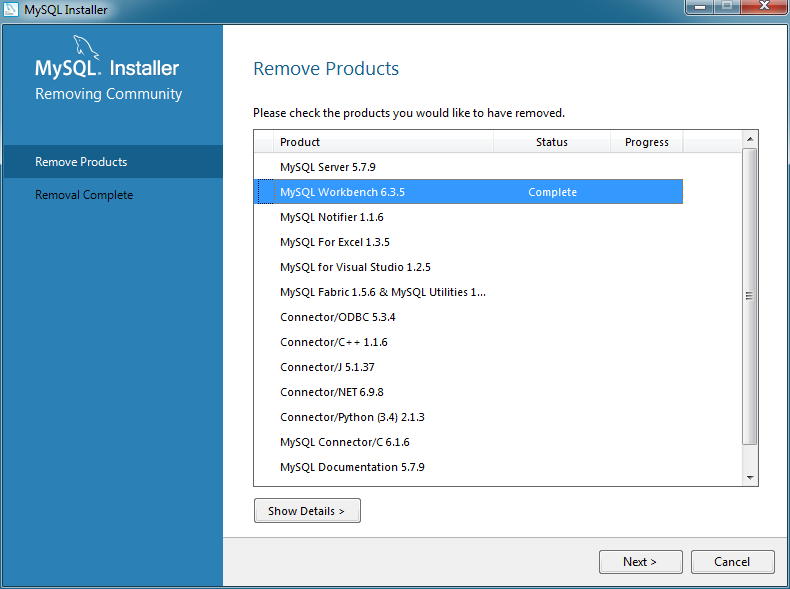
MySQL Installer can also remove MySQL products from your system. To remove a MySQL product, click Remove from the Installer dashboard. This opens a window with a list of installed MySQL products. Select the MySQL products you want to remove (uninstall), and then click to begin the removal process.
To select all MySQL products, click the [ ] checkbox to the left of the Product label.
Use MySQL Installer to modify, configure, or upgrade your MySQL product installations.
Upgradable MySQL products are listed on the main dashboard
with an arrow icon (
![]() ) next to their version number.
) next to their version number.
The "upgrade" functionality requires a current product catalog. This catalog is updated either manually or automatically (daily) by enabling the Automatic Catalog Update feature. For additional information, see Section 2.3.3.1.1, “MySQL Product Catalog”.
Click Upgrade to upgrade the available products. Our example indicates that MySQL Workbench 6.2.4 can be upgraded version 6.3.1 or 6.2.5, and MySQL server from 5.5.41 to 5.5.42.
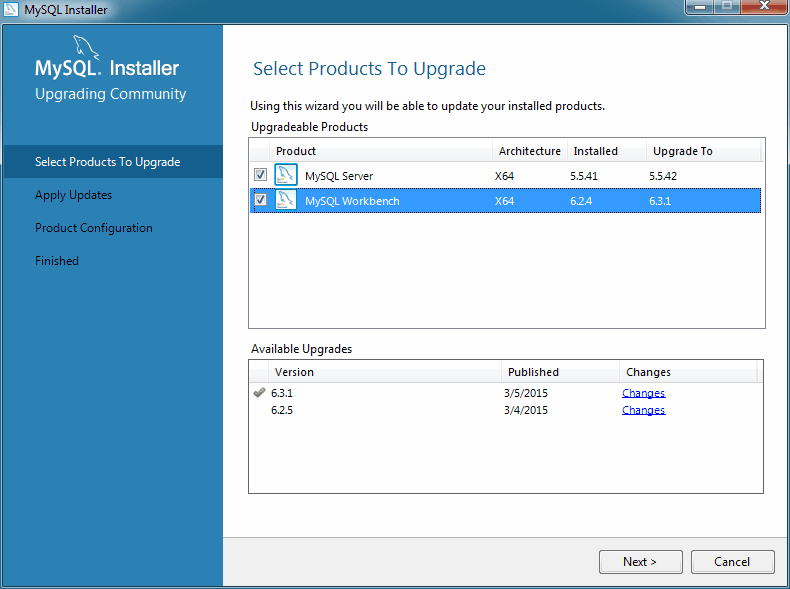
If multiple upgrade versions are available (such as our MySQL Workbench example above), select the desired version for the upgrade in the Available Upgrades area.
Optionally, click the Changes link to view the version's release notes.
After selecting (checking) the products and versions to upgrade, click to begin the upgrade process.
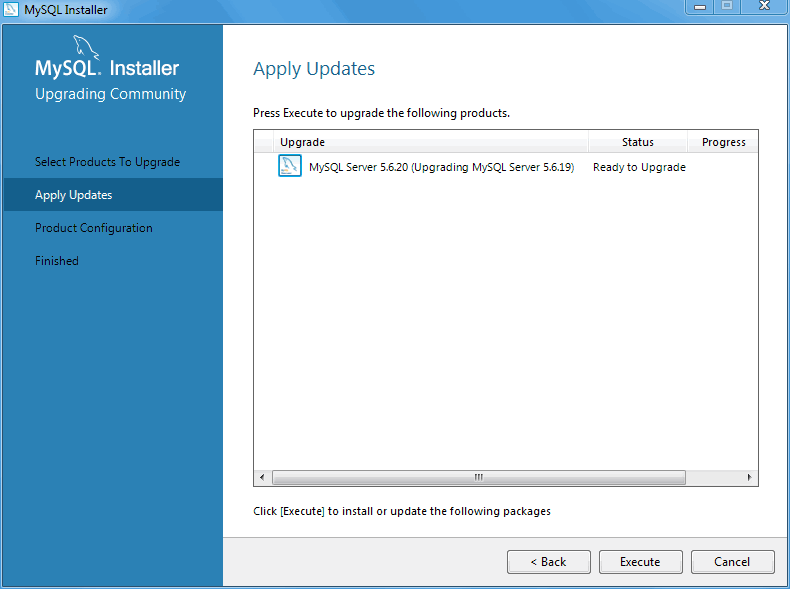
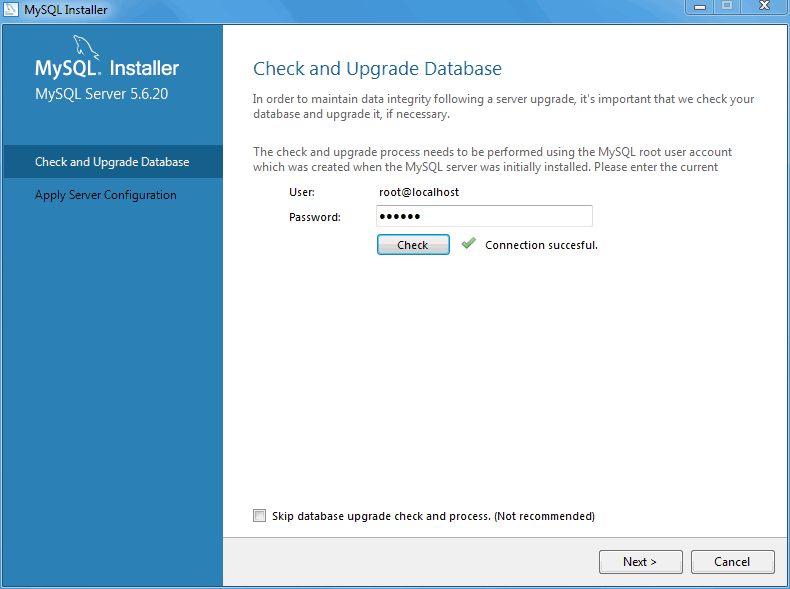
A MySQL server upgrade will also check and upgrade the server's database. Although optional, this step is recommended.
Upon completion, your upgraded products will be upgraded and available to use. A MySQL server upgrade also restarts the MySQL server.
Some MySQL products, such as the MySQL server, include a Reconfigure option. It opens the same configuration options that were set when the MySQL product was installed, and is pre-populated with the current values.
To execute, click the Reconfigure link
under the Quick Action column on the main
dashboard for the MySQL product that you want to reconfigure.

In the case of the MySQL server, this opens a configuration wizard that relates to the selected product. For example, for MySQL Server this includes setting the type, ports, log paths, and so on.
Many MySQL products contain feature components that can be
added or removed. For example, Debug
binaries and Client Programs are
subcomponents of the MySQL server.
The modify the features of a product, click Modify on the main dashboard.
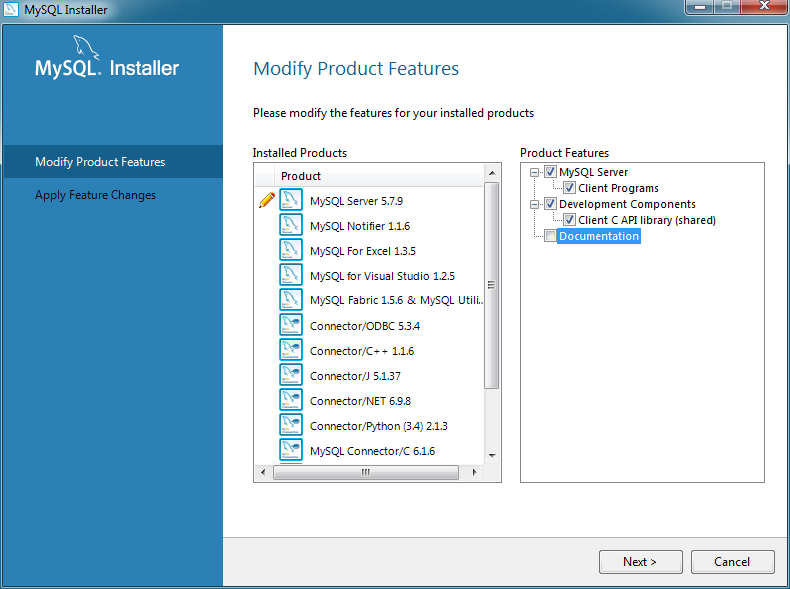
Click to execute the modification request.
MySQLInstallerConsole provides functionality
similar to the GUI version of MySQL Installer, but from the command-line. It
is installed when MySQL Installer is initially executed, and then available
within the MySQL Installer directory.
Typically that is in C:\Program Files (x86)\MySQL\MySQL
Installer\, and the console must be executed with
administrative privileges.
To use, invoke the Command Prompt with administrative privileges
by choosing ,
, then right-click on
and choose Run as
administrator. And from the command-line, optionally
change the directory to where
MySQLInstallerConsole is located:
C:\>cd "C:\Program Files (x86)\MySQL\MySQL Installer for Windows"C:\>MySQLInstallerConsole.exe helpC:\Program Files (x86)\MySQL\MySQL Installer for Windows>MySQLInstallerConsole.exe help The following commands are available: Configure - Configures one or more of your installed programs. Help - Provides list of available commands. Install - Install and configure one or more available MySQL programs. List - Provides an interactive way to list all products available. Modify - Modifies the features of installed products. Remove - Removes one or more products from your system. Status - Shows the status of all installed products. Update - Update the current product catalog. Upgrade - Upgrades one or more of your installed programs.
MySQLInstallerConsole supports the following options, which are specified on the command line:
Configuration block values that contain a colon (":") must be wrapped in double quotes. For example, installdir="C:\MySQL\MySQL Server 5.6".
configure[product1]:[setting]=[value]; [product2]:[setting]=[value]; [...]Configure one or more MySQL products on your system. Multiple setting=value pairs can be configured for each product.
Switches include:
-showsettings: Displays the available options for the selected product, by passing in the product name after-showsettings.-silent: Disable confirmation prompts.
C:\>
MySQLInstallerConsoleC:\>configure -showsettings serverMySQLInstallerConsoleconfigure server:port=3307Displays a help message with usage examples, and then exits. Pass in an additional command to receive help specific to that command.
C:\>
MySQLInstallerConsoleC:\>helpMySQLInstallerConsolehelp installinstall[product]:[features]:[config block]:[config block]:[config block]; [...]Install one or more MySQL products on your system.
Switches and syntax options include:
-type=[SetupType]: Installs a predefined set of software. The "SetupType" can be one of the following:NoteNon-custom setup types can only be chosen if no other MySQL products are installed.
Developer: Installs a complete development environment.
Server: Installs a single MySQL server
Client: Installs client programs and libraries
Full: Installs everything
Custom: Installs user selected products. This is the default option.
-showsettings: Displays the available options for the selected product, by passing in the product name after-showsettings.-silent: Disable confirmation prompts.[config block]: One or more configuration blocks can be specified. Each configuration block is a semicolon separated list of key value pairs. A block can include either a "config" or "user" type key, where "config" is the default type if one is not defined.Configuration block values that contain a colon (":") must be wrapped in double quotes. For example, installdir="C:\MySQL\MySQL Server 5.6".
Only one "config" type block can be defined per product. A "user" block should be defined for each user that should be created during the product's installation.
NoteAdding users is not supported when a product is being reconfigured.
[feature]: The feature block is a semicolon separated list of features, or '*' to select all features.
C:\>
MySQLInstallerConsoleC:\>install server;5.6.25:*:port=3307;serverid=2:type=user;username=foo;password=bar;role=DBManagerMySQLInstallerConsoleinstall server;5.6.25;x64 -silentAn example that passes in additional configuration blocks, broken up by
^to fit this screen:C:\>
MySQLInstallerConsoleinstall server;5.6.25;x64:*:type=config;openfirewall=true; ^ generallog=true;binlog=true;serverid=3306;enable_tcpip=true;port=3306;rootpasswd=pass; ^ installdir="C:\MySQL\MySQL Server 5.6":type=user;datadir="C:\MySQL\data";username=foo;password=bar;role=DBManagerLists an interactive console where all of the available MySQL products can be searched. Execute
MySQLInstallerConsole listto launch the console, and enter in a substring to search.C:\>
MySQLInstallerConsolelistmodify[product1:-removelist|+addlist] [product2:-removelist|+addlist] [...]Modifies or displays features of a previously installed MySQL product.
-silent: Disable confirmation prompts.
C:\>
MySQLInstallerConsoleC:\>modify serverMySQLInstallerConsoleC:\>modify server:+documentationMySQLInstallerConsolemodify server:-debugremove[product1] [product2] [...]Removes one ore more products from your system.
*: Pass in*to remove all of the MySQL products.-continue: Continue the operation even if an error occurs.-silent: Disable confirmation prompts.
C:\>
MySQLInstallerConsoleC:\>remove *MySQLInstallerConsoleremove serverProvides a quick overview of the MySQL products that are installed on the system. Information includes product name and version, architecture, date installed, and install location.
C:\>
MySQLInstallerConsolestatusupgrade [product1:version] [product2:version], [...]Upgrades one or more products on your system. Syntax options include:
*: Pass in*to upgrade all products to the latest version, or pass in specific products.!: Pass in!as a version number to upgrade the MySQL product to its latest version.-silent: Disable confirmation prompts.
C:\>
MySQLInstallerConsoleC:\>upgrade *MySQLInstallerConsoleC:\>upgrade workbench:6.3.5MySQLInstallerConsoleC:\>upgrade workbench:!MySQLInstallerConsoleupgrade workbench:6.3.5 excel:1.3.2Downloads the latest MySQL product catalog to your system. On success, the download catalog will be applied the next time either MySQLInstaller or MySQLInstallerConsole is executed.
C:\>
MySQLInstallerConsoleupdateNoteThe Automatic Catalog Update GUI option executes this command from the Windows Task Scheduler.
The MySQL Notifier is a tool that enables you to monitor and adjust the status of your local and remote MySQL Server instances through an indicator that resides in the system tray. The MySQL Notifier also gives quick access to several MySQL GUI tools (such as MySQL Workbench) through its context menu.
The MySQL Notifier is installed by MySQL Installer, and (by default) will start-up when Microsoft Windows is started.
To install, download and execute the MySQL Installer, be sure the MySQL Notifier product is selected, then proceed with the installation. See the MySQL Installer manual for additional details.
For notes detailing the changes in each release of MySQL Notifier, see the MySQL Notifier Release Notes.
Visit the MySQL Notifier forum for additional MySQL Notifier help and support.
Features include:
Start, Stop, and Restart instances of the MySQL Server.
Automatically detects (and adds) new MySQL Server services. These are listed under , and may also be configured.
The Tray icon changes, depending on the status. It's green if all monitored MySQL Server instances are running, or red if at least one service is stopped. The Update MySQL Notifier tray icon based on service status option, which dictates this behavior, is enabled by default for each service.
Links to other applications like MySQL Workbench, MySQL Installer, and the MySQL Utilities. For example, choosing will load the MySQL Workbench Server Administration window for that particular instance.
If MySQL Workbench is also installed, then the and options are available for local (but not remote) MySQL instances.
Monitors both local and remote MySQL instances.
The MySQL Notifier resides in the system tray and provides visual status information for your MySQL Server instances. A green icon is displayed at the top left corner of the tray icon if the current MySQL Server is running, or a red icon if the service is stopped.
The MySQL Notifier automatically adds discovered MySQL Services on
the local machine, and each service is saved and configurable. By
default, the Automatically add new services whose name
contains option is enabled and set to
mysql. Related Notifications
Options include being notified when new services are
either discovered or experience status changes, and are also
enabled by default. And uninstalling a service will also remove
the service from the MySQL Notifier.
Clicking the system tray icon will reveal several options, as seen in the screenshots below:
The Service Instance menu is the main MySQL Notifier window, and enables you to Stop, Start, and Restart the MySQL Server.
The menu includes several links to external applications (if they are installed), and a Refresh Status option to manually refresh the status of all monitored services (in both local and remote computers) and MySQL instances.
The main menu will not show the menu when there are no services being monitored by MySQL Notifier.
The , menu configures MySQL Notifier and includes options to:
Use colorful status icons: Enables a colorful style of icons for the tray of the MySQL Notifier.
Run at Windows Startup: Allows the application to be loaded when Microsoft Windows starts.
Automatically Check For Updates Every # Weeks: Checks for a new version of MySQL Notifier, and runs this check every # weeks.
Automatically add new services whose name contains: The text used to filter services and add them automatically to the monitored list of the local computer running MySQL Notifier, and on remote computers already monitoring Windows services. monitored services, and also filters the list of the Microsoft Windows services for the Add New Service dialog.
Notify me when a service is automatically added: Will display a balloon notification from the taskbar when a newly discovered service is added to the monitored services list.
Notify me when a service changes status: Will display a balloon notification from the taskbar when a monitored service changes its status.
The , menu enables you to configure the monitored services and MySQL instances. First, with the Services tab open:

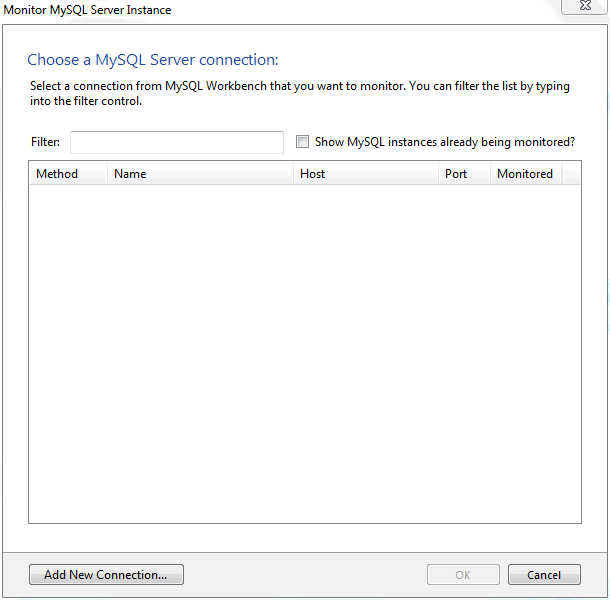
The Instances tab is similar:
Adding a service or instance (after clicking in the window) enables you to select a running Microsoft Windows service or instance connection, and configure MySQL Notifier to monitor it. Add a new service or instance by clicking service name from the list, then to accept. Multiple services and instances may be selected.
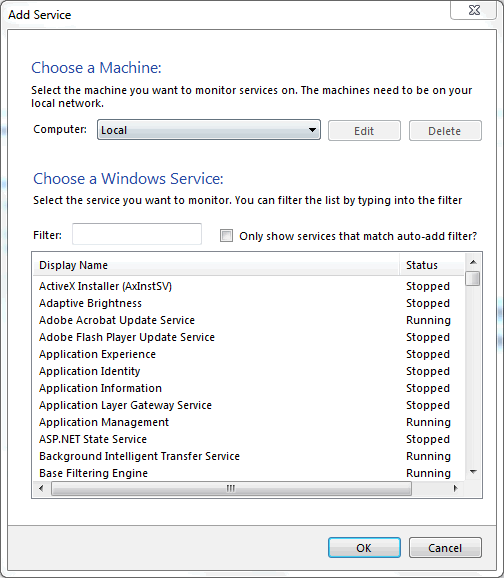
Add instances:
For issues that are not documented here, visit the MySQL Notifier Support Forum for MySQL Notifier help and support.
Problem: attempting to start/stop/restart a MySQL service might generate an error similar to "The Service MySQL
VERSIONfailed the most recent status change request with the message "The service mysqlVERSIONwas not found in the Windows Services".Explanation: this is a case-sensitivity issue, in that the service name is MySQL
VERSIONcompared to having mysqlVERSIONin the configuration file.Solution: either update your MySQL Notifier configuration file with the correct information, or stop Notifier and delete this configuration file. The Notifier configuration file is located at
%APPDATA%\Oracle\MySQL Notifier\settings.configwhere%APPDATA%is a variable and depends on your system. A typical location is "C:\Users\YourUsername\AppData\Running\Oracle\MySQL Notifier\system.config" whereYourUsernameis your system's username. In this file, and within the ServerList section, change the ServerName values from lowercase to the actual service names. For example, change mysqlVERSIONto MySQLVERSION, save, and then restart Notifier. Alternatively, stop MySQL Notifier, delete this file, then restart MySQL Notifier.
The MySQL Notifier uses Windows Management Instrumentation (WMI) to manage and monitor services in remote computers running Windows XP or later. This guide explains how it works, and how to set up your system to monitor remote MySQL instances.
In order to configure WMI, it is important to understand that the underlying Distributed Component Object Model (DCOM) architecture is doing the WMI work. Specifically, MySQL Notifier is using asynchronous notification queries on remote Microsoft Windows hosts as .NET events. These events send an asynchronous callback to the computer running the MySQL Notifier so it knows when a service status has changed on the remote computer. Asynchronous notifications offer the best performance compared to semisynchronous notifications or synchronous notifications that use timers.
Asynchronous notifications requires the remote computer to send a callback to the client computer (thus opening a reverse connection), so the Windows Firewall and DCOM settings must be properly configured for the communication to function properly.
Most of the common errors thrown by asynchronous WMI notifications are related to Windows Firewall blocking the communication, or to DCOM / WMI settings not being set up properly. For a list of common errors with solutions, see Common Errors.
The following steps are required to make WMI function. These steps are divided between two machines. A single host computer that runs MySQL Notifier (Computer A), and multiple remote machines that are being monitored (Computer B).
Computer running MySQL Notifier (Computer A)
Allow for remote administration by either editing the Group Policy Editor, or using
NETSH:Using the Group Policy Editor:
Click , click , type
GPEDIT.MSC, and then click .Under the Local Computer Policy heading, double-click Computer Configuration.
Double-click Administrative Templates, then Network, Network Connections, and then Windows Firewall.
If the computer is in the domain, then double-click Domain Profile; otherwise, double-click Standard Profile.
Click Windows Firewall: Allow inbound remote administration exception.
On the Action menu either select , or double-click the selection from the previous step.
Check the radio button, and then click .
Using the
NETSHcommand:NoteThe "netsh firewall" command is deprecated as of Microsoft Server 2008 and Vista, and replaced with "netsh advfirewall firewall".
Open a command prompt window with Administrative rights (you can right-click the Command Prompt icon and click Run as Administrator).
Execute the following command:
NETSH advfirewall firewall set service RemoteAdmin enable
Open the DCOM port TCP 135:
Open a command prompt window with Administrative rights (you can right-click the Command Prompt icon and click Run as Administrator) .
Execute the following command:
NETSH advfirewall firewall add portopening protocol=tcp port=135 name=DCOM_TCP135
Add the client application which contains the sink for the callback (
MySqlNotifier.exe) to the Windows Firewall Exceptions List (use either the Windows Firewall configuration orNETSH):Using the Windows Firewall configuration:
In the Control Panel, double-click Windows Firewall.
In the Windows Firewall window's left panel, click Allow a program or feature through Windows Firewall.
In the Allowed Programs window, click .
If
MySqlNotifier.exeis in the Allowed programs and features list, make sure it is checked for the type of networks the computer connects to (Private, Public or both).If
MySqlNotifier.exeis not in the list, click .In the Add a Program window, select the
MySqlNotifier.exeif it exists in the Programs list, otherwise click Browse... and go to the directory whereMySqlNotifier.exewas installed to select it, then click .Make sure
MySqlNotifier.exeis checked for the type of networks the computer connects to (Private, Public or both).
Using the
NETSHcommand:Open a command prompt window with Administrative rights (you can right-click the Command Prompt icon and click ).
Execute the following command, where you change "
[YOUR_INSTALL_DIRECTORY]":NETSH advfirewall firewall add allowedprogram program=[YOUR_INSTALL_DIRECTORY]\MySqlNotifier.exe name=MySqlNotifier
If Computer B is either a member of
WORKGROUPor is in a different domain that is untrusted by Computer A, then the callback connection (Connection 2) is created as an Anonymous connection. To grant Anonymous connections DCOM Remote Access permissions:Click , click , type
DCOMCNFG, and then click .In the Component Services dialog box, expand Component Services, expand Computers, and then right-click My Computer and click .
In the My Computer Properties dialog box, click the COM Security tab.
Under Access Permissions, click .
In the Access Permission dialog box, select ANONYMOUS LOGON name in the Group or user names box. In the Allow column under Permissions for User, select Remote Access, and then click .
Monitored Remote Computer (Computer B)
If the user account that is logged into the computer running the MySQL Notifier (Computer A) is a local administrator on the remote computer (Computer B), such that the same account is an administrator on Computer B, you can skip to the "Allow for remote administration" step.
Setting DCOM security to allow a non-administrator user to access a computer remotely:
Grant "DCOM remote launch" and activation permissions for a user or group:
Click , click , type
DCOMCNFG, and then click .In the Component Services dialog box, expand Component Services, expand Computers, and then right-click My Computer and click .
In the My Computer Properties dialog box, click the COM Security tab.
Under Access Permissions, click .
In the Launch Permission dialog box, follow these steps if your name or your group does not appear in the Groups or user names list:
In the Launch Permission dialog box, click .
In the Select Users, Computers, or Groups dialog box, add your name and the group in the "Enter the object names to select" box, and then click .
In the Launch Permission dialog box, select your user and group in the Group or user names box. In the Allow column under Permissions for User, select Remote Launch, select Remote Activation, and then click .
Grant DCOM remote access permissions:
Click , click , type
DCOMCNFG, and then click .In the Component Services dialog box, expand Component Services, expand Computers, and then right-click My Computer and click .
In the My Computer Properties dialog box, click the COM Security tab.
Under Access Permissions, click .
In the Access Permission dialog box, select ANONYMOUS LOGON name in the Group or user names box. In the Allow column under Permissions for User, select Remote Access, and then click .
Allowing non-administrator users access to a specific WMI namespace:
In the Control Panel, double-click Administrative Tools.
In the Administrative Tools window, double-click Computer Management.
In the Computer Management window, expand the Services and Applications tree and double-click the WMI Control.
Right-click the WMI Control icon and select Properties.
In the WMI Control Properties window, click the Security tab.
In the Security tab, select the namespace and click Security.
Locate the appropriate account and check Remote Enable in the Permissions list.
Allow for remote administration by either editing the Group Policy Editor or using
NETSH:Using the Group Policy Editor:
Click , click , type
GPEDIT.MSC, and then click .Under the Local Computer Policy heading, double-click Computer Configuration.
Double-click Administrative Templates, then Network, Network Connections, and then Windows Firewall.
If the computer is in the domain, then double-click Domain Profile; otherwise, double-click Standard Profile.
Click Windows Firewall: Allow inbound remote administration exception.
On the Action menu either select , or double-click the selection from the previous step.
Check the radio button, and then click .
Using the
NETSHcommand:Open a command prompt window with Administrative rights (you can right-click the Command Prompt icon and click Run as Administrator).
Execute the following command:
NETSH advfirewall firewall set service RemoteAdmin enable
Now, be sure the user you are logging in with uses the
Namevalue and not theFull Namevalue:In the Control Panel, double-click Administrative Tools.
In the Administrative Tools window, double-click Computer Management.
In the Computer Management window, expand the System Tools then Local Users and Groups.
Click the Users node, and on the right side panel locate your user and make sure it uses the Name value to connect, and not the Full Name value.
If the remote computer is running on
Windows XP Professional, make sure that remote logins are not being forcefully changed to the guest account user (also known asForceGuest), which is enabled by default on computers that are not attached to a domain.Click Start, click Run, type
SECPOL.MSC, and then click .Under the Local Policies node, double-click Security Options.
Select Network Access: Sharing and security model for local accounts and save.
Common Errors
0x80070005DCOM Security was not configured properly (see Computer B, the
Setting DCOM security...step).The remote computer (Computer B) is a member of WORKGROUP or is in a domain that is untrusted by the client computer (Computer A) (see Computer A, the
Grant Anonymous connections DCOM Remote Access permissionsstep).
0x8007000EThe remote computer (Computer B) is a member of WORKGROUP or is in a domain that is untrusted by the client computer (Computer A) (see Computer A, the
Grant Anonymous connections DCOM Remote Access permissionsstep).
0x80041003Access to the remote WMI namespace was not configured properly (see Computer B, the
Allowing non-administrator users access to a specific WMI namespacestep).
0x800706BAThe DCOM port is not open on the client computers (Computer A) firewall. See the
Open the DCOM port TCP 135step for Computer A.The remote computer (Computer B) is inaccessible because its network location is set to Public. Make sure you can access it through the Windows Explorer.
- 2.3.5.1 Extracting the Install Archive
- 2.3.5.2 Creating an Option File
- 2.3.5.3 Selecting a MySQL Server Type
- 2.3.5.4 Initializing the Data Directory
- 2.3.5.5 Starting the Server for the First Time
- 2.3.5.6 Starting MySQL from the Windows Command Line
- 2.3.5.7 Customizing the PATH for MySQL Tools
- 2.3.5.8 Starting MySQL as a Windows Service
- 2.3.5.9 Testing The MySQL Installation
Users who are installing from the noinstall
package can use the instructions in this section to manually
install MySQL. The process for installing MySQL from a Zip archive
is as follows:
Extract the main archive to the desired install directory
Optional: also extract the debug-test archive if you plan to execute the MySQL benchmark and test suite
Create an option file
Choose a MySQL server type
Initialize MySQL
Start the MySQL server
Secure the default user accounts
This process is described in the sections that follow.
To install MySQL manually, do the following:
If you are upgrading from a previous version please refer to Section 2.3.8, “Upgrading MySQL on Windows”, before beginning the upgrade process.
Make sure that you are logged in as a user with administrator privileges.
Choose an installation location. Traditionally, the MySQL server is installed in
C:\mysql. The MySQL Installation Wizard installs MySQL underC:\Program Files\MySQL. If you do not install MySQL atC:\mysql, you must specify the path to the install directory during startup or in an option file. See Section 2.3.5.2, “Creating an Option File”.NoteThe MySQL Installer installs MySQL under
C:\Program Files\MySQL.Extract the install archive to the chosen installation location using your preferred Zip archive tool. Some tools may extract the archive to a folder within your chosen installation location. If this occurs, you can move the contents of the subfolder into the chosen installation location.
If you need to specify startup options when you run the server, you can indicate them on the command line or place them in an option file. For options that are used every time the server starts, you may find it most convenient to use an option file to specify your MySQL configuration. This is particularly true under the following circumstances:
The installation or data directory locations are different from the default locations (
C:\Program Files\MySQL\MySQL Server 5.7andC:\Program Files\MySQL\MySQL Server 5.7\data).You need to tune the server settings, such as memory, cache, or InnoDB configuration information.
When the MySQL server starts on Windows, it looks for option
files in several locations, such as the Windows directory,
C:\, and the MySQL installation directory
(for the full list of locations, see
Section 4.2.6, “Using Option Files”). The Windows directory typically
is named something like C:\WINDOWS. You can
determine its exact location from the value of the
WINDIR environment variable using the
following command:
C:\> echo %WINDIR%
MySQL looks for options in each location first in the
my.ini file, and then in the
my.cnf file. However, to avoid confusion,
it is best if you use only one file. If your PC uses a boot
loader where C: is not the boot drive, your
only option is to use the my.ini file.
Whichever option file you use, it must be a plain text file.
When using the MySQL Installer to install MySQL Server, it will create
the my.ini at the default location, and
the user executing MySQL Installer is granted full permissions to this
new my.ini file.
In other words, be sure that the MySQL Server user has
permission to read the my.ini file.
You can also make use of the example option files included with your MySQL distribution; see Section 5.1.2, “Server Configuration Defaults”.
An option file can be created and modified with any text editor,
such as Notepad. For example, if MySQL is installed in
E:\mysql and the data directory is in
E:\mydata\data, you can create an option
file containing a [mysqld] section to specify
values for the basedir and
datadir options:
[mysqld] # set basedir to your installation path basedir=E:/mysql # set datadir to the location of your data directory datadir=E:/mydata/data
Microsoft Windows path names are specified in option files using (forward) slashes rather than backslashes. If you do use backslashes, double them:
[mysqld] # set basedir to your installation path basedir=E:\\mysql # set datadir to the location of your data directory datadir=E:\\mydata\\data
The rules for use of backslash in option file values are given in Section 4.2.6, “Using Option Files”.
As of MySQL 5.7.6, the Zip Archive no longer includes a
data directory. To initialize a MySQL
installation by creating the data directory and populating the
tables in the mysql system database, initialize MySQL using
either --initialize or
--initialize-insecure. For
additional information, see
Section 2.10.1.1, “Initializing the Data Directory Manually Using mysqld”.
If you would like to use a data directory in a different
location, you should copy the entire contents of the
data directory to the new location. For
example, if you want to use E:\mydata as
the data directory instead, you must do two things:
Move the entire
datadirectory and all of its contents from the default location (for exampleC:\Program Files\MySQL\MySQL Server 5.7\data) toE:\mydata.Use a
--datadiroption to specify the new data directory location each time you start the server.
The following table shows the available servers for Windows in MySQL 5.7.
| Binary | Description |
|---|---|
| mysqld | Optimized binary with named-pipe support |
| mysqld-debug | Like mysqld, but compiled with full debugging and automatic memory allocation checking |
All of the preceding binaries are optimized for modern Intel processors, but should work on any Intel i386-class or higher processor.
Each of the servers in a distribution support the same set of
storage engines. The SHOW ENGINES
statement displays which engines a given server supports.
All Windows MySQL 5.7 servers have support for symbolic linking of database directories.
MySQL supports TCP/IP on all Windows platforms. MySQL servers on
Windows also support named pipes, if you start the server with
the --enable-named-pipe option.
It is necessary to use this option explicitly because some users
have experienced problems with shutting down the MySQL server
when named pipes were used. The default is to use TCP/IP
regardless of platform because named pipes are slower than
TCP/IP in many Windows configurations.
If you installed MySQL using the Noinstall
package, you may need to initialize the data directory:
Windows distributions prior to MySQL 5.7.7 include a data directory with a set of preinitialized accounts in the
mysqldatabase.As of 5.7.7, Windows installation operations performed using the
Noinstallpackage do not include a data directory. To initialize the data directory, use the instructions at Section 2.10.1.1, “Initializing the Data Directory Manually Using mysqld”.
This section gives a general overview of starting the MySQL server. The following sections provide more specific information for starting the MySQL server from the command line or as a Windows service.
The information here applies primarily if you installed MySQL
using the Noinstall version, or if you wish
to configure and test MySQL manually rather than with the GUI
tools.
The MySQL server will automatically start after using the MySQL Installer, and the MySQL Notifier GUI can be used to start/stop/restart at any time.
The examples in these sections assume that MySQL is installed
under the default location of C:\Program
Files\MySQL\MySQL Server 5.7. Adjust the
path names shown in the examples if you have MySQL installed in
a different location.
Clients have two options. They can use TCP/IP, or they can use a named pipe if the server supports named-pipe connections.
MySQL for Windows also supports shared-memory connections if the
server is started with the
--shared-memory option. Clients
can connect through shared memory by using the
--protocol=MEMORY option.
For information about which server binary to run, see Section 2.3.5.3, “Selecting a MySQL Server Type”.
Testing is best done from a command prompt in a console window (or “DOS window”). In this way you can have the server display status messages in the window where they are easy to see. If something is wrong with your configuration, these messages make it easier for you to identify and fix any problems.
The database must be initialized before MySQL can be started. For additional information about the initialization process, see Section 2.10.1.1, “Initializing the Data Directory Manually Using mysqld”.
To start the server, enter this command:
C:\> "C:\Program Files\MySQL\MySQL Server 5.7\bin\mysqld" --console
For a server that includes InnoDB support,
you should see the messages similar to those following as it
starts (the path names and sizes may differ):
InnoDB: The first specified datafile c:\ibdata\ibdata1 did not exist: InnoDB: a new database to be created! InnoDB: Setting file c:\ibdata\ibdata1 size to 209715200 InnoDB: Database physically writes the file full: wait... InnoDB: Log file c:\iblogs\ib_logfile0 did not exist: new to be created InnoDB: Setting log file c:\iblogs\ib_logfile0 size to 31457280 InnoDB: Log file c:\iblogs\ib_logfile1 did not exist: new to be created InnoDB: Setting log file c:\iblogs\ib_logfile1 size to 31457280 InnoDB: Log file c:\iblogs\ib_logfile2 did not exist: new to be created InnoDB: Setting log file c:\iblogs\ib_logfile2 size to 31457280 InnoDB: Doublewrite buffer not found: creating new InnoDB: Doublewrite buffer created InnoDB: creating foreign key constraint system tables InnoDB: foreign key constraint system tables created 011024 10:58:25 InnoDB: Started
When the server finishes its startup sequence, you should see something like this, which indicates that the server is ready to service client connections:
mysqld: ready for connections Version: '5.7.13' socket: '' port: 3306
The server continues to write to the console any further diagnostic output it produces. You can open a new console window in which to run client programs.
If you omit the --console option,
the server writes diagnostic output to the error log in the data
directory (C:\Program Files\MySQL\MySQL Server
5.7\data by default). The error log is
the file with the .err extension, and may
be set using the --log-error
option.
The initial root account in the MySQL grant
tables has no password. After starting the server, you should
set up a password for it using the instructions in
Section 2.10.4, “Securing the Initial MySQL Accounts”.
The MySQL server can be started manually from the command line. This can be done on any version of Windows.
The MySQL Notifier GUI can also be used to start/stop/restart the MySQL server.
To start the mysqld server from the command line, you should start a console window (or “DOS window”) and enter this command:
C:\> "C:\Program Files\MySQL\MySQL Server 5.7\bin\mysqld"
The path to mysqld may vary depending on the install location of MySQL on your system.
You can stop the MySQL server by executing this command:
C:\> "C:\Program Files\MySQL\MySQL Server 5.7\bin\mysqladmin" -u root shutdown
If the MySQL root user account has a
password, you need to invoke mysqladmin
with the -p option and supply the password
when prompted.
This command invokes the MySQL administrative utility
mysqladmin to connect to the server and tell
it to shut down. The command connects as the MySQL
root user, which is the default
administrative account in the MySQL grant system.
Users in the MySQL grant system are wholly independent from any login users under Microsoft Windows.
If mysqld doesn't start, check the error log
to see whether the server wrote any messages there to indicate
the cause of the problem. By default, the error log is located
in the C:\Program Files\MySQL\MySQL Server
5.7\data directory. It is the file with
a suffix of .err, or may be specified by
passing in the --log-error
option. Alternatively, you can try to start the server with the
--console option; in this case,
the server may display some useful information on the screen
that will help solve the problem.
The last option is to start mysqld with the
--standalone and
--debug options. In this case,
mysqld writes a log file
C:\mysqld.trace that should contain the
reason why mysqld doesn't start. See
Section 25.5.3, “The DBUG Package”.
Use mysqld --verbose --help to display all the options that mysqld supports.
You must exercise great care when editing your system
PATH by hand; accidental deletion or
modification of any portion of the existing
PATH value can leave you with a
malfunctioning or even unusable system.
To make it easier to invoke MySQL programs, you can add the path
name of the MySQL bin directory to your
Windows system PATH environment variable:
On the Windows desktop, right-click the My Computer icon, and select .
Next select the tab from the menu that appears, and click the button.
Under System Variables, select , and then click the button. The dialogue should appear.
Place your cursor at the end of the text appearing in the space marked Variable Value. (Use the End key to ensure that your cursor is positioned at the very end of the text in this space.) Then enter the complete path name of your MySQL
bindirectory (for example,C:\Program Files\MySQL\MySQL Server 5.7\bin)NoteThere must be a semicolon separating this path from any values present in this field.
Dismiss this dialogue, and each dialogue in turn, by clicking until all of the dialogues that were opened have been dismissed. The new
PATHvalue should now be available to any new command shell you open, allowing you to invoke any MySQL executable program by typing its name at the DOS prompt from any directory on the system, without having to supply the path. This includes the servers, the mysql client, and all MySQL command-line utilities such as mysqladmin and mysqldump.
You should not add the MySQL bin directory
to your Windows PATH if you are running
multiple MySQL servers on the same machine.
On Windows, the recommended way to run MySQL is to install it as a Windows service, so that MySQL starts and stops automatically when Windows starts and stops. A MySQL server installed as a service can also be controlled from the command line using NET commands, or with the graphical Services utility. Generally, to install MySQL as a Windows service you should be logged in using an account that has administrator rights.
The MySQL Notifier GUI can also be used to monitor the status of the MySQL service.
The Services utility (the Windows Service Control Manager) can be found in the Windows Control Panel (under on Windows 2000, XP, Vista, and Server 2003). To avoid conflicts, it is advisable to close the Services utility while performing server installation or removal operations from the command line.
Installing the service
Before installing MySQL as a Windows service, you should first stop the current server if it is running by using the following command:
C:\>"C:\Program Files\MySQL\MySQL Server 5.7\bin\mysqladmin"-u root shutdown
If the MySQL root user account has a
password, you need to invoke mysqladmin
with the -p option and supply the password
when prompted.
This command invokes the MySQL administrative utility
mysqladmin to connect to the server and tell
it to shut down. The command connects as the MySQL
root user, which is the default
administrative account in the MySQL grant system.
Users in the MySQL grant system are wholly independent from any login users under Windows.
Install the server as a service using this command:
C:\> "C:\Program Files\MySQL\MySQL Server 5.7\bin\mysqld" --install
The service-installation command does not start the server. Instructions for that are given later in this section.
To make it easier to invoke MySQL programs, you can add the path
name of the MySQL bin directory to your
Windows system PATH environment variable:
On the Windows desktop, right-click the My Computer icon, and select .
Next select the tab from the menu that appears, and click the button.
Under System Variables, select , and then click the button. The dialogue should appear.
Place your cursor at the end of the text appearing in the space marked Variable Value. (Use the End key to ensure that your cursor is positioned at the very end of the text in this space.) Then enter the complete path name of your MySQL
bindirectory (for example,C:\Program Files\MySQL\MySQL Server 5.7\bin), and there should be a semicolon separating this path from any values present in this field. Dismiss this dialogue, and each dialogue in turn, by clicking until all of the dialogues that were opened have been dismissed. You should now be able to invoke any MySQL executable program by typing its name at the DOS prompt from any directory on the system, without having to supply the path. This includes the servers, the mysql client, and all MySQL command-line utilities such as mysqladmin and mysqldump.You should not add the MySQL
bindirectory to your WindowsPATHif you are running multiple MySQL servers on the same machine.
You must exercise great care when editing your system
PATH by hand; accidental deletion or
modification of any portion of the existing
PATH value can leave you with a
malfunctioning or even unusable system.
The following additional arguments can be used when installing the service:
You can specify a service name immediately following the
--installoption. The default service name isMySQL.If a service name is given, it can be followed by a single option. By convention, this should be
--defaults-file=to specify the name of an option file from which the server should read options when it starts.file_nameThe use of a single option other than
--defaults-fileis possible but discouraged.--defaults-fileis more flexible because it enables you to specify multiple startup options for the server by placing them in the named option file.You can also specify a
--local-serviceoption following the service name. This causes the server to run using theLocalServiceWindows account that has limited system privileges. This account is available only for Windows XP or newer. If both--defaults-fileand--local-serviceare given following the service name, they can be in any order.
For a MySQL server that is installed as a Windows service, the following rules determine the service name and option files that the server uses:
If the service-installation command specifies no service name or the default service name (
MySQL) following the--installoption, the server uses the service name ofMySQLand reads options from the[mysqld]group in the standard option files.If the service-installation command specifies a service name other than
MySQLfollowing the--installoption, the server uses that service name. It reads options from the[mysqld]group and the group that has the same name as the service in the standard option files. This enables you to use the[mysqld]group for options that should be used by all MySQL services, and an option group with the service name for use by the server installed with that service name.If the service-installation command specifies a
--defaults-fileoption after the service name, the server reads options the same way as described in the previous item, except that it reads options only from the named file and ignores the standard option files.
As a more complex example, consider the following command:
C:\>"C:\Program Files\MySQL\MySQL Server 5.7\bin\mysqld"--install MySQL --defaults-file=C:\my-opts.cnf
Here, the default service name (MySQL) is
given after the --install option. If no
--defaults-file option had been
given, this command would have the effect of causing the server
to read the [mysqld] group from the standard
option files. However, because the
--defaults-file option is
present, the server reads options from the
[mysqld] option group, and only from the
named file.
On Windows, if the server is started with the
--defaults-file and
--install options,
--install must be first.
Otherwise, mysqld.exe will attempt to start
the MySQL server.
You can also specify options as Start parameters in the Windows Services utility before you start the MySQL service.
Starting the service
Once a MySQL server has been installed as a service, Windows starts the service automatically whenever Windows starts. The service also can be started immediately from the Services utility, or by using a NET START MySQL command. The NET command is not case sensitive.
When run as a service, mysqld has no access
to a console window, so no messages can be seen there. If
mysqld does not start, check the error log to
see whether the server wrote any messages there to indicate the
cause of the problem. The error log is located in the MySQL data
directory (for example, C:\Program Files\MySQL\MySQL
Server 5.7\data). It is the file with a
suffix of .err.
When a MySQL server has been installed as a service, and the
service is running, Windows stops the service automatically when
Windows shuts down. The server also can be stopped manually by
using the Services utility, the NET
STOP MySQL command, or the mysqladmin
shutdown command.
You also have the choice of installing the server as a manual
service if you do not wish for the service to be started
automatically during the boot process. To do this, use the
--install-manual option rather than the
--install option:
C:\> "C:\Program Files\MySQL\MySQL Server 5.7\bin\mysqld" --install-manual
Removing the service
To remove a server that is installed as a service, first stop it
if it is running by executing NET STOP MySQL.
Then use the --remove option to
remove it:
C:\> "C:\Program Files\MySQL\MySQL Server 5.7\bin\mysqld" --remove
If mysqld is not running as a service, you can start it from the command line. For instructions, see Section 2.3.5.6, “Starting MySQL from the Windows Command Line”.
If you encounter difficulties during installation. see Section 2.3.6, “Troubleshooting a Microsoft Windows MySQL Server Installation”.
You can test whether the MySQL server is working by executing any of the following commands:
C:\>"C:\Program Files\MySQL\MySQL Server 5.7\bin\mysqlshow"C:\>"C:\Program Files\MySQL\MySQL Server 5.7\bin\mysqlshow" -u root mysqlC:\>"C:\Program Files\MySQL\MySQL Server 5.7\bin\mysqladmin" version status procC:\>"C:\Program Files\MySQL\MySQL Server 5.7\bin\mysql" test
If mysqld is slow to respond to TCP/IP
connections from client programs, there is probably a problem
with your DNS. In this case, start mysqld
with the --skip-name-resolve
option and use only localhost and IP
addresses in the Host column of the MySQL
grant tables. (Be sure that an account exists that specifies an
IP address or you may not be able to connect.)
You can force a MySQL client to use a named-pipe connection
rather than TCP/IP by specifying the
--pipe or
--protocol=PIPE option, or by
specifying . (period) as the host name. Use
the --socket option to specify
the name of the pipe if you do not want to use the default pipe
name.
If you have set a password for the root
account, deleted the anonymous account, or created a new user
account, then to connect to the MySQL server you must use the
appropriate -u and -p options
with the commands shown previously. See
Section 4.2.2, “Connecting to the MySQL Server”.
For more information about mysqlshow, see Section 4.5.7, “mysqlshow — Display Database, Table, and Column Information”.
When installing and running MySQL for the first time, you may encounter certain errors that prevent the MySQL server from starting. This section helps you diagnose and correct some of these errors.
Your first resource when troubleshooting server issues is the
error log. The MySQL server
uses the error log to record information relevant to the error
that prevents the server from starting. The error log is located
in the data directory
specified in your my.ini file. The default
data directory location is C:\Program Files\MySQL\MySQL
Server 5.7\data, or
C:\ProgramData\Mysql on Windows 7 and Windows
Server 2008. The C:\ProgramData directory is
hidden by default. You need to change your folder options to see
the directory and contents. For more information on the error log
and understanding the content, see Section 5.2.2, “The Error Log”.
For information regarding possible errors, also consult the console messages displayed when the MySQL service is starting. Use the NET START MySQL command from the command line after installing mysqld as a service to see any error messages regarding the starting of the MySQL server as a service. See Section 2.3.5.8, “Starting MySQL as a Windows Service”.
The following examples show other common error messages you might encounter when installing MySQL and starting the server for the first time:
If the MySQL server cannot find the
mysqlprivileges database or other critical files, it displays these messages:System error 1067 has occurred. Fatal error: Can't open and lock privilege tables: Table 'mysql.user' doesn't exist
These messages often occur when the MySQL base or data directories are installed in different locations than the default locations (
C:\Program Files\MySQL\MySQL Server 5.7andC:\Program Files\MySQL\MySQL Server 5.7\data, respectively).This situation can occur when MySQL is upgraded and installed to a new location, but the configuration file is not updated to reflect the new location. In addition, old and new configuration files might conflict. Be sure to delete or rename any old configuration files when upgrading MySQL.
If you have installed MySQL to a directory other than
C:\Program Files\MySQL\MySQL Server 5.7, ensure that the MySQL server is aware of this through the use of a configuration (my.ini) file. Put themy.inifile in your Windows directory, typicallyC:\WINDOWS. To determine its exact location from the value of theWINDIRenvironment variable, issue the following command from the command prompt:C:\>
echo %WINDIR%You can create or modify an option file with any text editor, such as Notepad. For example, if MySQL is installed in
E:\mysqland the data directory isD:\MySQLdata, you can create the option file and set up a[mysqld]section to specify values for thebasediranddatadiroptions:[mysqld] # set basedir to your installation path basedir=E:/mysql # set datadir to the location of your data directory datadir=D:/MySQLdata
Microsoft Windows path names are specified in option files using (forward) slashes rather than backslashes. If you do use backslashes, double them:
[mysqld] # set basedir to your installation path basedir=C:\\Program Files\\MySQL\\MySQL Server 5.7 # set datadir to the location of your data directory datadir=D:\\MySQLdata
The rules for use of backslash in option file values are given in Section 4.2.6, “Using Option Files”.
If you change the
datadirvalue in your MySQL configuration file, you must move the contents of the existing MySQL data directory before restarting the MySQL server.If you reinstall or upgrade MySQL without first stopping and removing the existing MySQL service and install MySQL using the MySQL Installer, you might see this error:
Error: Cannot create Windows service for MySql. Error: 0
This occurs when the Configuration Wizard tries to install the service and finds an existing service with the same name.
One solution to this problem is to choose a service name other than
mysqlwhen using the configuration wizard. This enables the new service to be installed correctly, but leaves the outdated service in place. Although this is harmless, it is best to remove old services that are no longer in use.To permanently remove the old
mysqlservice, execute the following command as a user with administrative privileges, on the command line:C:\>
sc delete mysql[SC] DeleteService SUCCESSIf the
scutility is not available for your version of Windows, download thedelsrvutility from http://www.microsoft.com/windows2000/techinfo/reskit/tools/existing/delsrv-o.asp and use thedelsrv mysqlsyntax.
GUI tools exist that perform most of the tasks described in this section, including:
MySQL Installer: Used to install and upgrade MySQL products.
MySQL Workbench: Manages the MySQL server and edits SQL statements.
MySQL Notifier: Starts, stops, or restarts the MySQL server, and monitors its status.
MySQL for Excel: Edits MySQL data with Microsoft Excel.
If necessary, initialize the data directory and create the MySQL
grant tables. Windows distributions prior to MySQL 5.7.7 include a
data directory with a set of preinitialized accounts in the
mysql database. As of 5.7.7, Windows
installation operations performed by MySQL Installer initialize the data
directory automatically. For installation from a Zip package, you
can initialize the data directory as described at
Section 2.10.1.1, “Initializing the Data Directory Manually Using mysqld”.
Regarding passwords, if you installed MySQL using the MySQL Installer, you
may have already assigned a passwords to the initial
root account. (See
Section 2.3.3, “Installing MySQL on Microsoft Windows Using MySQL Installer”.) Otherwise, use the
password-assignment procedure given in
Section 2.10.4, “Securing the Initial MySQL Accounts”.
Before assigning passwords, you might want to try running some client programs to make sure that you can connect to the server and that it is operating properly. Make sure that the server is running (see Section 2.3.5.5, “Starting the Server for the First Time”). You can also set up a MySQL service that runs automatically when Windows starts (see Section 2.3.5.8, “Starting MySQL as a Windows Service”).
These instructions assume that your current location is the MySQL
installation directory and that it has a bin
subdirectory containing the MySQL programs used here. If that is
not true, adjust the command path names accordingly.
If you installed MySQL using MySQL Installer (see
Section 2.3.3, “Installing MySQL on Microsoft Windows Using MySQL Installer”), the default installation
directory is C:\Program Files\MySQL\MySQL Server
5.7:
C:\> cd "C:\Program Files\MySQL\MySQL Server 5.7"
A common installation location for installation from a Zip package
is C:\mysql:
C:\> cd C:\mysql
Alternatively, add the bin directory to your
PATH environment variable setting. That enables
your command interpreter to find MySQL programs properly, so that
you can run a program by typing only its name, not its path name.
See Section 2.3.5.7, “Customizing the PATH for MySQL Tools”.
With the server running, issue the following commands to verify that you can retrieve information from the server. The output should be similar to that shown here.
Use mysqlshow to see what databases exist:
C:\> bin\mysqlshow
+--------------------+
| Databases |
+--------------------+
| information_schema |
| mysql |
| performance_schema |
| sys |
+--------------------+
The list of installed databases may vary, but will always include
the minimum of mysql and
information_schema. Before MySQL 5.7.7, a
test database may also be created
automatically.
The preceding command (and commands for other MySQL programs such
as mysql) may not work if the correct MySQL
account does not exist. For example, the program may fail with an
error, or you may not be able to view all databases. If you
installed MySQL using MySQL Installer, the root user will
have been created automatically with the password you supplied. In
this case, you should use the -u root and
-p options. (You must use those options if you
have already secured the initial MySQL accounts.) With
-p, the client program prompts for the
root password. For example:
C:\>bin\mysqlshow -u root -pEnter password:(enter root password here)+--------------------+ | Databases | +--------------------+ | information_schema | | mysql | | performance_schema | | sys | +--------------------+
If you specify a database name, mysqlshow displays a list of the tables within the database:
C:\> bin\mysqlshow mysql
Database: mysql
+---------------------------+
| Tables |
+---------------------------+
| columns_priv |
| db |
| engine_cost |
| event |
| func |
| general_log |
| gtid_executed |
| help_category |
| help_keyword |
| help_relation |
| help_topic |
| innodb_index_stats |
| innodb_table_stats |
| ndb_binlog_index |
| plugin |
| proc |
| procs_priv |
| proxies_priv |
| server_cost |
| servers |
| slave_master_info |
| slave_relay_log_info |
| slave_worker_info |
| slow_log |
| tables_priv |
| time_zone |
| time_zone_leap_second |
| time_zone_name |
| time_zone_transition |
| time_zone_transition_type |
| user |
+---------------------------+
Use the mysql program to select information
from a table in the mysql database:
C:\> bin\mysql -e "SELECT User, Host, plugin FROM mysql.user" mysql
+------+-----------+-----------------------+
| User | Host | plugin |
+------+-----------+-----------------------+
| root | localhost | mysql_native_password |
+------+-----------+-----------------------+
For more information about mysql and mysqlshow, see Section 4.5.1, “mysql — The MySQL Command-Line Tool”, and Section 4.5.7, “mysqlshow — Display Database, Table, and Column Information”.
To upgrade MySQL on Windows, follow these steps:
Review Section 2.11.1, “Upgrading MySQL”, for additional information on upgrading MySQL that is not specific to Windows.
Always back up your current MySQL installation before performing an upgrade. See Section 7.2, “Database Backup Methods”.
Download the latest Windows distribution of MySQL from http://dev.mysql.com/downloads/.
Before upgrading MySQL, stop the server. If the server is installed as a service, stop the service with the following command from the command prompt:
C:\>
NET STOP MySQLIf you are not running the MySQL server as a service, use mysqladmin to stop it. For example, before upgrading from MySQL 5.6 to 5.7, use mysqladmin from MySQL 5.6 as follows:
C:\>
"C:\Program Files\MySQL\MySQL Server 5.6\bin\mysqladmin" -u root shutdownNoteIf the MySQL
rootuser account has a password, invoke mysqladmin with the-poption and enter the password when prompted.Before upgrading to MySQL 5.7 from a version previous to 4.1.5, or from a version of MySQL installed from a Zip archive to a version of MySQL installed with the MySQL Installation Wizard, you must first manually remove the previous installation and MySQL service (if the server is installed as a service).
To remove the MySQL service, use the following command:
C:\>
C:\mysql\bin\mysqld --removeIf you do not remove the existing service, the MySQL Installation Wizard may fail to properly install the new MySQL service.
If you are using the MySQL Installer, start it as described in Section 2.3.3, “Installing MySQL on Microsoft Windows Using MySQL Installer”.
If you are upgrading MySQL from a Zip archive, extract the archive. You may either overwrite your existing MySQL installation (usually located at
C:\mysql), or install it into a different directory, such asC:\mysql5. Overwriting the existing installation is recommended. However, for upgrades (as opposed to installing for the first time), you must remove the data directory from your existing MySQL installation to avoid replacing your current data files. To do so, follow these steps:Unzip the Zip archive in some location other than your current MySQL installation
Remove the data directory
Rezip the Zip archive
Unzip the modified Zip archive on top of your existing installation
Alternatively:
Unzip the Zip archive in some location other than your current MySQL installation
Remove the data directory
Move the data directory from the current MySQL installation to the location of the just-removed data directory
Remove the current MySQL installation
Move the unzipped installation to the location of the just-removed installation
If you were running MySQL as a Windows service and you had to remove the service earlier in this procedure, reinstall the service. (See Section 2.3.5.8, “Starting MySQL as a Windows Service”.)
Restart the server. For example, use NET START MySQL if you run MySQL as a service, or invoke mysqld directly otherwise.
As Administrator, run mysql_upgrade to check your tables, attempt to repair them if necessary, and update your grant tables if they have changed so that you can take advantage of any new capabilities. See Section 4.4.7, “mysql_upgrade — Check and Upgrade MySQL Tables”.
If you encounter errors, see Section 2.3.6, “Troubleshooting a Microsoft Windows MySQL Server Installation”.
For a list of OS X versions that the MySQL server supports, see http://www.mysql.com/support/supportedplatforms/database.html.
MySQL for OS X is available in a number of different forms:
Native Package Installer, which uses the native OS X installer (DMG) to walk you through the installation of MySQL. For more information, see Section 2.4.2, “Installing MySQL on OS X Using Native Packages”. You can use the package installer with OS X. The user you use to perform the installation must have administrator privileges.
Compressed TAR archive, which uses a file packaged using the Unix tar and gzip commands. To use this method, you will need to open a Terminal window. You do not need administrator privileges using this method, as you can install the MySQL server anywhere using this method. For more information on using this method, you can use the generic instructions for using a tarball, Section 2.2, “Installing MySQL on Unix/Linux Using Generic Binaries”.
In addition to the core installation, the Package Installer also includes Section 2.4.3, “Installing a MySQL Launch Daemon” and Section 2.4.4, “Installing and Using the MySQL Preference Pane”, both of which simplify the management of your installation.
For additional information on using MySQL on OS X, see Section 2.4.1, “General Notes on Installing MySQL on OS X”.
You should keep the following issues and notes in mind:
As of MySQL server 5.7.8, the DMG bundles a launchd daemon instead of the deprecated startup item. Startup items do not function as of OS X 10.10 (Yosemite), so using launchd is preferred. The available MySQL preference pane under OS X System Preferences was also updated to use launchd.
You may need (or want) to create a specific
mysqluser to own the MySQL directory and data. You can do this through the Directory Utility, and themysqluser should already exist. For use in single user mode, an entry for_mysql(note the underscore prefix) should already exist within the system/etc/passwdfile.Because the MySQL package installer installs the MySQL contents into a version and platform specific directory, you can use this to upgrade and migrate your database between versions. You will need to either copy the
datadirectory from the old version to the new version, or alternatively specify an alternativedatadirvalue to set location of the data directory. By default, the MySQL directories are installed under/usr/local/.You might want to add aliases to your shell's resource file to make it easier to access commonly used programs such as mysql and mysqladmin from the command line. The syntax for bash is:
alias mysql=/usr/local/mysql/bin/mysql alias mysqladmin=/usr/local/mysql/bin/mysqladmin
For tcsh, use:
alias mysql /usr/local/mysql/bin/mysql alias mysqladmin /usr/local/mysql/bin/mysqladmin
Even better, add
/usr/local/mysql/binto yourPATHenvironment variable. You can do this by modifying the appropriate startup file for your shell. For more information, see Section 4.2.1, “Invoking MySQL Programs”.After you have copied over the MySQL database files from the previous installation and have successfully started the new server, you should consider removing the old installation files to save disk space. Additionally, you should also remove older versions of the Package Receipt directories located in
/Library/Receipts/mysql-.VERSION.pkgPrior to OS X 10.7, MySQL server was bundled with OS X Server.
The package is located inside a disk image
(.dmg) file that you first need to mount by
double-clicking its icon in the Finder. It should then mount the
image and display its contents.
Before proceeding with the installation, be sure to stop all running MySQL server instances by using either the MySQL Manager Application (on OS X Server), the preference pane, or mysqladmin shutdown on the command line.
When installing from the package version, you can also install the MySQL preference pane, which will enable you to control the startup and execution of your MySQL server from System Preferences. For more information, see Section 2.4.4, “Installing and Using the MySQL Preference Pane”.
When installing using the package installer, the files are
installed into a directory within /usr/local
matching the name of the installation version and platform. For
example, the installer file
mysql-5.7.13-
installs MySQL into
osx10.9-x86_64.dmg/usr/local/mysql-5.7.13-osx10.9-x86_64/
. The following table shows the layout of the
installation directory.
Table 2.5 MySQL Installation Layout on OS X
| Directory | Contents of Directory |
|---|---|
bin, scripts | mysqld server, client and utility programs |
data | Log files, databases |
docs | Helper documents, like the Release Notes and build information |
include | Include (header) files |
lib | Libraries |
man | Unix manual pages |
mysql-test | MySQL test suite |
share | Miscellaneous support files, including error messages, sample configuration files, SQL for database installation |
sql-bench | Benchmarks |
support-files | Scripts and sample configuration files |
/tmp/mysql.sock | Location of the MySQL Unix socket |
During the package installer process, a symbolic link from
/usr/local/mysql to the version/platform
specific directory created during installation will be created
automatically.
Download and open the MySQL package installer, which is provided on a disk image (
.dmg) that includes the main MySQL installation package file. Double-click the disk image to open it.Double-click the MySQL installer package. It will be named according to the version of MySQL you have downloaded. For example, if you have downloaded MySQL server 5.7.13, double-click
mysql-5.7.13-osx-.10.9-x86_64.pkgYou will be presented with the opening installer dialog. Click to begin installation.
If you have downloaded the community version of MySQL, you will be shown a copy of the relevant GNU General Public License. Click and then to continue.
From the Installation Type page you can either click to execute the installation wizard using all defaults, click to alter which components to install (MySQL server, Preference Pane, Launchd Support -- all enabled by default), or click to change the type of installation, if available.
Click to begin the installation process.
Once the installation has been completed successfully, you will be provided with your temporary root password. This cannot be recovered, so you must save this password. For example:
NoteAfter logging into MySQL using this temporary password, MySQL will expire this password and require you to create a new password.
Next is an Install Succeeded message with a short summary. Now, the wizard and begin using the MySQL server.
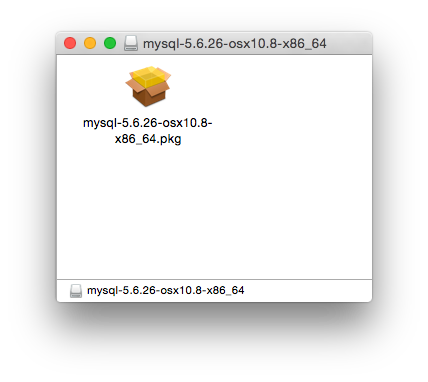
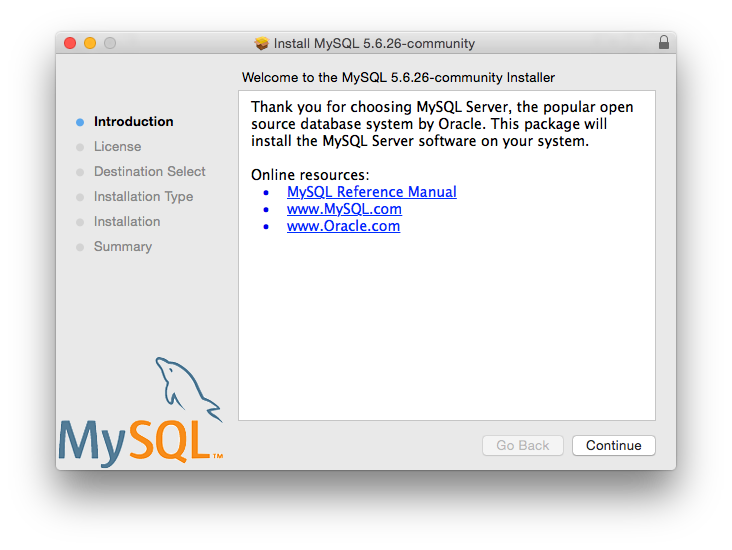
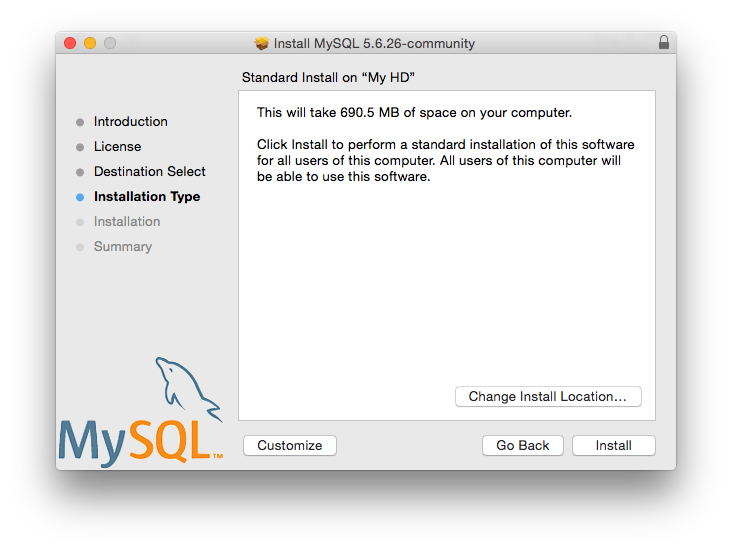
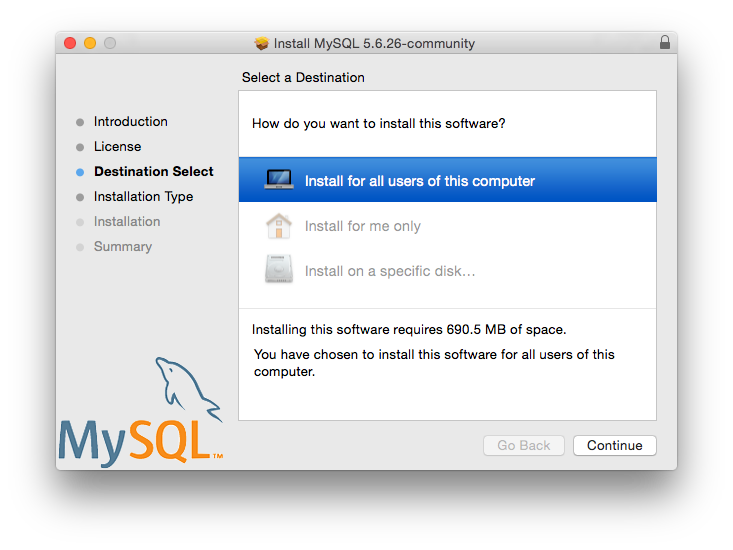
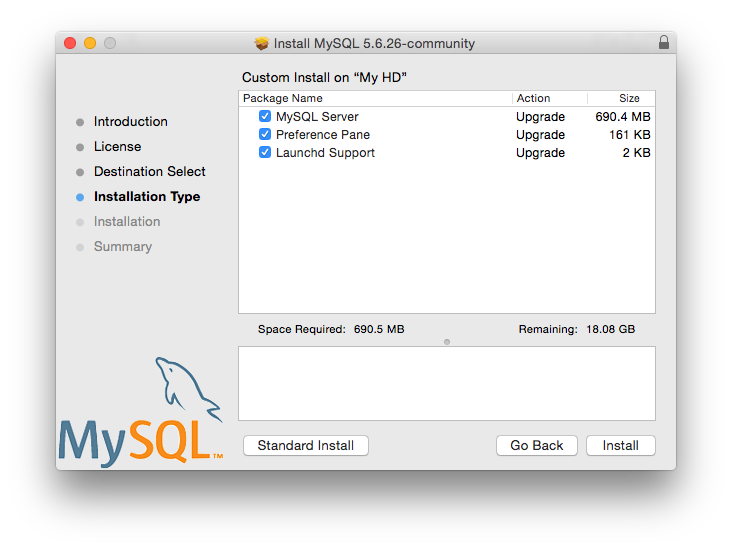
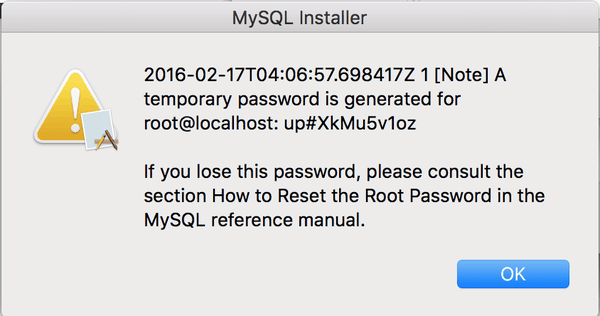
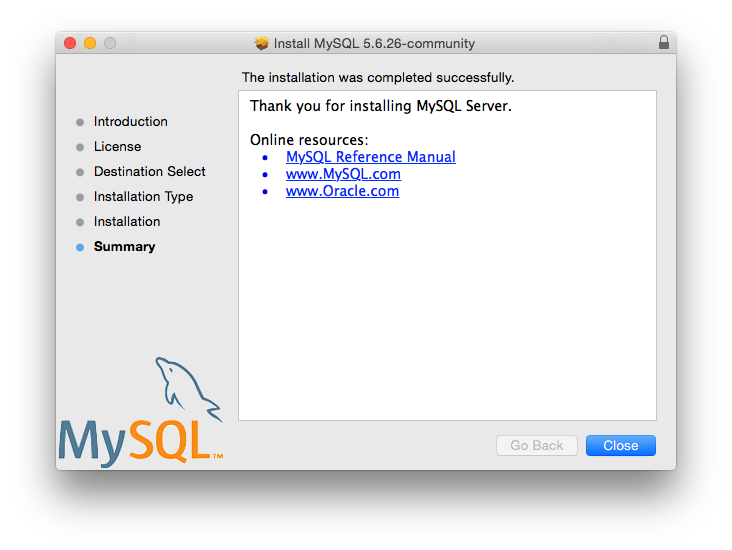
MySQL server is now installed, but it is not loaded (or started) by default. Use either launchctl from the command line, or start MySQL by clicking "Start" using the MySQL preference pane. For additional information, see Section 2.4.3, “Installing a MySQL Launch Daemon”, and Section 2.4.4, “Installing and Using the MySQL Preference Pane”. Use launchd to configure MySQL to automatically start at bootup.
OS X uses launch daemons to automatically start, stop, and manage processes and applications such as MySQL.
Before MySQL 5.7.8, the OS X builds installed startup items instead of launchd daemons. However, startup items do not function as of OS X 10.10 (Yosemite). The OS X builds now install launchd daemons.
By default, the installation package (DMG) on OS X installs a
launchd file named
/Library/LaunchDaemons/com.oracle.oss.mysql.mysqld.plist
that contains a plist definition similar to:
<?xml version="1.0" encoding="UTF-8"?>
<!DOCTYPE plist PUBLIC "-//Apple Computer//DTD PLIST 1.0//EN" "http://www.apple.com/DTDs/PropertyList-1.0.dtd">
<plist version="1.0">
<dict>
<key>Label</key> <string>com.oracle.oss.mysql.mysqld</string>
<key>ProcessType</key> <string>Interactive</string>
<key>Disabled</key> <false/>
<key>RunAtLoad</key> <true/>
<key>KeepAlive</key> <true/>
<key>SessionCreate</key> <true/>
<key>LaunchOnlyOnce</key> <false/>
<key>UserName</key> <string>_mysql</string>
<key>GroupName</key> <string>_mysql</string>
<key>ExitTimeOut</key> <integer>600</integer>
<key>Program</key> <string>/usr/local/mysql/bin/mysqld</string>
<key>ProgramArguments</key>
<array>
<string>/usr/local/mysql/bin/mysqld</string>
<string>--user=_mysql</string>
<string>--basedir=/usr/local/mysql</string>
<string>--datadir=/usr/local/mysql/data</string>
<string>--plugin-dir=/usr/local/mysql/lib/plugin</string>
<string>--log-error=/usr/local/mysql/data/mysqld.local.err</string>
<string>--pid-file=/usr/local/mysql/data/mysqld.local.pid</string>
</array>
<key>WorkingDirectory</key> <string>/usr/local/mysql</string>
</dict>
</plist>
Some users report that adding a plist DOCTYPE declaration causes the launchd operation to fail, despite it passing the lint check. We suspect it's a copy-n-paste error. The md5 checksum of a file containing the above snippet is 24710a27dc7a28fb7ee6d825129cd3cf.
To enable the launchd service, you can either:
Click from the MySQL preference pane.
Or, manually load the launchd file.
shell> cd /Library/LaunchDaemons shell> sudo launchctl load -F com.oracle.oss.mysql.mysqld.plistTo configure MySQL to automatically start at bootup, you can:
shell> sudo launchctl load -w com.oracle.oss.mysql.mysqld.plist
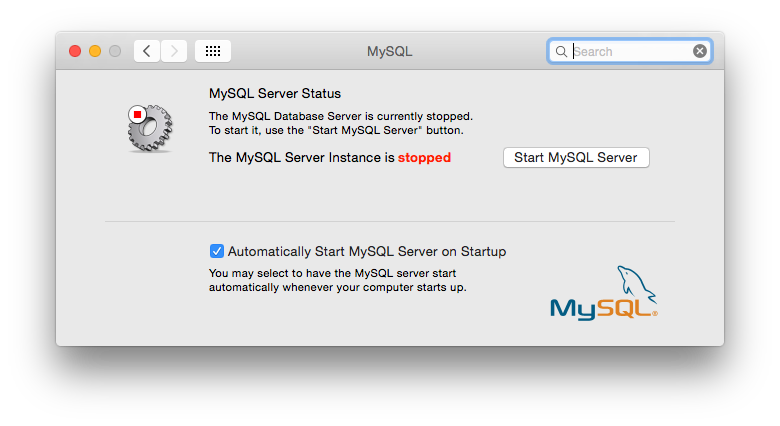
When upgrading MySQL server, the launchd installation process will remove the old startup items that were installed with MySQL server 5.7.7 and below.
The MySQL Installation Package includes a MySQL preference pane that enables you to start, stop, and control automated startup during boot of your MySQL installation.
This preference pane is installed by default, and is listed under your system's System Preferences window.
To install the MySQL Preference Pane:
Download and open the MySQL package installer, which is provided on a disk image (
.dmg) that includes the main MySQL installation package.NoteBefore MySQL 5.7.8, OS X packages included the deprecated startup items instead of launchd daemons, and the preference pane managed that intstead of launchd.
Go through the process of installing the MySQL server, as described in the documentation at Section 2.4.2, “Installing MySQL on OS X Using Native Packages”.
Click at the Installation Type step. The "Preference Pane" option is listed there and enabled by default.
Complete the MySQL server installation process.
The MySQL preference pane only starts and stops MySQL installation installed from the MySQL package installation that have been installed in the default location.
Once the MySQL preference pane has been installed, you can control your MySQL server instance using the preference pane. To use the preference pane, open the System Preferences... from the Apple menu. Select the MySQL preference pane by clicking the MySQL logo within the bottom section of the preference panes list.
The MySQL Preference Pane shows the current status of the MySQL server, showing stopped (in red) if the server is not running and running (in green) if the server has already been started. The preference pane also shows the current setting for whether the MySQL server has been set to start automatically.
To start the MySQL server using the preference pane:
Click . You may be prompted for the username and password of a user with administrator privileges to start the MySQL server.
To stop the MySQL server using the preference pane:
Click . You may be prompted for the username and password of a user with administrator privileges to stop the MySQL server.
To automatically start the MySQL server when the system boots:
Check the check box next to Automatically Start MySQL Server on Startup.
To disable automatic MySQL server startup when the system boots:
Uncheck the check box next to Automatically Start MySQL Server on Startup.
You can close the System Preferences... window once you have completed your settings.
- 2.5.1 Installing MySQL on Linux Using the MySQL Yum Repository
- 2.5.2 Replacing a Third-Party Distribution of MySQL Using the MySQL Yum Repository
- 2.5.3 Installing MySQL on Linux Using the MySQL APT Repository
- 2.5.4 Installing MySQL on Linux Using the MySQL SLES Repository
- 2.5.5 Installing MySQL on Linux Using RPM Packages from Oracle
- 2.5.6 Installing MySQL on Linux Using Debian Packages from Oracle
- 2.5.7 Installing MySQL on Linux from the Native Software Repositories
- 2.5.8 Installing MySQL on Linux with docker
- 2.5.9 Installing MySQL on Linux with juju
- 2.5.10 Managing MySQL Server with systemd
Linux supports a number of different solutions for installing MySQL. We recommend that you use one of the distributions from Oracle, for which several methods for installation are available:
Installing with Yum using the MySQL Yum repository. For details, see Section 2.5.1, “Installing MySQL on Linux Using the MySQL Yum Repository”.
Installing with APT using the MySQL APT Repository. For details, see Section 2.5.3, “Installing MySQL on Linux Using the MySQL APT Repository”.
Installing with Zypper using the MySQL SLES Repository. For details, see Section 2.5.4, “Installing MySQL on Linux Using the MySQL SLES Repository”.
Installing using a precompiled RPM package. For more information, see Section 2.5.5, “Installing MySQL on Linux Using RPM Packages from Oracle”.
Installing using a precompiled Debian package. For more information, see Section 2.5.6, “Installing MySQL on Linux Using Debian Packages from Oracle”.
Installing from a generic binary package in
.tar.gzformat. See Section 2.2, “Installing MySQL on Unix/Linux Using Generic Binaries” for more information.Installing using Oracle's Unbreakable Linux Network (ULN). For more information, see Section 2.6, “Installing MySQL Using Unbreakable Linux Network (ULN)”.
Extracting and compiling MySQL from a source distribution. For detailed instructions, see Section 2.9, “Installing MySQL from Source”.
As an alternative, you can use the package manager on your system to automatically download and install MySQL with packages from the native software repositories of your Linux distribution. These native packages are often several versions behind the currently available release. You will also normally be unable to install development milestone releases (DMRs), as these are not usually made available in the native repositories. For more information on using the native package installers, see Section 2.5.7, “Installing MySQL on Linux from the Native Software Repositories”.
For many Linux installations, you will want to set up MySQL to be
started automatically when your machine starts. Many of the native
package installations perform this operation for you, but for
source, binary and RPM solutions you may need to set this up
separately. The required script, mysql.server,
can be found in the support-files directory
under the MySQL installation directory or in a MySQL source tree.
You can install it as /etc/init.d/mysql for
automatic MySQL startup and shutdown. See
Section 4.3.3, “mysql.server — MySQL Server Startup Script”.
MySQL provides a Yum-style software repository for the following Linux platforms:
EL5, EL6, and EL7-based platforms (for example, the corresponding versions of Red Hat Enterprise Linux, Oracle Linux, and CentOS)
Fedora 22 and 23
Currently, the MySQL Yum repository for the above-mentioned platforms provides RPM packages for installing the MySQL server, client, MySQL Workbench, MySQL Utilities, Connector/ODBC, and Connector/Python (not all packages are available for all the platforms; see Installing Additional MySQL Products and Components with Yum for details).
Before You Start
As a popular, open-source software, MySQL, in its original or re-packaged form, is widely installed on many systems from various sources, including different software download sites, software repositories, and so on. The following instructions assume that MySQL is not already installed on your system using a third-party-distributed RPM package; if that is not the case, follow the instructions given in Section 2.11.1.2, “Upgrading MySQL with the MySQL Yum Repository” or Section 2.5.2, “Replacing a Third-Party Distribution of MySQL Using the MySQL Yum Repository”.
Steps for a Fresh Installation of MySQL
Follow the steps below to install the latest GA version of MySQL with the MySQL Yum repository:
-
Adding the MySQL Yum Repository
First, add the MySQL Yum repository to your system's repository list. This is a one-time operation, which can be performed by installing an RPM provided by MySQL. Follow these steps:
Go to the Download MySQL Yum Repository page (http://dev.mysql.com/downloads/repo/yum/) in the MySQL Developer Zone.
Select and download the release package for your platform.
Install the downloaded release package with the following command (except for EL5-based systems), replacing
platform-and-version-specific-package-namewith the name of the downloaded RPM package:shell>
sudo yum localinstallplatform-and-version-specific-package-name.rpmFor an EL6-based system, the command is in the form of:
shell>
sudo yum localinstall mysql57-community-release-el6-{version-number}.noarch.rpmFor an EL7-based system:
shell>
sudo yum localinstall mysql57-community-release-el7-{version-number}.noarch.rpmFor Fedora 22:
shell>
sudo dnf install mysql57-community-release-fc22-{version-number}.noarch.rpmFor Fedora 23:
shell>
sudo dnf install mysql57-community-release-fc23-{version-number}.noarch.rpmFor an EL5-based system, use the following command instead:
shell>
sudo rpm -Uvh mysql57-community-release-el5-{version-number}.noarch.rpmThe installation command adds the MySQL Yum repository to your system's repository list and downloads the GnuPG key to check the integrity of the software packages. See Section 2.1.3.2, “Signature Checking Using GnuPG” for details on GnuPG key checking.
You can check that the MySQL Yum repository has been successfully added by the following command (for dnf-enabled systems, replace yum in the command with dnf):
shell>
yum repolist enabled | grep "mysql.*-community.*"
NoteOnce the MySQL Yum repository is enabled on your system, any system-wide update by the yum update command (or dnf upgrade for dnf-enabled systems) will upgrade MySQL packages on your system and also replace any native third-party packages, if Yum finds replacements for them in the MySQL Yum repository; see Section 2.11.1.2, “Upgrading MySQL with the MySQL Yum Repository” and, for a discussion on some possible effects of that on your system, see Upgrading the Shared Client Libraries.
-
Selecting a Release Series
When using the MySQL Yum repository, the latest GA series (currently MySQL 5.7) is selected for installation by default. If this is what you want, you can skip to the next step, Installing MySQL.
Within the MySQL Yum repository, different release series of the MySQL Community Server are hosted in different subrepositories. The subrepository for the latest GA series (currently MySQL 5.7) is enabled by default, and the subrepositories for all other series (for example, the MySQL 5.6 series) are disabled by default. Use this command to see all the subrepositories in the MySQL Yum repository, and see which of them are enabled or disabled (for dnf-enabled systems, replace yum in the command with dnf):
shell>
yum repolist all | grep mysqlTo install the latest release from the latest GA series, no configuration is needed. To install the latest release from a specific series other than the latest GA series, disable the subrepository for the latest GA series and enable the subrepository for the specific series before running the installation command. If your platform supports yum-config-manager, you can do that by issuing these commands, which disable the subrepository for the 5.7 series and enable the one for the 5.6 series:
shell>
sudo yum-config-manager --disable mysql57-communityshell>sudo yum-config-manager --enable mysql56-communityFor dnf-enabled platforms:
shell>
sudo dnf config-manager --disable mysql57-communityshell>sudo dnf config-manager --enable mysql56-communityBesides using yum-config-manager or the dnf config-manager command, you can also select a release series by editing manually the
/etc/yum.repos.d/mysql-community.repofile. This is a typical entry for a release series' subrepository in the file:[mysql57-community] name=MySQL 5.7 Community Server baseurl=http://repo.mysql.com/yum/mysql-5.7-community/el/6/$basearch/ enabled=1 gpgcheck=1 gpgkey=file:///etc/pki/rpm-gpg/RPM-GPG-KEY-mysql
Find the entry for the subrepository you want to configure, and edit the
enabledoption. Specifyenabled=0to disable a subrepository, orenabled=1to enable a subrepository. For example, to install MySQL 5.6, make sure you haveenabled=0for the above subrepository entry for MySQL 5.7, and haveenabled=1for the entry for the 5.6 series:# Enable to use MySQL 5.6 [mysql56-community] name=MySQL 5.6 Community Server baseurl=http://repo.mysql.com/yum/mysql-5.6-community/el/6/$basearch/ enabled=1 gpgcheck=1 gpgkey=file:///etc/pki/rpm-gpg/RPM-GPG-KEY-mysql
You should only enable subrepository for one release series at any time. When subrepositories for more than one release series are enabled, the latest series will be used by Yum.
Verify that the correct subrepositories have been enabled and disabled by running the following command and checking its output (for dnf-enabled systems, replace yum in the command with dnf):
shell>
yum repolist enabled | grep mysql -
Installing MySQL
Install MySQL by the following command (for dnf-enabled systems, replace yum in the command with dnf):
shell>
sudo yum install mysql-community-serverThis installs the package for MySQL server (
mysql-community-server) and also packages for the components required to run the server, including packages for the client (mysql-community-client), the common error messages and character sets for client and server (mysql-community-common), and the shared client libraries (mysql-community-libs). -
Starting the MySQL Server
Start the MySQL server with the following command:
shell>
sudo service mysqld startStarting mysqld:[ OK ]You can check the status of the MySQL server with the following command:
shell>
sudo service mysqld statusmysqld (pid 3066) is running.
At the initial start up of the server, the following happens, given that the data directory of the server is empty:
The server is initialized.
An SSL certificate and key files are generated in the data directory.
The validate_password plugin is installed and enabled.
A superuser account
'root'@'localhostis created. A password for the superuser is set and stored in the error log file. To reveal it, use the following command:shell>
sudo grep 'temporary password' /var/log/mysqld.logChange the root password as soon as possible by logging in with the generated, temporary password and set a custom password for the superuser account:
shell>
mysql -uroot -pmysql>
ALTER USER 'root'@'localhost' IDENTIFIED BY 'MyNewPass4!';NoteMySQL's validate_password plugin is installed by default. This will require that passwords contain at least one upper case letter, one lower case letter, one digit, and one special character, and that the total password length is at least 8 characters.
For more information on the postinstallation procedures, see Section 2.10, “Postinstallation Setup and Testing”.
Compatibility Information for EL7-based platforms: The following RPM packages from the native software repositories of the platforms are incompatible with the package from the MySQL Yum repository that installs the MySQL server. Once you have installed MySQL using the MySQL Yum repository, you will not be able to install these packages (and vice versa).
akonadi-mysql
ocsinventory
Installing Additional MySQL Products and Components with Yum
You can use Yum to install and manage individual components of MySQL. Some of these components are hosted in sub-repositories of the MySQL Yum repository: for example, the MySQL Connectors are to be found in the MySQL Connectors Community sub-repository, and the MySQL Workbench in MySQL Tools Community. You can use the following command to list the packages for all the MySQL components available for your platform from the MySQL Yum repository (for dnf-enabled systems, replace yum in the command with dnf):
shell> sudo yum --disablerepo=\* --enablerepo='mysql*-community*' list available
Install any packages of your choice with the following command,
replacing package-name with name of the
package (for dnf-enabled systems, replace yum
in the command with dnf):
shell> sudo yum install package-name
For example, to install MySQL Workbench on Fedora 22:
shell> sudo dnf install mysql-workbench-community
To install the shared client libraries (for dnf-enabled systems, replace yum in the command with dnf):
shell> sudo yum install mysql-community-libs
Updating MySQL with Yum
Besides installation, you can also perform updates for MySQL products and components using the MySQL Yum repository. See Section 2.11.1.2, “Upgrading MySQL with the MySQL Yum Repository” for details.
For supported Yum-based platforms (see Section 2.5.1, “Installing MySQL on Linux Using the MySQL Yum Repository”, for a list), you can replace a third-party distribution of MySQL with the latest GA release (from the MySQL 5.7 series currently) from the MySQL Yum repository. According to how your third-party distribution of MySQL was installed, there are different steps to follow:
Replacing a Native Third-Party Distribution of MySQL
If you have installed a third-party distribution of MySQL from a native software repository (that is, a software repository provided by your own Linux distribution), follow these steps:
-
Backing Up Your Database
To avoid loss of data, always back up your database before trying to replace your MySQL installation using the MySQL Yum repository. See Chapter 7, Backup and Recovery, on how to back up your database.
-
Adding the MySQL Yum Repository
Add the MySQL Yum repository to your system's repository list by following the instructions given in Adding the MySQL Yum Repository.
-
Replacing the Native Third-Party Distribution by a Yum Update or a DNF Upgrade
By design, the MySQL Yum repository will replace your native, third-party MySQL with the latest GA release (from the MySQL 5.7 series currently) from the MySQL Yum repository when you perform a yum update command (or dnf upgrade for dnf-enabled systems) on the system, or a yum update mysql-server (or dnf upgrade mysql-server for dnf-enabled systems).
After updating MySQL using the Yum repository, applications compiled with older versions of the shared client libraries should continue to work. However, if you want to recompile applications and dynamically link them with the updated libraries, see Upgrading the Shared Client Libraries, for some special considerations.
Replacing a Nonnative Third-Party Distribution of MySQL
If you have installed a third-party distribution of MySQL from a nonnative software repository (that is, a software repository not provided by your own Linux distribution), follow these steps:
-
Backing Up Your Database
To avoid loss of data, always back up your database before trying to replace your MySQL installation using the MySQL Yum repository. See Chapter 7, Backup and Recovery, on how to back up your database.
-
Stopping Yum from Receiving MySQL Packages from Third-Party, Nonnative Repositories
Before you can use the MySQL Yum repository for installing MySQL, you must stop your system from receiving MySQL packages from any third-party, nonnative Yum repositories.
For example, if you have installed MariaDB using their own software repository, get a list of the installed MariaDB packages using the following command (for dnf-enabled systems, replace yum in the command with dnf):
shell>
yum list installed mariadb\*MariaDB-common.i686 10.0.4-1 @mariadb MariaDB-compat.i686 10.0.4-1 @mariadb MariaDB-server.i686 10.0.4-1 @mariadbFrom the command output, we can identify the installed packages (
MariaDB-common,MariaDB-compat, andMariaDB-server) and the source of them (a nonnative software repository namedmariadb).As another example, if you have installed Percona using their own software repository, get a list of the installed Percona packages using the following command (for dnf-enabled systems, replace yum in the command with dnf):
shell>
yum list installed Percona\*Percona-Server-client-55.i686 5.5.39-rel36.0.el6 @percona-release-i386 Percona-Server-server-55.i686 5.5.39-rel36.0.el6 @percona-release-i386 Percona-Server-shared-55.i686 5.5.39-rel36.0.el6 @percona-release-i386 percona-release.noarch 0.1-3 @/percona-release-0.1-3.noarchFrom the command output, we can identify the installed packages (
Percona-Server-client,Percona-Server-server,Percona-Server-shared, andpercona-release.noarch) and the source of them (a nonnative software repository namedpercona-release).If you are not sure which third-party MySQL fork you have installed, this command should reveal it and list the RPM packages installed for it, as well as the third-party repository that supplies the packages (for dnf-enabled systems, replace yum in the command with dnf):
shell>
yum --disablerepo=\* provides mysql\*The next step is to stop Yum from receiving packages from the nonnative repository. If the yum-config-manager utility is supported on your platform, you can, for example, use this command for stopping delivery from MariaDB (on dnf-enabled systems, use the dnf config-manager command instead of yum-config-manager):
shell>
sudo yum-config-manager --disable mariadbUse this command for stopping delivery from Percona (on dnf-enabled systems, use the dnf config-manager command instead of yum-config-manager):
shell>
sudo yum-config-manager --disable percona-releaseYou can perform the same task by removing the entry for the software repository existing in one of the repository files under the
/etc/yum.repos.d/directory. This is how the entry typically looks for MariaDB:[mariadb] name = MariaDB baseurl =
[base URL for repository]gpgkey =[URL for GPG key]gpgcheck =1The entry is usually found in the file
/etc/yum.repos.d/MariaDB.repofor MariaDB—delete the file, or remove entry from it (or from the file in which you find the entry).NoteThis step is not necessary for an installation that was configured with a Yum repository release package (like Percona) if you are going to remove the release package (
percona-release.noarchfor Percona), as shown in the uninstall command for Percona in Step 3 below. -
Uninstalling the Nonnative Third-Party MySQL Distribution of MySQL
The nonnative third-party MySQL distribution must first be uninstalled before you can use the MySQL Yum repository to install MySQL. For the MariaDB packages found in Step 2 above, uninstall them with the following command (for dnf-enabled systems, replace yum in the command with dnf):
shell>
sudo yum remove MariaDB-common MariaDB-compat MariaDB-serverFor the Percona packages we found in Step 2 above (for dnf-enabled systems, replace yum in the command with dnf):
shell>
sudo yum remove Percona-Server-client-55 Percona-Server-server-55 \ Percona-Server-shared-55.i686 percona-release -
Installing MySQL with the MySQL Yum Repository
Then, install MySQL with the MySQL Yum repository by following the instructions given in Section 2.5.1, “Installing MySQL on Linux Using the MySQL Yum Repository”: .
ImportantIf you have chosen to replace your third-party MySQL distribution with a newer version of MySQL from the MySQL Yum repository, remember to run mysql_upgrade after the server starts, to check and possibly resolve any incompatibilities between the old data and the upgraded software. mysql_upgrade also performs other functions; see Section 4.4.7, “mysql_upgrade — Check and Upgrade MySQL Tables” for details.
For EL7-based platforms: See Compatibility Information for EL7-based platforms.
The MySQL APT repository provides deb
packages for installing and managing the MySQL server, client, and
other components on the following Linux platforms: :
Debian 7.x (“wheezy”)
Debian 8.x (“jessie”)
Ubuntu 12.04 LTS (“Precise Pangolin”)
Ubuntu 14.04 LTS (“Trusty Tahr”)
Ubuntu 15.10 (“Wily Werewolf”)
Instructions for using the MySQL APT Repository are available in A Quick Guide to Using the MySQL APT Repository.
The MySQL SLES repository provides RPM packages for installing and managing the MySQL server, client, and other components on SUSE Enterprise Linux Server.
Instructions for using the MySQL SLES repository are available in A Quick Guide to Using the MySQL SLES Repository.
The MySQL SLES repository is now in development release. We encourage you to try it and provide us with feedback. Please report any bugs or inconsistencies you observe to our Bugs Database.
The recommended way to install MySQL on RPM-based Linux distributions is by using the RPM packages provided by Oracle. There are two sources for obtaining them, for the Community Edition of MySQL:
From the MySQL software repositories:
The MySQL Yum repository (see Section 2.5.1, “Installing MySQL on Linux Using the MySQL Yum Repository” for details).
The MySQL SLES repository (see Section 2.5.4, “Installing MySQL on Linux Using the MySQL SLES Repository” for details).
From the MySQL Downloads page in the MySQL Developer Zone.
RPM distributions of MySQL are also provided by other vendors. Be aware that they may differ from those built by Oracle in features, capabilities, and conventions (including communication setup), and that the installation instructions in this manual do not necessarily apply to them. The vendor's instructions should be consulted instead.
If you have such a third-party distribution of MySQL running on your system and now want to migrate to Oracle's distribution using the RPM packages downloaded from the MySQL Developer Zone, see Compatibility with RPM Packages from Other Vendors below. The preferred method of migration, however, is to use the MySQL Yum repository or MySQL SLES repository.
RPM packages for MySQL are listed in the following tables:
Table 2.6 RPM Packages for MySQL Community Edition
| Package Name | Summary |
|---|---|
mysql-community-server | Database server and related tools |
mysql-community-client | MySQL client applications and tools |
mysql-community-common | Common files for server and client libraries |
mysql-community-devel | Development header files and libraries for MySQL database client applications |
mysql-community-libs | Shared libraries for MySQL database client applications |
mysql-community-libs-compat | Shared compatibility libraries for previous MySQL installations |
mysql-community-embedded | MySQL embedded library |
mysql-community-embedded-devel | Development header files and libraries for MySQL as an embeddable library |
mysql-community-test | Test suite for the MySQL server |
Table 2.7 RPM Packages for the MySQL Enterprise Edition
| Package Name | Summary |
|---|---|
mysql-commercial-server | Database server and related tools |
mysql-commercial-client | MySQL client applications and tools |
mysql-commercial-common | Common files for server and client libraries |
mysql-commercial-devel | Development header files and libraries for MySQL database client applications |
mysql-commercial-libs | Shared libraries for MySQL database client applications |
mysql-commercial-libs-compat | Shared compatibility libraries for previous MySQL installations |
mysql-commercial-embedded | MySQL embedded library |
mysql-commercial-embedded-devel | Development header files and libraries for MySQL as an embeddable library |
mysql-commercial-test | Test suite for the MySQL server |
Dependency relationships exist among some of the packages. If you plan to install many of the packages, you may wish to download the RPM bundle tar file instead, which contains all the RPM packages listed above, so that you need not download them separately.
The full names for the RPMs have the following syntax:
packagename-version-distribution-arch.rpm
The distribution and
arch values indicate the Linux
distribution and the processor type for which the package was
built. See the table below for lists of the distribution
identifiers:
Table 2.8 MySQL Linux RPM Package Distribution Identifiers
| distribution Value | Intended Use |
|---|---|
el5, el6, el7 | Red Hat Enterprise Linux/Oracle Linux/CentOS 5, 6, or 7 |
fc22, fc23 | Fedora 22 or 23 |
sles12 | SUSE Linux Enterprise Server 12 |
To see all files in an RPM package (for example,
mysql-community-server), use the following
command:
shell> rpm -qpl mysql-community-server-version-distribution-arch.rpm
In most cases, you need to install the
mysql-community-server,
mysql-community-client,
mysql-community-libs,
mysql-community-common, and
mysql-community-libs-compat to get a
functional, standard MySQL installation. To perform such a
standard, minimal installation, go to the folder that contains all
those packages (and, preferably, no other RPM packages with
similar names), and issue the following command for platforms
other than Red Hat Enterprise Linux/Oracle
Linux/CentOS 5:
shell> yum install mysql-community-{server,client,common,libs}-*
For Red Hat Enterprise Linux/Oracle Linux/CentOS 5 systems, there
is an extra package
(mysql-)
to be installed; use the following command:
version-el5-arch.rpm
shell> yum install mysql-community-{server,client,common,libs}-* mysql-5.*
Replace yum with zypper for SLES systems, and with dnf for dnf-enabled systems (like Fedora 22).
While it is much preferable to use a high-level package management tool like yum to install the packages, users who prefer direct rpm commands can replace the yum install command with the rpm -Uvh command; however, using rpm -Uvh instead makes the installation process more prone to failure, due to potential dependency issues the installation process might run into.
To install only the client programs, you can skip
mysql-community-server in your list of packages
to install; issue the following command for platforms
other than Red Hat Enterprise Linux/Oracle
Linux/CentOS 5:
shell> yum install mysql-community-{client,common,libs}-*
For Red Hat Enterprise Linux/Oracle Linux/CentOS 5 systems:
shell> yum install mysql-community-{client,common,libs}-* mysql-5.*
A standard installation of MySQL using the RPM packages result in files and resources created under the system directories, shown in the following table.
Table 2.9 MySQL Installation Layout for Linux RPM Packages from the MySQL Developer Zone
| Files or Resources | Location |
|---|---|
| Client programs and scripts | /usr/bin |
| mysqld server | /usr/sbin |
| Configuration file | /etc/my.cnf |
| Data directory | /var/lib/mysql |
| Error log file |
For RHEL, Oracle Linux, CentOS or Fedora platforms:
For SLES: |
Value of secure_file_priv | /var/lib/mysql-files |
| System V init script |
For RHEL, Oracle Linux, CentOS or Fedora platforms:
For SLES: |
| Systemd service |
For RHEL, Oracle Linux, CentOS or Fedora platforms:
For SLES: |
| Pid file | /var/run/mysql/mysqld.pid |
| Socket | /var/lib/mysql/mysql.sock |
| Keyring directory | /var/lib/mysql-keyring |
| Unix manual pages | /usr/share/man |
| Include (header) files | /usr/include/mysql |
| Libraries | /usr/lib/mysql |
| Miscellaneous support files (for example, error messages, and character set files) | /usr/share/mysql |
The installation also creates a user named
mysql and a group named
mysql on the system.
MySQL is NOT automatically started at the end of the installation process. Use the following command to start MySQL:
shell> service mysqld start
If the operating system is systemd enabled, standard
service commands such as
stop, start,
status and restart should be
used to manage the MySQL server service. The
mysqld service is enabled by default, and it
starts on system reboot. Notice that certain things might work
differently on systemd platforms: for example, changing the
location of the data directory might cause issues. See
Section 2.5.10, “Managing MySQL Server with systemd” for additional
information.
At the initial start up of the server, the following happens, given that the data directory of the server is empty:
The server is initialized.
An SSL certificate and key files are generated in the data directory.
The validate_password plugin is installed and enabled.
A superuser account
'root'@'localhost'is created. A password for the superuser is set and stored in the error log file. To reveal it, use the following command for RHEL, Oracle Linux, CentOS, and Fedora platform:shell>
grep 'temporary password' /var/log/mysqld.logUse the following command for SLES platform:
shell>
grep 'temporary password' /var/log/mysql/mysqld.logThe next step is to log in with the generated, temporary password and set a custom password for the superuser account:
shell> mysql -uroot -p
mysql> ALTER USER 'root'@'localhost' IDENTIFIED BY 'MyNewPass4!';
MySQL's validate_password plugin is installed by default. This will require that passwords contain at least one upper case letter, one lower case letter, one digit, and one special character, and that the total password length is at least 8 characters.
If something goes wrong during installation, you might find debug
information in the error log file
/var/log/mysqld.log.
Compatibility with RPM Packages from Other Vendors.
If you have installed packages for MySQL from your Linux
distribution's local software repository, it is much preferable
to install the new, directly-downloaded packages from Oracle
using the package management system of your platform
(yum, dnf, or
zypper), as described above. The command
replaces old packages with new ones to ensure compatibility of
old applications with the new installation; for example, the old
mysql-libs package is replaced with the
mysql-community-libs-compat package, which
provides a replacement-compatible client library for
applications that were using your older MySQL installation. If
there was an older version of
mysql-community-libs-compat on the system, it
also gets replaced.
If you have installed third-party packages for MySQL that are NOT from your Linux distribution's local software repository (for example, packages directly downloaded from a vendor other than Oracle), you should uninstall all those packages before installing the new, directly-downloaded packages from Oracle. This is because conflicts may arise between those vendor's RPM packages and Oracle's: for example, a vendor's convention about which files belong with the server and which belong with the client library may differ from that used for Oracle packages. Attempts to install an Oracle RPM may then result in messages saying that files in the RPM to be installed conflict with files from an installed package.
Debug Package.
A special variant of MySQL Server compiled with the
debug package has been
included in the server RPM packages. It performs debugging and
memory allocation checks and produces a trace file when the
server is running. To use that debug version, start MySQL with
/usr/sbin/mysqld-debug, instead of starting
it as a service or with /usr/sbin/mysqld.
See Section 25.5.3, “The DBUG Package” for the debug options you can
use.
Rebuilding RPMs from source SRPMs. Source code SRPM packages for MySQL are available for download. They can be used as-is to rebuild the MySQL RPMs with the standard rpmbuild tool chain.
root passwords for pre-GA releases.
For MySQL 5.7.4 and 5.7.5, the initial random
root password is written to the
.mysql_secret file in the directory named
by the HOME environment variable. When trying
to access the file, bear in mind that depending on operating
system, using a command such as sudo may
cause the value of HOME to refer to the home
directory of the root system user
. .mysql_secret is created with mode 600 to
be accessible only to the system user for whom it is created.
Before MySQL 5.7.4, the accounts (including
root) created in the MySQL grant tables for
an RPM installation initially have no passwords; after starting
the server, you should assign passwords to them using the
instructions in Section 2.10, “Postinstallation Setup and Testing”."
Oracle provides Debian packages for installing MySQL on Debian or Debian-like Linux systems. The packages are available through two different channels:
The MySQL APT Repository. This is the preferred method for installing MySQL on Debian-like systems, as it provides a simple and convenient way to install and update MySQL products. For details, see Section 2.5.3, “Installing MySQL on Linux Using the MySQL APT Repository”.
The MySQL Developer Zone's Download Area. For details, see Section 2.1.2, “How to Get MySQL”. The following are some information on the Debian packages available there and the instructions for installing them:
Various Debian packages are provided in the MySQL Developer Zone for installing different components of MySQL on different Debian or Ubuntu platforms (currently, Debian 7 and 8, and Ubuntu 12, 14, and 15 are supported). The preferred method is to use the tarball bundle, which contains the packages needed for a basic setup of MySQL. The tarball bundles have names in the format of
mysql-server_.MVER-DVER_CPU.deb-bundle.tarMVERis the MySQL version andDVERis the Linux distribution version. TheCPUvalue indicates the processor type or family for which the package is built, as shown in the following table:Table 2.10 MySQL Debian and Ubuntu Installation Packages CPU Identifiers
CPUValueIntended Processor Type or Family i386Pentium processor or better, 32 bit amd6464-bit x86 processor After downloading the tarball, unpack it with the following command:
shell>
tar -xvf mysql-server_MVER-DVER_CPU.deb-bundle.tarYou may need to install the
libaiolibrary if it is not already present on your system:shell>
sudo apt-get install libaio1Preconfigure the MySQL server package with the following command:
shell>
sudo dpkg-preconfigure mysql-community-server_*.debYou will be asked to provide a password for the root user for your MySQL installation. You might also be asked other questions regarding the installation.
ImportantMake sure you remember the root password you set. Users who want to set a password later can leave the password field blank in the dialogue box and just press ; in that case, root access to the server is authenticated using the MySQL Socket Peer-Credential Authentication Plugin for connections using a Unix socket file. You can set the root password later using mysql_secure_installation.
For a basic installation of the MySQL server, install the database common files package, the client package, the client metapackage, the server package, and the server metapackage (in that order); you can do that with a single command:
shell>
sudo dpkg -i mysql-{common,community-client,client,community-server,server}_*.debIf you are being warned of unmet dependencies by dpkg, you can fix them using apt-get:
sudo apt-get -f installHere are where the files are installed on the system:
All configuration files (like
my.cnf) are under/etc/mysqlAll binaries, libraries, headers, etc., are under
/usr/binand/usr/sbinThe data directory is under
/var/lib/mysql
Debian distributions of MySQL are also provided by other vendors. Be aware that they may differ from those built by Oracle in features, capabilities, and conventions (including communication setup), and that the instructions in this manual do not necessarily apply to installing them. The vendor's instructions should be consulted instead.
Many Linux distributions include a version of the MySQL server, client tools, and development components in their native software repositories and can be installed with the platforms' standard package management systems. This section provides basic instructions for installing MySQL using those package management systems.
Native packages are often several versions behind the currently available release. You will also normally be unable to install development milestone releases (DMRs), as these are not usually made available in the native repositories. Before proceeding, we recommend that you check out the other installation options described in Section 2.5, “Installing MySQL on Linux”.
Distribution specific instructions are shown below:
Red Hat Linux, Fedora, CentOS
NoteFor EL5, EL6, or EL7-based Linux platforms and Fedora 22 or 23, you can install MySQL using the MySQL Yum repository instead of the platform's native software repository. See Section 2.5.1, “Installing MySQL on Linux Using the MySQL Yum Repository” for details.
For Red Hat and similar distributions, the MySQL distribution is divided into a number of separate packages,
mysqlfor the client tools,mysql-serverfor the server and associated tools, andmysql-libsfor the libraries. The libraries are required if you want to provide connectivity from different languages and environments such as Perl, Python and others.To install, use the yum command to specify the packages that you want to install. For example:
root-shell> yum install mysql mysql-server mysql-libs mysql-server Loaded plugins: presto, refresh-packagekit Setting up Install Process Resolving Dependencies --> Running transaction check ---> Package mysql.x86_64 0:5.1.48-2.fc13 set to be updated ---> Package mysql-libs.x86_64 0:5.1.48-2.fc13 set to be updated ---> Package mysql-server.x86_64 0:5.1.48-2.fc13 set to be updated --> Processing Dependency: perl-DBD-MySQL for package: mysql-server-5.1.48-2.fc13.x86_64 --> Running transaction check ---> Package perl-DBD-MySQL.x86_64 0:4.017-1.fc13 set to be updated --> Finished Dependency Resolution Dependencies Resolved ================================================================================ Package Arch Version Repository Size ================================================================================ Installing: mysql x86_64 5.1.48-2.fc13 updates 889 k mysql-libs x86_64 5.1.48-2.fc13 updates 1.2 M mysql-server x86_64 5.1.48-2.fc13 updates 8.1 M Installing for dependencies: perl-DBD-MySQL x86_64 4.017-1.fc13 updates 136 k Transaction Summary ================================================================================ Install 4 Package(s) Upgrade 0 Package(s) Total download size: 10 M Installed size: 30 M Is this ok [y/N]: y Downloading Packages: Setting up and reading Presto delta metadata Processing delta metadata Package(s) data still to download: 10 M (1/4): mysql-5.1.48-2.fc13.x86_64.rpm | 889 kB 00:04 (2/4): mysql-libs-5.1.48-2.fc13.x86_64.rpm | 1.2 MB 00:06 (3/4): mysql-server-5.1.48-2.fc13.x86_64.rpm | 8.1 MB 00:40 (4/4): perl-DBD-MySQL-4.017-1.fc13.x86_64.rpm | 136 kB 00:00 -------------------------------------------------------------------------------- Total 201 kB/s | 10 MB 00:52 Running rpm_check_debug Running Transaction Test Transaction Test Succeeded Running Transaction Installing : mysql-libs-5.1.48-2.fc13.x86_64 1/4 Installing : mysql-5.1.48-2.fc13.x86_64 2/4 Installing : perl-DBD-MySQL-4.017-1.fc13.x86_64 3/4 Installing : mysql-server-5.1.48-2.fc13.x86_64 4/4 Installed: mysql.x86_64 0:5.1.48-2.fc13 mysql-libs.x86_64 0:5.1.48-2.fc13 mysql-server.x86_64 0:5.1.48-2.fc13 Dependency Installed: perl-DBD-MySQL.x86_64 0:4.017-1.fc13 Complete!
MySQL and the MySQL server should now be installed. A sample configuration file is installed into
/etc/my.cnf. An init script, to start and stop the server, will have been installed into/etc/init.d/mysqld. To start the MySQL server use service:root-shell> service mysqld start
To enable the server to be started and stopped automatically during boot, use chkconfig:
root-shell> chkconfig --levels 235 mysqld on
Which enables the MySQL server to be started (and stopped) automatically at the specified the run levels.
The database tables will have been automatically created for you, if they do not already exist. You should, however, run mysql_secure_installation to set the root passwords on your server.
Debian, Ubuntu, Kubuntu
NoteFor Debian 7 and 8, and Ubuntu 12, 14, and 15, MySQL can be installed using the MySQL APT Repository instead of the platform's native software repository. See Section 2.5.3, “Installing MySQL on Linux Using the MySQL APT Repository” for details.
On Debian and related distributions, there are two packages for MySQL in their software repositories,
mysql-clientandmysql-server, for the client and server components respectively. You should specify an explicit version, for examplemysql-client-5.1, to ensure that you install the version of MySQL that you want.To download and install, including any dependencies, use the apt-get command, specifying the packages that you want to install.
NoteBefore installing, make sure that you update your
apt-getindex files to ensure you are downloading the latest available version.A sample installation of the MySQL packages might look like this (some sections trimmed for clarity):
root-shell> apt-get install mysql-client-5.1 mysql-server-5.1 Reading package lists... Done Building dependency tree Reading state information... Done The following packages were automatically installed and are no longer required: linux-headers-2.6.28-11 linux-headers-2.6.28-11-generic Use 'apt-get autoremove' to remove them. The following extra packages will be installed: bsd-mailx libdbd-mysql-perl libdbi-perl libhtml-template-perl libmysqlclient15off libmysqlclient16 libnet-daemon-perl libplrpc-perl mailx mysql-common postfix Suggested packages: dbishell libipc-sharedcache-perl tinyca procmail postfix-mysql postfix-pgsql postfix-ldap postfix-pcre sasl2-bin resolvconf postfix-cdb The following NEW packages will be installed bsd-mailx libdbd-mysql-perl libdbi-perl libhtml-template-perl libmysqlclient15off libmysqlclient16 libnet-daemon-perl libplrpc-perl mailx mysql-client-5.1 mysql-common mysql-server-5.1 postfix 0 upgraded, 13 newly installed, 0 to remove and 182 not upgraded. Need to get 1907kB/25.3MB of archives. After this operation, 59.5MB of additional disk space will be used. Do you want to continue [Y/n]? Y Get: 1 http://gb.archive.ubuntu.com jaunty-updates/main mysql-common 5.1.30really5.0.75-0ubuntu10.5 [63.6kB] Get: 2 http://gb.archive.ubuntu.com jaunty-updates/main libmysqlclient15off 5.1.30really5.0.75-0ubuntu10.5 [1843kB] Fetched 1907kB in 9s (205kB/s) Preconfiguring packages ... Selecting previously deselected package mysql-common. (Reading database ... 121260 files and directories currently installed.) ... Processing 1 added doc-base file(s)... Registering documents with scrollkeeper... Setting up libnet-daemon-perl (0.43-1) ... Setting up libplrpc-perl (0.2020-1) ... Setting up libdbi-perl (1.607-1) ... Setting up libmysqlclient15off (5.1.30really5.0.75-0ubuntu10.5) ... Setting up libdbd-mysql-perl (4.008-1) ... Setting up libmysqlclient16 (5.1.31-1ubuntu2) ... Setting up mysql-client-5.1 (5.1.31-1ubuntu2) ... Setting up mysql-server-5.1 (5.1.31-1ubuntu2) ... * Stopping MySQL database server mysqld ...done. 2013-09-24T13:03:09.048353Z 0 [Note] InnoDB: 5.7.13 started; log sequence number 1566036 2013-09-24T13:03:10.057269Z 0 [Note] InnoDB: Starting shutdown... 2013-09-24T13:03:10.857032Z 0 [Note] InnoDB: Shutdown completed; log sequence number 1566036 * Starting MySQL database server mysqld ...done. * Checking for corrupt, not cleanly closed and upgrade needing tables. ... Processing triggers for libc6 ... ldconfig deferred processing now taking place
NoteThe apt-get command will install a number of packages, including the MySQL server, in order to provide the typical tools and application environment. This can mean that you install a large number of packages in addition to the main MySQL package.
During installation, the initial database will be created, and you will be prompted for the MySQL root password (and confirmation). A configuration file will have been created in
/etc/mysql/my.cnf. An init script will have been created in/etc/init.d/mysql.The server will already be started. You can manually start and stop the server using:
root-shell> service mysql [start|stop]
The service will automatically be added to the 2, 3 and 4 run levels, with stop scripts in the single, shutdown and restart levels.
The docker deployment framework supports easy installation and configuration of MySQL servers. For instructions, see https://hub.docker.com/r/mysql/mysql-server/. This page also provides extensive documentation about using MySQL under docker.
The juju deployment framework supports easy installation and configuration of MySQL servers. For instructions, see https://jujucharms.com/mysql/.
As of MySQL 5.7.6, if you install MySQL using an RPM distribution on the following Linux platforms, server startup and shutdown is managed by systemd:
Red Hat Enterprise Linux 7, Oracle Linux 7, CentOS 7
SUSE Linux Enterprise Server 12
Fedora 22 and 23
To obtain systemd support if you install from a source
distribution, configure the distribution using the
-DWITH_SYSTEMD=1
CMake option.
systemd provides automatic server startup and shutdown. It also enables manual server management using the systemctl command. For example:
systemctl {start|stop|restart|status} mysqld
Alternatively, use the service command (with the arguments reversed), which is compatible with System V systems:
service mysqld {start|stop|restart|status}
For the systemctl or service
commands, if the MySQL service name is not
mysqld, use the appropriate name (for example,
mysql on SLES systems).
Support for systemd includes these files:
mysqld.service: systemd service unit configuration, with details about themysqldservice.mysqld.tmpfiles.d: File containing information to support thetmpfilesfeature. This file is installed under the namemysql.conf.mysqld_pre_systemd: Support script for the unit file.
On platforms for which systemd support is installed, scripts such as mysqld_safe and the System V initialization script are not installed because they are unnecessary. For example, mysqld_safe can handle server restarts, but systemd provides the same capability, and does so in a manner consistent with management of other services rather than using an application-specific program.
To add or change systemd options for MySQL, these methods are available:
Use a localized systemd configuration file.
Arrange for systemd to set environment variables for the MySQL server process.
Set the
MYSQLD_OPTSsystemd variable.
To use a localized systemd configuration file, create the
/etc/systemd/system/mysqld.service.d
directory if it does not exist. In that directory, create a file
that contains a [Service] section listing the
desired settings. For example:
[Service] LimitNOFILE=max_open_filesPIDFile=/path/to/pid/fileNice=nice_levelLimitCore=core_file_limitEnvironment="LD_PRELOAD=/path/to/malloc/library" Environment="TZ=time_zone_setting"
The discussion here uses override.conf as
the name of this file. Newer versions of systemd support the
following command, which opens an editor and permits you to edit
the file:
systemctl edit mysqld
Whenever you create or change
override.conf, reload the systemd
configuration, then tell systemd to restart the MySQL service:
systemctl daemon-reload systemctl restart mysqld
Support for configuration using
override.conf was added in MySQL 5.7.7.
With systemd, the override.conf
configuration method must be used for certain parameters, rather
than settings in a [mysqld_safe] or
[mysqld] group in a MySQL option file:
For some parameters,
override.confmust be used because systemd itself must know their values and it cannot read MySQL option files to get them.Parameters that specify values otherwise settable only using options known to mysqld_safe must be specified using systemd because there is no corresponding mysqld parameter.
For additional information about using systemd rather than mysqld_safe, see Migrating from mysqld_safe to systemd.
You can set the following parameters in
override.conf:
To specify the process ID file:
As of MySQL 5.7.10: Use
override.confand change bothPIDFileandExecStartto name the PID file path name. Any setting of the process ID file in MySQL option files will be ignored.Before MySQL 5.7.10: Use
PIDFileinoverride.confrather than the--pid-fileoption for mysqld_safe or mysqld. systemd must know the PID file location so that it can restart or stop the server. If the PID file value is specified in a MySQL option file, the value must match thePIDFilevalue or MySQL startup may fail.
To set the number of file descriptors available to the MySQL server, use
LimitNOFILEinoverride.confrather than the--open-files-limitoption for mysqld_safe or mysqld.To set the maximum core file size, use
LimitCoreinoverride.confrather than the--core-file-sizeoption for mysqld_safe.To set the scheduling priority for the MySQL server, use
Niceinoverride.confrather than the--niceoption for mysqld_safe.
Some MySQL parameters are configured using environment variables:
LD_PRELOAD: Set this variable if the MySQL server should use a specific memory-allocation library.TZ: Set this variable to specify the default time zone for the server.
There are multiple ways to specify the value of environment values that should be in effect for the MySQL server process managed by systemd:
Use
Environmentlines in theoverride.conffile. For the syntax, see the example in the preceding discussion that describes how to use this file.Specify the values in the
/etc/sysconfig/mysqlfile (create the file if it does not exist). Assign values using the following syntax:LD_PRELOAD=
/path/to/malloc/libraryTZ=time_zone_settingAfter modifying
/etc/sysconfig/mysql, restart the server to make the changes effective:systemctl restart mysqld
To specify options for mysqld without
modifying systemd configuration files directly, set or unset the
MYSQLD_OPTS systemd variable. For example:
systemctl set-environment MYSQLD_OPTS="--general_log=1" systemctl unset-environment MYSQLD_OPTS
After modifying the systemd environment, restart the server to make the changes effective:
systemctl restart mysqld
Because mysqld_safe is not installed when
systemd is used, options previously specified for that program
(for example, in an [mysqld_safe] option
group) must be specified another way:
Some mysqld_safe options are also understood by mysqld and can be moved from the
[mysqld_safe]option group to the[mysqld]group. This does not include--pid-fileor--open-files-limit. To specify those options, use theoverride.confsystemd file, described previously.For some mysqld_safe options, there are similar mysqld options. For example, the mysqld_safe option for enabling
sysloglogging is--syslog. For mysqld, enable thelog_syslogsystem variable instead. For details, see Section 5.2.2, “The Error Log”.mysqld_safe options not understood by mysqld can be specified in
override.confor environment variables. For example, with mysqld_safe, if the server should use a specific memory allocation library, this is specified using the--malloc-liboption. For installations that manage the server with systemd, arrange to set theLD_PRELOADenvironment variable instead, as described previously.
Linux supports a number of different solutions for installing MySQL, covered in Section 2.5, “Installing MySQL on Linux”. One of the methods, covered in this section, is installing from Oracle's Unbreakable Linux Network (ULN). You can find information about Oracle Linux and ULN under http://linux.oracle.com/.
To use ULN, you need to obtain a ULN login and register the machine used for installation with ULN. This is described in detail in the ULN FAQ. The page also describes how to install and update packages.The MySQL packages are in the “MySQL for Oracle Linux 6” and “MySQL for Oracle Linux 7” channels for your system architecture on ULN.
At the time of this writing, ULN provides MySQL 5.7 for Oracle Linux 6 and Oracle Linux 7.
Once MySQL has been installed using ULN, you can find information on starting and stopping the server, and more, in this section, particularly under Section 2.5.5, “Installing MySQL on Linux Using RPM Packages from Oracle”.
If you're updating an existing MySQL installation to an installation using ULN, the recommended procedure is to export your data using mysqldump, remove the existing installation, install MySQL from ULN, and load the exported data into your freshly installed MySQL.
If the existing MySQL installation you're upgrading from is from a previous release series (prior to MySQL 5.7), make sure to read the section on upgrading MySQL, Section 2.11.1, “Upgrading MySQL”.
MySQL on Solaris and OpenSolaris is available in a number of different formats.
For information on installing using the native Solaris PKG format, see Section 2.7.1, “Installing MySQL on Solaris Using a Solaris PKG”.
On OpenSolaris, the standard package repositories include MySQL packages specially built for OpenSolaris that include entries for the Service Management Framework (SMF) to enable control of the installation using the SMF administration commands. For more information, see Section 2.7.2, “Installing MySQL on OpenSolaris Using IPS”.
To use a standard
tarbinary installation, use the notes provided in Section 2.2, “Installing MySQL on Unix/Linux Using Generic Binaries”. Check the notes and hints at the end of this section for Solaris specific notes that you may need before or after installation.
To obtain a binary MySQL distribution for Solaris in tarball or PKG format, http://dev.mysql.com/downloads/mysql/5.7.html.
Additional notes to be aware of when installing and using MySQL on Solaris:
If you want to use MySQL with the
mysqluser and group, use the groupadd and useradd commands:groupadd mysql useradd -g mysql -s /bin/false mysql
If you install MySQL using a binary tarball distribution on Solaris, you may run into trouble even before you get the MySQL distribution unpacked, as the Solaris tar cannot handle long file names. This means that you may see errors when you try to unpack MySQL.
If this occurs, you must use GNU tar (gtar) to unpack the distribution. In Solaris 10 and OpenSolaris gtar is normally located in
/usr/sfw/bin/gtar, but may not be included in the default path definition.When using Solaris 10 for x86_64, you should mount any file systems on which you intend to store
InnoDBfiles with theforcedirectiooption. (By default mounting is done without this option.) Failing to do so will cause a significant drop in performance when using theInnoDBstorage engine on this platform.If you would like MySQL to start automatically, you can copy
support-files/mysql.serverto/etc/init.dand create a symbolic link to it named/etc/rc3.d/S99mysql.server.If too many processes try to connect very rapidly to mysqld, you should see this error in the MySQL log:
Error in accept: Protocol error
You might try starting the server with the
--back_log=50option as a workaround for this.To configure the generation of core files on Solaris you should use the coreadm command. Because of the security implications of generating a core on a
setuid()application, by default, Solaris does not support core files onsetuid()programs. However, you can modify this behavior using coreadm. If you enablesetuid()core files for the current user, they will be generated using the mode 600 and owned by the superuser.
You can install MySQL on Solaris and OpenSolaris using a binary package using the native Solaris PKG format instead of the binary tarball distribution.
To use this package, download the corresponding
mysql-VERSION-solaris10-PLATFORM.pkg.gz file,
then uncompress it. For example:
shell> gunzip mysql-5.7.13-solaris10-x86_64.pkg.gz
To install a new package, use pkgadd and follow the onscreen prompts. You must have root privileges to perform this operation:
shell> pkgadd -d mysql-5.7.13-solaris10-x86_64.pkg
The following packages are available:
1 mysql MySQL Community Server (GPL)
(i86pc) 5.7.13
Select package(s) you wish to process (or 'all' to process
all packages). (default: all) [?,??,q]:
The PKG installer installs all of the files and tools needed, and then initializes your database if one does not exist. To complete the installation, you should set the root password for MySQL as provided in the instructions at the end of the installation. Alternatively, you can run the mysql_secure_installation script that comes with the installation.
By default, the PKG package installs MySQL under the root path
/opt/mysql. You can change only the
installation root path when using pkgadd, which
can be used to install MySQL in a different Solaris zone. If you
need to install in a specific directory, use a binary
tar file distribution.
The pkg installer copies a suitable startup
script for MySQL into /etc/init.d/mysql. To
enable MySQL to startup and shutdown automatically, you should
create a link between this file and the init script directories.
For example, to ensure safe startup and shutdown of MySQL you
could use the following commands to add the right links:
shell>ln /etc/init.d/mysql /etc/rc3.d/S91mysqlshell>ln /etc/init.d/mysql /etc/rc0.d/K02mysql
To remove MySQL, the installed package name is
mysql. You can use this in combination with the
pkgrm command to remove the installation.
To upgrade when using the Solaris package file format, you must remove the existing installation before installing the updated package. Removal of the package does not delete the existing database information, only the server, binaries and support files. The typical upgrade sequence is therefore:
shell>mysqladmin shutdownshell>pkgrm mysqlshell>pkgadd -d mysql-shell>5.7.13-solaris10-x86_64.pkgmysqld_safe &shell>mysql_upgrade
You should check the notes in Section 2.11, “Upgrading or Downgrading MySQL” before performing any upgrade.
OpenSolaris includes standard packages for MySQL in the core
repository. The MySQL packages are based on a specific release of
MySQL and updated periodically. For the latest release you must
use either the native Solaris PKG, tar, or
source installations. The native OpenSolaris packages include SMF
files so that you can easily control your MySQL installation,
including automatic startup and recovery, using the native service
management tools.
To install MySQL on OpenSolaris, use the pkg command. You will need to be logged in as root, or use the pfexec tool, as shown in the example below:
shell> pfexec pkg install SUNWmysql57
The package set installs three individual packages,
SUNWmysql57lib, which
contains the MySQL client libraries;
SUNWmysql57r which contains
the root components, including SMF and configuration files; and
SUNWmysql57u which contains
the scripts, binary tools and other files. You can install these
packages individually if you only need the corresponding
components.
The MySQL files are installed into /usr/mysql
which symbolic links for the sub directories
(bin, lib, etc.) to a
version specific directory. For MySQL 5.7, the full
installation is located in
/usr/mysql/5.7. The default data
directory is
/var/mysql/5.7/data. The
configuration file is installed in
/etc/mysql/5.7/my.cnf. This
layout permits multiple versions of MySQL to be installed, without
overwriting the data and binaries from other versions.
Once installed, you must initialize the data directory (see Section 2.10.1, “Initializing the Data Directory”), and use the mysql_secure_installation to secure your installation.
Using SMF to manage your MySQL installation
Once installed, you can start and stop your MySQL server using the
installed SMF configuration. The service name is
mysql, or if you have multiple versions
installed, you should use the full version name, for example
mysql:version_57. To start
and enable MySQL to be started at boot time:
shell> svcadm enable mysql
To disable MySQL from starting during boot time, and shut the MySQL server down if it is running, use:
shell> svcadm disable mysql
To restart MySQL, for example after a configuration file changes,
use the restart option:
shell> svcadm restart mysql
You can also use SMF to configure the data directory and enable full 64-bit mode. For example, to set the data directory used by MySQL:
shell>svccfgsvc:>select mysql:version_57svc:/application/database/mysql:version_57> setprop mysql/data=/data0/mysql
By default, the 32-bit binaries are used. To enable the 64-bit
server on 64-bit platforms, set the
enable_64bit parameter. For example:
svc:/application/database/mysql:version_57> setprop mysql/enable_64bit=1
You need to refresh the SMF after settings these options:
shell> svcadm refresh mysql
This section provides information about installing MySQL on variants of FreeBSD Unix.
You can install MySQL on FreeBSD by using the binary distribution provided by Oracle. For more information, see Section 2.2, “Installing MySQL on Unix/Linux Using Generic Binaries”.
The easiest (and preferred) way to install MySQL is to use the
mysql-server and mysql-client
ports available at http://www.freebsd.org/. Using
these ports gives you the following benefits:
A working MySQL with all optimizations enabled that are known to work on your version of FreeBSD.
Automatic configuration and build.
Startup scripts installed in
/usr/local/etc/rc.d.The ability to use
pkg_info -Lto see which files are installed.The ability to use
pkg_deleteto remove MySQL if you no longer want it on your machine.
The MySQL build process requires GNU make (gmake) to work. If GNU make is not available, you must install it first before compiling MySQL.
To install using the ports system:
# cd /usr/ports/databases/mysql57-server # make ... # cd /usr/ports/databases/mysql57-client # make ...
The standard port installation places the server into
/usr/local/libexec/mysqld, with the startup
script for the MySQL server placed in
/usr/local/etc/rc.d/mysql-server.
Some additional notes on the BSD implementation:
To remove MySQL after installation using the ports system:
# cd /usr/ports/databases/mysql57-server # make deinstall ... # cd /usr/ports/databases/mysql57-client # make deinstall ...
If you get problems with the current date in MySQL, setting the
TZvariable should help. See Section 2.12, “Environment Variables”.
Building MySQL from the source code enables you to customize build parameters, compiler optimizations, and installation location. For a list of systems on which MySQL is known to run, see http://www.mysql.com/support/supportedplatforms/database.html.
Before you proceed with an installation from source, check whether Oracle produces a precompiled binary distribution for your platform and whether it works for you. We put a great deal of effort into ensuring that our binaries are built with the best possible options for optimal performance. Instructions for installing binary distributions are available in Section 2.2, “Installing MySQL on Unix/Linux Using Generic Binaries”.
Source Installation Methods
There are two methods for installing MySQL from source:
Use a standard MySQL source distribution. To obtain a standard distribution, see Section 2.1.2, “How to Get MySQL”. For instructions on building from a standard distribution, see Section 2.9.2, “Installing MySQL Using a Standard Source Distribution”.
Standard distributions are available as compressed tar files, Zip archives, or RPM packages. Distribution files have names of the form
mysql-,VERSION.tar.gzmysql-, orVERSION.zipmysql-, whereVERSION.rpmVERSIONis a number like5.7.13. File names for source distributions can be distinguished from those for precompiled binary distributions in that source distribution names are generic and include no platform name, whereas binary distribution names include a platform name indicating the type of system for which the distribution is intended (for example,pc-linux-i686orwinx64).Use a MySQL development tree. For information on building from one of the development trees, see Section 2.9.3, “Installing MySQL Using a Development Source Tree”.
Source Installation System Requirements
Installation of MySQL from source requires several development tools. Some of these tools are needed no matter whether you use a standard source distribution or a development source tree. Other tool requirements depend on which installation method you use.
To install MySQL from source, the following system requirements must be satisfied, regardless of installation method:
CMake, which is used as the build framework on all platforms. CMake can be downloaded from http://www.cmake.org.
A good make program. Although some platforms come with their own make implementations, it is highly recommended that you use GNU make 3.75 or newer. It may already be available on your system as gmake. GNU make is available from http://www.gnu.org/software/make/.
A working ANSI C++ compiler. GCC 4.4.6 or later, Clang 3.3 or later (FreeBSD and OS X), Visual Studio 2013 or later, and many current vendor-supplied compilers are known to work.
The Boost C++ libraries are required to build MySQL (but not to use it). Boost 1.59.0 or newer must be installed. To obtain Boost and its installation instructions, visit the official site. After Boost is installed, tell the build system where the Boost files are located by defining the
WITH_BOOSToption when you invoke CMake. For example:shell>
cmake . -DWITH_BOOST=/usr/local/boost_1_59_0Adjust the path as necessary to match your installation.
Sufficient free memory. If you encounter problems such as “internal compiler error” when compiling large source files, it may be that you have too little memory. If compiling on a virtual machine, try increasing the memory allocation.
Perl is needed if you intend to run test scripts. Most Unix-like systems include Perl. On Windows, you can use a version such as ActiveState Perl.
To install MySQL from a standard source distribution, one of the following tools is required to unpack the distribution file:
For a
.tar.gzcompressed tar file: GNUgunzipto uncompress the distribution and a reasonable tar to unpack it. If your tar program supports thezoption, it can both uncompress and unpack the file.GNU tar is known to work. The standard tar provided with some operating systems is not able to unpack the long file names in the MySQL distribution. You should download and install GNU tar, or if available, use a preinstalled version of GNU tar. Usually this is available as gnutar, gtar, or as tar within a GNU or Free Software directory, such as
/usr/sfw/binor/usr/local/bin. GNU tar is available from http://www.gnu.org/software/tar/.For a
.zipZip archive: WinZip or another tool that can read.zipfiles.For an
.rpmRPM package: The rpmbuild program used to build the distribution unpacks it.
To install MySQL from a development source tree, the following additional tools are required:
The Git revision control system is required to obtain the development source code. The GitHub Help provides instructions for downloading and installing Git on different platforms. MySQL officially joined GitHub in September, 2014. For more information about MySQL's move to GitHub, refer to the announcement on the MySQL Release Engineering blog: MySQL on GitHub
bison 2.1 or newer, available from http://www.gnu.org/software/bison/. (Version 1 is no longer supported.) Use the latest version of bison where possible; if you experience problems, upgrade to a later version, rather than revert to an earlier one.
bison is available from http://www.gnu.org/software/bison/.
bisonfor Windows can be downloaded from http://gnuwin32.sourceforge.net/packages/bison.htm. Download the package labeled “Complete package, excluding sources”. On Windows, the default location for bison is theC:\Program Files\GnuWin32directory. Some utilities may fail to find bison because of the space in the directory name. Also, Visual Studio may simply hang if there are spaces in the path. You can resolve these problems by installing into a directory that does not contain a space; for exampleC:\GnuWin32.On OpenSolaris and Solaris Express, m4 must be installed in addition to bison. m4 is available from http://www.gnu.org/software/m4/.
If you have to install any programs, modify your
PATH environment variable to include any
directories in which the programs are located. See
Section 4.2.10, “Setting Environment Variables”.
If you run into problems and need to file a bug report, please use the instructions in Section 1.7, “How to Report Bugs or Problems”.
By default, when you install MySQL after compiling it from source,
the installation step installs files under
/usr/local/mysql. The component locations
under the installation directory are the same as for binary
distributions. See Table 2.3, “MySQL Installation Layout for Generic Unix/Linux Binary Package”,
and Section 2.3.1, “MySQL Installation Layout on Microsoft Windows”. To configure
installation locations different from the defaults, use the
options described at
Section 2.9.4, “MySQL Source-Configuration Options”.
To install MySQL from a standard source distribution:
Verify that your system satisfies the tool requirements listed at Section 2.9, “Installing MySQL from Source”.
Obtain a distribution file using the instructions in Section 2.1.2, “How to Get MySQL”.
Configure, build, and install the distribution using the instructions in this section.
Perform postinstallation procedures using the instructions in Section 2.10, “Postinstallation Setup and Testing”.
In MySQL 5.7, CMake is used as the build framework on all platforms. The instructions given here should enable you to produce a working installation. For additional information on using CMake to build MySQL, see How to Build MySQL Server with CMake.
If you start from a source RPM, use the following command to make a binary RPM that you can install. If you do not have rpmbuild, use rpm instead.
shell> rpmbuild --rebuild --clean MySQL-VERSION.src.rpm
The result is one or more binary RPM packages that you install as indicated in Section 2.5.5, “Installing MySQL on Linux Using RPM Packages from Oracle”.
The sequence for installation from a compressed tar file or Zip archive source distribution is similar to the process for installing from a generic binary distribution (see Section 2.2, “Installing MySQL on Unix/Linux Using Generic Binaries”), except that it is used on all platforms and includes steps to configure and compile the distribution. For example, with a compressed tar file source distribution on Unix, the basic installation command sequence looks like this:
# Preconfiguration setup shell>groupadd mysqlshell>useradd -r -g mysql -s /bin/false mysql# Beginning of source-build specific instructions shell>tar zxvf mysql-shell>VERSION.tar.gzcd mysql-shell>VERSIONcmake .shell>makeshell>make install# End of source-build specific instructions # Postinstallation setup shell>cd /usr/local/mysqlshell>chown -R mysql .shell>chgrp -R mysql .shell>bin/mysql_install_db --user=mysql# Before MySQL 5.7.6 shell>bin/mysqld --initialize --user=mysql# MySQL 5.7.6 and up shell>bin/mysql_ssl_rsa_setup# MySQL 5.7.6 and up shell>chown -R root .shell>chown -R mysql datashell>bin/mysqld_safe --user=mysql &# Next command is optional shell>cp support-files/mysql.server /etc/init.d/mysql.server
Before MySQL 5.7.5, mysql_install_db creates a
default option file named my.cnf in the base
installation directory. This file is created from a template
included in the distribution package named
my-default.cnf. For more information, see
Section 5.1.2, “Server Configuration Defaults”.
A more detailed version of the source-build specific instructions is shown following.
The procedure shown here does not set up any passwords for MySQL accounts. After following the procedure, proceed to Section 2.10, “Postinstallation Setup and Testing”, for postinstallation setup and testing.
Perform Preconfiguration Setup
On Unix, set up the mysql user and group that
will be used to run and execute the MySQL server and own the
database directory. For details, see
Creating a
mysql System User and Group, in
Section 2.2, “Installing MySQL on Unix/Linux Using Generic Binaries”. Then perform the following
steps as the mysql user, except as noted.
Obtain and Unpack the Distribution
Pick the directory under which you want to unpack the distribution and change location into it.
Obtain a distribution file using the instructions in Section 2.1.2, “How to Get MySQL”.
Unpack the distribution into the current directory:
To unpack a compressed tar file, tar can uncompress and unpack the distribution if it has
zoption support:shell>
tar zxvf mysql-VERSION.tar.gzIf your tar does not have
zoption support, use gunzip to unpack the distribution and tar to unpack it:shell>
gunzip < mysql-VERSION.tar.gz | tar xvf -Alternatively, CMake can uncompress and unpack the distribution:
shell>
cmake -E tar zxvf mysql-VERSION.tar.gzTo unpack a Zip archive, use WinZip or another tool that can read
.zipfiles.
Unpacking the distribution file creates a directory named
mysql-.
VERSION
Configure the Distribution
Change location into the top-level directory of the unpacked distribution:
shell> cd mysql-VERSION
Configure the source directory. The minimum configuration command includes no options to override configuration defaults:
shell> cmake .
On Windows, specify the development environment. For example, the following commands configure MySQL for 32-bit or 64-bit builds, respectively:
shell>cmake . -G "Visual Studio 10 2010"shell>cmake . -G "Visual Studio 10 2010 Win64"
On OS X, to use the Xcode IDE:
shell> cmake . -G Xcode
When you run cmake, you might want to add options to the command line. Here are some examples:
-DBUILD_CONFIG=mysql_release: Configure the source with the same build options used by Oracle to produce binary distributions for official MySQL releases.-DCMAKE_INSTALL_PREFIX=: Configure the distribution for installation under a particular location.dir_name-DCPACK_MONOLITHIC_INSTALL=1: Cause make package to generate a single installation file rather than multiple files.-DWITH_DEBUG=1: Build the distribution with debugging support.
For a more extensive list of options, see Section 2.9.4, “MySQL Source-Configuration Options”.
To list the configuration options, use one of the following commands:
shell>cmake . -L# overview shell>cmake . -LH# overview with help text shell>cmake . -LAH# all params with help text shell>ccmake .# interactive display
If CMake fails, you might need to reconfigure by running it again with different options. If you do reconfigure, take note of the following:
If CMake is run after it has previously been run, it may use information that was gathered during its previous invocation. This information is stored in
CMakeCache.txt. When CMake starts up, it looks for that file and reads its contents if it exists, on the assumption that the information is still correct. That assumption is invalid when you reconfigure.Each time you run CMake, you must run make again to recompile. However, you may want to remove old object files from previous builds first because they were compiled using different configuration options.
To prevent old object files or configuration information from being used, run these commands on Unix before re-running CMake:
shell>make cleanshell>rm CMakeCache.txt
Or, on Windows:
shell>devenv MySQL.sln /cleanshell>del CMakeCache.txt
If you build out of the source tree (as described later), the
CMakeCache.txt file and all built files are
in the build directory, so you can remove that directory to object
files and cached configuration information.
If you are going to send mail to a MySQL mailing list to ask for
configuration assistance, first check the files in the
CMakeFiles directory for useful information
about the failure. To file a bug report, please use the
instructions in Section 1.7, “How to Report Bugs or Problems”.
Build the Distribution
On Unix:
shell>makeshell>make VERBOSE=1
The second command sets VERBOSE to show the
commands for each compiled source.
Use gmake instead on systems where you are using GNU make and it has been installed as gmake.
On Windows:
shell> devenv MySQL.sln /build RelWithDebInfo
It is possible to build out of the source tree to keep the tree
clean. If the top-level source directory is named
mysql-src under your current working
directory, you can build in a directory named
bld at the same level like this:
shell>mkdir bldshell>cd bldshell>cmake ../mysql-src
The build directory need not actually be outside the source tree.
For example, to build in a directory, you can build in a directory
named bld under the top-level source tree, do
this, starting with mysql-src as your current
working directory:
shell>mkdir bldshell>cd bldshell>cmake ..
If you have multiple source trees at the same level (for example, to build multiple versions of MySQL), the second strategy can be advantageous. The first strategy places all build directories at the same level, which requires that you choose a unique name for each. With the second strategy, you can use the same name for the build directory within each source tree.
If you have gotten to the compilation stage, but the distribution
does not build, see Section 2.9.5, “Dealing with Problems Compiling MySQL”, for
help. If that does not solve the problem, please enter it into our
bugs database using the instructions given in
Section 1.7, “How to Report Bugs or Problems”. If you have installed the latest
versions of the required tools, and they crash trying to process
our configuration files, please report that also. However, if you
get a command not found error or a similar
problem for required tools, do not report it. Instead, make sure
that all the required tools are installed and that your
PATH variable is set correctly so that your
shell can find them.
Install the Distribution
On Unix:
shell> make install
This installs the files under the configured installation
directory (by default, /usr/local/mysql). You
might need to run the command as root.
To install in a specific directory, add a
DESTDIR parameter to the command line:
shell> make install DESTDIR="/opt/mysql"
Alternatively, generate installation package files that you can install where you like:
shell> make package
This operation produces one or more .tar.gz
files that can be installed like generic binary distribution
packages. See Section 2.2, “Installing MySQL on Unix/Linux Using Generic Binaries”. If you run
CMake with
-DCPACK_MONOLITHIC_INSTALL=1, the
operation produces a single file. Otherwise, it produces multiple
files.
On Windows, generate the data directory, then create a
.zip archive installation package:
shell>devenv MySQL.sln /build RelWithDebInfo /project initial_databaseshell>devenv MySQL.sln /build RelWithDebInfo /project package
You can install the resulting .zip archive
where you like. See Section 2.3.5, “Installing MySQL on Microsoft Windows Using a noinstall Zip Archive”.
Perform Postinstallation Setup
The remainder of the installation process involves setting up the configuration file, creating the core databases, and starting the MySQL server. For instructions, see Section 2.10, “Postinstallation Setup and Testing”.
The accounts that are listed in the MySQL grant tables initially have no passwords. After starting the server, you should set up passwords for them using the instructions in Section 2.10, “Postinstallation Setup and Testing”.
This section describes how to install MySQL from the latest development source code, which is currently hosted on GitHub. To obtain the MySQL Server source code from this repository hosting service, you can set up a local MySQL Git repository.
On GitHub, MySQL Server and other MySQL projects are found on the MySQL page. The MySQL Server project is a single repository that contains branches for several MySQL series, such as 5.5, 5.6, and 5.7.
MySQL officially joined GitHub in September, 2014. For more information about MySQL's move to GitHub, refer to the announcement on the MySQL Release Engineering blog: MySQL on GitHub
To install MySQL from a development source tree, your system must satisfy the tool requirements outlined in Section 2.9, “Installing MySQL from Source”.
To set up a MySQL Git repository on your machine, use this procedure:
Clone the MySQL Git repository to your machine. The following command clones the MySQL Git repository to a directory named
mysql-server. The download size is approximately 437 MB. The initial download will take some time to complete, depending on the speed of your connection.~$ git clone https://github.com/mysql/mysql-server.git Cloning into 'mysql-server'... remote: Counting objects: 1035465, done. remote: Total 1035465 (delta 0), reused 0 (delta 0) Receiving objects: 100% (1035465/1035465), 437.48 MiB | 5.10 MiB/s, done. Resolving deltas: 100% (855607/855607), done. Checking connectivity... done. Checking out files: 100% (21902/21902), done.
When the clone operation completes, the contents of your local MySQL Git repository appear similar to the following:
~$ cd mysql-server ~/mysql-server$ ls BUILD COPYING libmysqld regex tests BUILD-CMAKE dbug libservices scripts unittest client Docs man sql VERSION cmake extra mysql-test sql-bench vio CMakeLists.txt include mysys sql-common win cmd-line-utils INSTALL-SOURCE packaging storage zlib config.h.cmake INSTALL-WIN-SOURCE plugin strings configure.cmake libmysql README support-files
Use the git branch -r command to view the remote tracking branches for the MySQL repository.
~/mysql-server$ git branch -r origin/5.5 origin/5.6 origin/5.7 origin/HEAD -> origin/5.7 origin/cluster-7.2 origin/cluster-7.3 origin/cluster-7.4
To view the branches that are checked out in your local repository, issue the git branch command. When you cloned the MySQL Git repository, the MySQL 5.7 branch was checked out automatically. The asterisk identifies the 5.7 branch as the active branch.
~/mysql-server$ git branch * 5.7
To check out a different MySQL branch, run the git checkout command, specifying the branch name. For example, to checkout the MySQL 5.5 branch:
~/mysql-server$ git checkout 5.5 Branch 5.5 set up to track remote branch 5.5 from origin. Switched to a new branch '5.5'
Run
git branchto verify that the MySQL 5.5 branch is present. MySQL 5.5, which is the last branch you checked out, is marked by an asterisk indicating that it is the active branch.~/mysql-server$ git branch * 5.5 5.7
Use the git checkout command to switch back to the MySQL 5.7 branch:
~/mysql-server$ git checkout 5.7
To obtain changes made after your initial setup of the MySQL Git repository, switch to the branch you want to update and issue the
git pullcommand:~/mysql-server$ git checkout 5.7 ~/mysql-server$ git pull
To examine the commit history, use the
git logoption:~/mysql-server$ git log
You can also browse commit history and source code on the GitHub MySQL site.
If you see changes or code that you have a question about, send an email to the MySQL
internalsmailing list. See Section 1.6.1, “MySQL Mailing Lists”. For information about contributing a patch, see Contributing to MySQL Server.After you have cloned the MySQL Git repository and have checked out the branch you want to build, you can build MySQL Server from the source code. Instructions are provided in Section 2.9.2, “Installing MySQL Using a Standard Source Distribution”, except that you skip the part about obtaining and unpacking the distribution.
Be careful about installing a build from a distribution source tree on a production machine. The installation command may overwrite your live release installation. If you already have MySQL installed and do not want to overwrite it, run CMake with values for the
CMAKE_INSTALL_PREFIX,MYSQL_TCP_PORT, andMYSQL_UNIX_ADDRoptions different from those used by your production server. For additional information about preventing multiple servers from interfering with each other, see Section 5.3, “Running Multiple MySQL Instances on One Machine”.Play hard with your new installation. For example, try to make new features crash. Start by running make test. See Section 25.1.2, “The MySQL Test Suite”.
The CMake program provides a great deal of control over how you configure a MySQL source distribution. Typically, you do this using options on the CMake command line. For information about options supported by CMake, run either of these commands in the top-level source directory:
shell>cmake . -LHshell>ccmake .
You can also affect CMake using certain environment variables. See Section 2.12, “Environment Variables”.
The following table shows the available CMake
options. In the Default column,
PREFIX stands for the value of the
CMAKE_INSTALL_PREFIX option, which
specifies the installation base directory. This value is used as
the parent location for several of the installation
subdirectories.
Table 2.11 MySQL Source-Configuration Option Reference (CMake)
| Formats | Description | Default | Introduced | Removed |
|---|---|---|---|---|
BUILD_CONFIG | Use same build options as official releases | |||
CMAKE_BUILD_TYPE | Type of build to produce | RelWithDebInfo | ||
CMAKE_CXX_FLAGS | Flags for C++ Compiler | |||
CMAKE_C_FLAGS | Flags for C Compiler | |||
CMAKE_INSTALL_PREFIX | Installation base directory | /usr/local/mysql | ||
COMPILATION_COMMENT | Comment about compilation environment | |||
CPACK_MONOLITHIC_INSTALL | Whether package build produces single file | OFF | ||
DEFAULT_CHARSET | The default server character set | latin1 | ||
DEFAULT_COLLATION | The default server collation | latin1_swedish_ci | ||
DISABLE_PSI_COND | Exclude Performance Schema condition instrumentation | OFF | 5.7.3 | |
DISABLE_PSI_FILE | Exclude Performance Schema file instrumentation | OFF | 5.7.3 | |
DISABLE_PSI_IDLE | Exclude Performance Schema idle instrumentation | OFF | 5.7.3 | |
DISABLE_PSI_MEMORY | Exclude Performance Schema memory instrumentation | OFF | 5.7.3 | |
DISABLE_PSI_METADATA | Exclude Performance Schema metadata instrumentation | OFF | 5.7.3 | |
DISABLE_PSI_MUTEX | Exclude Performance Schema mutex instrumentation | OFF | 5.7.3 | |
DISABLE_PSI_RWLOCK | Exclude Performance Schema rwlock instrumentation | OFF | 5.7.3 | |
DISABLE_PSI_SOCKET | Exclude Performance Schema socket instrumentation | OFF | 5.7.3 | |
DISABLE_PSI_SP | Exclude Performance Schema stored program instrumentation | OFF | 5.7.3 | |
DISABLE_PSI_STAGE | Exclude Performance Schema stage instrumentation | OFF | 5.7.3 | |
DISABLE_PSI_STATEMENT | Exclude Performance Schema statement instrumentation | OFF | 5.7.3 | |
DISABLE_PSI_STATEMENT_DIGEST | Exclude Performance Schema statement_digest instrumentation | OFF | 5.7.3 | |
DISABLE_PSI_TABLE | Exclude Performance Schema table instrumentation | OFF | 5.7.3 | |
DOWNLOAD_BOOST | Whether to download the Boost library | OFF | 5.7.5 | |
DOWNLOAD_BOOST_TIMEOUT | Timeout in seconds for downloading the Boost library | 600 | 5.7.6 | |
ENABLED_LOCAL_INFILE | Whether to enable LOCAL for LOAD DATA INFILE | OFF | ||
ENABLED_PROFILING | Whether to enable query profiling code | ON | ||
ENABLE_DEBUG_SYNC | Whether to enable Debug Sync support | ON | ||
ENABLE_DOWNLOADS | Whether to download optional files | OFF | ||
ENABLE_DTRACE | Whether to include DTrace support | |||
ENABLE_GCOV | Whether to include gcov support | |||
ENABLE_GPROF | Enable gprof (optimized Linux builds only) | OFF | ||
FORCE_UNSUPPORTED_COMPILER | Whether to permit unsupported compiler | OFF | 5.7.5 | |
IGNORE_AIO_CHECK | With -DBUILD_CONFIG=mysql_release, ignore libaio check | OFF | ||
INNODB_PAGE_ATOMIC_REF_COUNT | Enable or disable atomic page reference counting | ON | 5.7.4 | 5.7.5 |
INSTALL_BINDIR | User executables directory | PREFIX/bin | ||
INSTALL_DOCDIR | Documentation directory | PREFIX/docs | ||
INSTALL_DOCREADMEDIR | README file directory | PREFIX | ||
INSTALL_INCLUDEDIR | Header file directory | PREFIX/include | ||
INSTALL_INFODIR | Info file directory | PREFIX/docs | ||
INSTALL_LAYOUT | Select predefined installation layout | STANDALONE | ||
INSTALL_LIBDIR | Library file directory | PREFIX/lib | ||
INSTALL_MANDIR | Manual page directory | PREFIX/man | ||
INSTALL_MYSQLKEYRINGDIR | Directory for keyring_file plugin data file | platform specific | 5.7.11 | |
INSTALL_MYSQLSHAREDIR | Shared data directory | PREFIX/share | ||
INSTALL_MYSQLTESTDIR | mysql-test directory | PREFIX/mysql-test | ||
INSTALL_PKGCONFIGDIR | Directory for mysqlclient.pc pkg-config file | INSTALL_LIBDIR/pkgconfig | 5.7.9 | |
INSTALL_PLUGINDIR | Plugin directory | PREFIX/lib/plugin | ||
INSTALL_SBINDIR | Server executable directory | PREFIX/bin | ||
INSTALL_SCRIPTDIR | Scripts directory | PREFIX/scripts | ||
INSTALL_SECURE_FILE_PRIVDIR | secure_file_priv default value | platform specific | 5.7.6 | |
INSTALL_SECURE_FILE_PRIV_EMBEDDEDDIR | secure_file_priv default value for libmysqld | 5.7.8 | ||
INSTALL_SHAREDIR | aclocal/mysql.m4 installation directory | PREFIX/share | ||
INSTALL_SQLBENCHDIR | sql-bench directory | PREFIX | 5.7.8 | |
INSTALL_SUPPORTFILESDIR | Extra support files directory | PREFIX/support-files | ||
MAX_INDEXES | Maximum indexes per table | 64 | 5.7.1 | |
MUTEX_TYPE | InnoDB mutex type | event | 5.7.2 | |
MYSQL_DATADIR | Data directory | |||
MYSQL_MAINTAINER_MODE | Whether to enable MySQL maintainer-specific development environment | OFF | ||
MYSQL_PROJECT_NAME | Windows/OS X project name | 3306 | ||
MYSQL_TCP_PORT | TCP/IP port number | 3306 | ||
MYSQL_UNIX_ADDR | Unix socket file | /tmp/mysql.sock | ||
ODBC_INCLUDES | ODBC includes directory | |||
ODBC_LIB_DIR | ODBC library directory | |||
OPTIMIZER_TRACE | Whether to support optimizer tracing | |||
SUNPRO_CXX_LIBRARY | Client link library on Solaris 10+ | 5.7.5 | ||
SYSCONFDIR | Option file directory | |||
SYSTEMD_PID_DIR | Directory for PID file under systemd | /var/run/mysqld | 5.7.6 | |
SYSTEMD_SERVICE_NAME | Name of MySQL service under systemd | mysqld | 5.7.6 | |
TMPDIR | tmpdir default value | 5.7.4 | ||
WIN_DEBUG_NO_INLINE | Whether to disable function inlining | OFF | 5.7.6 | |
WITHOUT_SERVER | Do not build the server | OFF | ||
WITHOUT_xxx_STORAGE_ENGINE | Exclude storage engine xxx from build | |||
WITH_ASAN | Enable AddressSanitizer | OFF | 5.7.3 | |
WITH_AUTHENTICATION_PAM | Build PAM authentication plugin | OFF | ||
WITH_BOOST | The location of the Boost library sources | 5.7.5 | ||
WITH_CLIENT_PROTOCOL_TRACING | Build client-side protocol tracing framework | ON | 5.7.2 | |
WITH_DEBUG | Whether to include debugging support | OFF | ||
WITH_DEFAULT_COMPILER_OPTIONS | Whether to use default compiler options | ON | ||
WITH_DEFAULT_FEATURE_SET | Whether to use default feature set | ON | ||
WITH_EDITLINE | Which libedit/editline library to use | bundled | 5.7.2 | |
WITH_EMBEDDED_SERVER | Whether to build embedded server | OFF | ||
WITH_EMBEDDED_SHARED_LIBRARY | Whether to build a shared embedded server library | OFF | 5.7.4 | |
WITH_EXTRA_CHARSETS | Which extra character sets to include | all | ||
WITH_INNODB_EXTRA_DEBUG | Whether to include extra debugging support for InnoDB. | OFF | 5.7.2 | |
WITH_INNODB_MEMCACHED | Whether to generate memcached shared libraries. | OFF | ||
WITH_KEYRING_TEST | Build the keyring test program | OFF | 5.7.11 | |
WITH_LIBEVENT | Which libevent library to use | bundled | ||
WITH_LIBWRAP | Whether to include libwrap (TCP wrappers) support | OFF | ||
WITH_MECAB | Compiles MeCab | 5.7.6 | ||
WITH_MSAN | Enable MemorySanitizer | OFF | 5.7.4 | |
WITH_MSCRT_DEBUG | Enable Visual Studio CRT memory leak tracing | OFF | 5.7.6 | |
WITH_NDBCLUSTER | Build the NDB storage engine; alias for WITH_NDBCLUSTER_STORAGE_ENGINE | ON | ||
WITH_NDBCLUSTER_STORAGE_ENGINE | Build the NDB storage engine | ON | ||
WITH_RAPID | Whether to build rapid development cycle plugins | ON | 5.7.12 | |
WITH_SSL | Type of SSL support | bundled | ||
WITH_SYSTEMD | Enable installation of systemd support files | OFF | 5.7.6 | |
WITH_TEST_TRACE_PLUGIN | Build test protocol trace plugin | OFF | 5.7.2 | |
WITH_UBSAN | Enable Undefined Behavior Sanitizer | OFF | 5.7.6 | |
WITH_UNIXODBC | Enable unixODBC support | OFF | ||
WITH_VALGRIND | Whether to compile in Valgrind header files | OFF | ||
WITH_ZLIB | Type of zlib support | bundled | ||
WITH_xxx_STORAGE_ENGINE | Compile storage engine xxx statically into server |
The following sections provide more information about CMake options.
For boolean options, the value may be specified as 1 or
ON to enable the option, or as 0 or
OFF to disable the option.
Many options configure compile-time defaults that can be
overridden at server startup. For example, the
CMAKE_INSTALL_PREFIX,
MYSQL_TCP_PORT, and
MYSQL_UNIX_ADDR options that
configure the default installation base directory location, TCP/IP
port number, and Unix socket file can be changed at server startup
with the --basedir,
--port, and
--socket options for
mysqld. Where applicable, configuration option
descriptions indicate the corresponding mysqld
startup option.
General Options
This option configures a source distribution with the same build options used by Oracle to produce binary distributions for official MySQL releases.
The type of build to produce:
RelWithDebInfo: Enable optimizations and generate debugging information. This is the default MySQL build type.Debug: Disable optimizations and generate debugging information. This build type is also used if theWITH_DEBUGoption is enabled. That is,-DWITH_DEBUG=1has the same effect as-DCMAKE_BUILD_TYPE=Debug.
-DCPACK_MONOLITHIC_INSTALL=boolThis option affects whether the make package operation produces multiple installation package files or a single file. If disabled, the operation produces multiple installation package files, which may be useful if you want to install only a subset of a full MySQL installation. If enabled, it produces a single file for installing everything.
Installation Layout Options
The CMAKE_INSTALL_PREFIX option
indicates the base installation directory. Other options with
names of the form
INSTALL_ that
indicate component locations are interpreted relative to the
prefix and their values are relative pathnames. Their values
should not include the prefix.
xxx
-DCMAKE_INSTALL_PREFIX=dir_nameThe installation base directory.
This value can be set at server startup with the
--basediroption.Where to install user programs.
Where to install documentation.
-DINSTALL_DOCREADMEDIR=dir_nameWhere to install
READMEfiles.Where to install header files.
Where to install Info files.
Select a predefined installation layout:
STANDALONE: Same layout as used for.tar.gzand.zippackages. This is the default.RPM: Layout similar to RPM packages.SVR4: Solaris package layout.DEB: DEB package layout (experimental).
You can select a predefined layout but modify individual component installation locations by specifying other options. For example:
shell>
cmake . -DINSTALL_LAYOUT=SVR4 -DMYSQL_DATADIR=/var/mysql/dataAs of MySQL 5.7.6, the
INSTALL_LAYOUTvalue determines the default value of thesecure_file_privsystem andkeyring_file_datasystem variables; see the descriptions of those variables in Section 5.1.4, “Server System Variables”.Where to install library files.
Where to install manual pages.
-DINSTALL_MYSQLKEYRINGDIR=dir_pathThe default directory to use as the location of the
keyring_fileplugin data file. The default value is platform specific and depends on the value of theINSTALL_LAYOUTCMake option; see the description of thekeyring_file_datasystem variable in Section 5.1.4, “Server System Variables”.This option was added in MySQL 5.7.11.
-DINSTALL_MYSQLSHAREDIR=dir_nameWhere to install shared data files.
-DINSTALL_MYSQLTESTDIR=dir_nameWhere to install the
mysql-testdirectory. As of MySQL 5.7.2, to suppress installation of this directory, explicitly set the option to the empty value (-DINSTALL_MYSQLTESTDIR=).-DINSTALL_PKGCONFIGDIR=dir_nameThe directory in which to install the
mysqlclient.pcfile for use by pkg-config. The default value isINSTALL_LIBDIR/pkgconfig, unlessINSTALL_LIBDIRends with/mysql, in which case that is removed first.This option was added in MySQL 5.7.9.
The location of the plugin directory.
This value can be set at server startup with the
--plugin_diroption.Where to install the mysqld server.
Where to install mysql_install_db.
-DINSTALL_SECURE_FILE_PRIVDIR=dir_nameThe default value for the
secure_file_privsystem variable. The default value is platform specific and depends on the value of theINSTALL_LAYOUTCMake option; see the description of thesecure_file_privsystem variable in Section 5.1.4, “Server System Variables”.This option was added in MySQL 5.7.6. To set the value for the
libmysqldembedded server, useINSTALL_SECURE_FILE_PRIV_EMBEDDEDDIR.-DINSTALL_SECURE_FILE_PRIV_EMBEDDEDDIR=dir_nameThe default value for the
secure_file_privsystem variable, for thelibmysqldembedded server. This option was added in MySQL 5.7.8.Where to install
aclocal/mysql.m4.-DINSTALL_SQLBENCHDIR=dir_nameWhere to install the
sql-benchdirectory. To suppress installation of this directory, explicitly set the option to the empty value (-DINSTALL_SQLBENCHDIR=).As of MySQL 5.7.8, the
sql-benchdirectory is no longer included in MYSQL distributions, so theINSTALL_SQLBENCHDIR=option is removed as well.-DINSTALL_SUPPORTFILESDIR=dir_nameWhere to install extra support files.
The location of the MySQL data directory.
This value can be set at server startup with the
--datadiroption.The location of the ODBC includes directory, and may be used while configuring Connector/ODBC.
The location of the ODBC library directory, and may be used while configuring Connector/ODBC.
The default
my.cnfoption file directory.This location cannot be set at server startup, but you can start the server with a given option file using the
--defaults-file=option, wherefile_namefile_nameis the full path name to the file.The name of the directory in which to create the PID file when MySQL is managed by systemd. The default is
/var/run/mysqld; this might be changed implicitly according to theINSTALL_LAYOUTvalue.This option is ignored unless
WITH_SYSTEMDis enabled. It was added in MySQL 5.7.6.The name of the MySQL service to use when MySQL is managed by systemd. The default is
mysqld; this might be changed implicitly according to theINSTALL_LAYOUTvalue.This option is ignored unless
WITH_SYSTEMDis enabled. It was added in MySQL 5.7.6.The default location to use for the
tmpdirsystem variable. If unspecified, the value defaults toP_tmpdirin<stdio.h>. This option was added in MySQL 5.7.4.
Storage Engine Options
Storage engines are built as plugins. You can build a plugin as a
static module (compiled into the server) or a dynamic module
(built as a dynamic library that must be installed into the server
using the INSTALL PLUGIN statement
or the --plugin-load option before
it can be used). Some plugins might not support static or dynamic
building.
The MyISAM,
MERGE,
MEMORY, and
CSV engines are mandatory (always
compiled into the server) and need not be installed explicitly.
To compile a storage engine statically into the server, use
-DWITH_.
Some permissible engine_STORAGE_ENGINE=1engine values are
ARCHIVE, BLACKHOLE,
EXAMPLE, FEDERATED,
INNOBASE (InnoDB),
NDB or NDBCLUSTER
(NDB), PARTITION
(partitioning support), and PERFSCHEMA
(Performance Schema). Examples:
-DWITH_INNOBASE_STORAGE_ENGINE=1 -DWITH_ARCHIVE_STORAGE_ENGINE=1 -DWITH_BLACKHOLE_STORAGE_ENGINE=1 -DWITH_PERFSCHEMA_STORAGE_ENGINE=1
WITH_NDBCLUSTER_STORAGE_ENGINE is
supported only when building MySQL Cluster using the MySQL
Cluster sources. It cannot be used to enable clustering support
in other MySQL source trees or distributions. In MySQL Cluster
source distributions, it is enabled by default. See
Section 18.2.2.4, “Building MySQL Cluster from Source on Linux”, and
Section 18.2.3.2, “Compiling and Installing MySQL Cluster from Source on Windows”, for more
information.
As of MySQL 5.7.9, it is not possible to compile without Performance Schema support. If it is desired to compile without particular types of instrumentation, that can be done with the following CMake options:
DISABLE_PSI_COND DISABLE_PSI_FILE DISABLE_PSI_IDLE DISABLE_PSI_MEMORY DISABLE_PSI_METADATA DISABLE_PSI_MUTEX DISABLE_PSI_PS DISABLE_PSI_RWLOCK DISABLE_PSI_SOCKET DISABLE_PSI_SP DISABLE_PSI_STAGE DISABLE_PSI_STATEMENT DISABLE_PSI_STATEMENT_DIGEST DISABLE_PSI_TABLE DISABLE_PSI_THREAD DISABLE_PSI_TRANSACTION
For example, to compile without mutex instrumentation, configure
MySQL using the -DDISABLE_PSI_MUTEX=1 option.
As of MySQL 5.7.4, to exclude a storage engine from the build, use
-DWITH_.
Examples:
engine_STORAGE_ENGINE=0
-DWITH_EXAMPLE_STORAGE_ENGINE=0 -DWITH_FEDERATED_STORAGE_ENGINE=0 -DWITH_PARTITION_STORAGE_ENGINE=0
Before MySQL 5.7.4, to exclude a storage engine from the build,
use
-DWITHOUT_.
(That syntax also works in 5.7.4 or later, but
engine_STORAGE_ENGINE=1-DWITH_
is preferred.) Examples:
engine_STORAGE_ENGINE=0
-DWITHOUT_EXAMPLE_STORAGE_ENGINE=1 -DWITHOUT_FEDERATED_STORAGE_ENGINE=1 -DWITHOUT_PARTITION_STORAGE_ENGINE=1
If neither
-DWITH_
nor
engine_STORAGE_ENGINE-DWITHOUT_
are specified for a given storage engine, the engine is built as a
shared module, or excluded if it cannot be built as a shared
module.
engine_STORAGE_ENGINE
Feature Options
A descriptive comment about the compilation environment.
-DDEFAULT_CHARSET=charset_nameThe server character set. By default, MySQL uses the
latin1(cp1252 West European) character set.charset_namemay be one ofbinary,armscii8,ascii,big5,cp1250,cp1251,cp1256,cp1257,cp850,cp852,cp866,cp932,dec8,eucjpms,euckr,gb2312,gbk,geostd8,greek,hebrew,hp8,keybcs2,koi8r,koi8u,latin1,latin2,latin5,latin7,macce,macroman,sjis,swe7,tis620,ucs2,ujis,utf8,utf8mb4,utf16,utf16le,utf32. The permissible character sets are listed in thecmake/character_sets.cmakefile as the value ofCHARSETS_AVAILABLE.This value can be set at server startup with the
--character_set_serveroption.-DDEFAULT_COLLATION=collation_nameThe server collation. By default, MySQL uses
latin1_swedish_ci. Use theSHOW COLLATIONstatement to determine which collations are available for each character set.This value can be set at server startup with the
--collation_serveroption.Whether to exclude the Performance Schema condition instrumentation. The default is
OFF(include). This option was added in MySQL 5.7.3.Whether to exclude the Performance Schema file instrumentation. The default is
OFF(include). This option was added in MySQL 5.7.3.Whether to exclude the Performance Schema idle instrumentation. The default is
OFF(include). This option was added in MySQL 5.7.3.Whether to exclude the Performance Schema memory instrumentation. The default is
OFF(include). This option was added in MySQL 5.7.3.Whether to exclude the Performance Schema metadata instrumentation. The default is
OFF(include). This option was added in MySQL 5.7.3.Whether to exclude the Performance Schema mutex instrumentation. The default is
OFF(include). This option was added in MySQL 5.7.3.Whether to exclude the Performance Schema rwlock instrumentation. The default is
OFF(include). This option was added in MySQL 5.7.3.Whether to exclude the Performance Schema socket instrumentation. The default is
OFF(include). This option was added in MySQL 5.7.3.Whether to exclude the Performance Schema stored program instrumentation. The default is
OFF(include). This option was added in MySQL 5.7.3.Whether to exclude the Performance Schema stage instrumentation. The default is
OFF(include). This option was added in MySQL 5.7.3.Whether to exclude the Performance Schema statement instrumentation. The default is
OFF(include). This option was added in MySQL 5.7.3.-DDISABLE_PSI_STATEMENT_DIGEST=boolWhether to exclude the Performance Schema statement_digest instrumentation. The default is
OFF(include). This option was added in MySQL 5.7.3.Whether to exclude the Performance Schema table instrumentation. The default is
OFF(include). This option was added in MySQL 5.7.3.Whether to download the Boost library. The default is
OFF. This option was added in MySQL 5.7.5.See the
WITH_BOOSToption for additional discussion about using Boost.-DDOWNLOAD_BOOST_TIMEOUT=secondsThe timeout in seconds for downloading the Boost library. The default is 600 seconds. This option was added in MySQL 5.7.6.
See the
WITH_BOOSToption for additional discussion about using Boost.Whether to compile the Debug Sync facility into the server. This facility is used for testing and debugging. This option is enabled by default, but has no effect unless MySQL is configured with debugging enabled. If debugging is enabled and you want to disable Debug Sync, use
-DENABLE_DEBUG_SYNC=0.When compiled in, Debug Sync is disabled by default at runtime. To enable it, start mysqld with the
--debug-sync-timeout=option, whereNNis a timeout value greater than 0. (The default value is 0, which disables Debug Sync.)Nbecomes the default timeout for individual synchronization points.As of MySQL 5.7.8, sync debug checking for the
InnoDBstorage engine is available when debugging support is compiled in using theWITH_DEBUGoption.For a description of the Debug Sync facility and how to use synchronization points, see MySQL Internals: Test Synchronization.
Whether to download optional files. For example, with this option enabled, CMake downloads the Google Test distribution that is used by the test suite to run unit tests.
Whether to include support for DTrace probes. For information about DTrace, wee Section 5.4, “Tracing mysqld Using DTrace”
Whether to include gcov support (Linux only).
Whether to enable
gprof(optimized Linux builds only).Whether to enable
LOCALcapability in the client library forLOAD DATA INFILE.This option controls client-side
LOCALcapability, but the capability can be set on the server side at server startup with the--local-infileoption. See Section 6.1.6, “Security Issues with LOAD DATA LOCAL”.Whether to enable query profiling code (for the
SHOW PROFILEandSHOW PROFILESstatements).-DFORCE_UNSUPPORTED_COMPILER=boolBy default, CMake checks for minimum versions of supported compilers: gcc 4.4 (Linux, Solaris); Sun Studio 12u2 (Solaris client library); Clang 3.3 (OS X, FreeBSD). To disable this check, use
-DFORCE_UNSUPPORTED_COMPILER=ON. This option was added in MySQL 5.7.5.If the
-DBUILD_CONFIG=mysql_releaseoption is given on Linux, thelibaiolibrary must be linked in by default. If you do not havelibaioor do not want to install it, you can suppress the check for it by specifying-DIGNORE_AIO_CHECK=1.-DINNODB_PAGE_ATOMIC_REF_COUNT=boolWhether to enable or disable atomic page reference counting. Fetching and releasing pages from the buffer pool and tracking the page state are expensive and complex operations. Using a page mutex to track these operations does not scale well. With
INNODB_PAGE_ATOMIC_REF_COUNT=ON(default), fetch and release is tracked using atomics where available. For platforms that do not support atomics, setINNODB_PAGE_ATOMIC_REF_COUNT=OFFto disable atomic page reference counting.When atomic page reference counting is enabled (default), “
[Note] InnoDB: Using atomics to ref count buffer pool pages” is printed to the error log at server startup. If atomic page reference counting is disabled, “[Note] InnoDB: Using mutexes to ref count buffer pool pages” is printed instead.INNODB_PAGE_ATOMIC_REF_COUNTwas introduced with the fix for MySQL Bug #68079. The option is removed in MySQL 5.7.5. Support for atomics is required to build MySQL as of MySQL 5.7.5, which makes the option obsolete.The maximum number of indexes per table. The default is 64. The maximum is 255. Values smaller than 64 are ignored and the default of 64 is used.
Whether to enable a MySQL maintainer-specific development environment. If enabled, this option causes compiler warnings to become errors.
The mutex type used by
InnoDB. Options include:event: Use event mutexes. This is the default value and the originalInnoDBmutex implementation.sys: Use POSIX mutexes on UNIX systems. UseCRITICAL_SECTIONonjects on Windows, if available.futex: Use Linux futexes instead of condition variables to schedule waiting threads.
For Windows or OS X, the project name to incorporate into the project file name.
The port number on which the server listens for TCP/IP connections. The default is 3306.
This value can be set at server startup with the
--portoption.The Unix socket file path on which the server listens for socket connections. This must be an absolute path name. The default is
/tmp/mysql.sock.This value can be set at server startup with the
--socketoption.Whether to support optimizer tracing. See MySQL Internals: Tracing the Optimizer.
Whether to disable function inlining on Windows. The default is off (inlining enabled). This option was added in MySQL 5.7.6.
Whether to enable the AddressSanitizer, for compilers that support it. The default is off. This option was added in MySQL 5.7.3.
-DWITH_AUTHENTICATION_PAM=boolWhether to build the PAM authentication plugin, for source trees that include this plugin. (See Section 6.4.1.5, “The PAM Authentication Plugin”.) Beginning with MySQL 5.7.2, if this option is specified and the plugin cannot be compiled, the build fails.
As of MySQL 5.7.5, the Boost library is required to build MySQL. These CMake options enable control over the library source location, and whether to download it automatically:
-DWITH_BOOST=specifies the Boost library directory location. It is also possible to specify the Boost location by setting thepath_nameBOOST_ROOTorWITH_BOOSTenvironment variable.As of MySQL 5.7.11,
-DWITH_BOOST=systemis permitted and indicates that the correct version of Boost is installed on the compilation host in the standard location. In this case, the installed version of Boost is used rather than any version included with a MySQL source distribution.-DDOWNLOAD_BOOST=specifies whether to download the Boost source if it is not present in the specified location. The default isboolOFF.-DDOWNLOAD_BOOST_TIMEOUT=the timeout in seconds for downloading the Boost library. The default is 600 seconds.seconds
For example, if you normally build MySQL placing the object output in the
bldsubdirectory of your MySQL source tree, you can build with Boost like this:mkdir bld cd bld cmake .. -DDOWNLOAD_BOOST=ON -DWITH_BOOST=$HOME/my_boost
This causes Boost to be downloaded into the
my_boostdirectory under your home directory. If the required Boost version is already there, no download is done. If the required Boost version changes, the newer version is downloaded.If Boost is already installed locally and your compiler finds the Boost header files on its own, it may not be necessary to specify the preceding CMake options. However, if the version of Boost required by MySQL changes and the locally installed version has not been upgraded, you may have build problems. Using the CMake options should give you a successful build.
-DWITH_CLIENT_PROTOCOL_TRACING=boolWhether to build the client-side protocol tracing framework into the client library. By default, this option is enabled. This option was added in MySQL 5.7.2.
For information about writing protocol trace client plugins, see Section 25.2.4.11, “Writing Protocol Trace Plugins”.
See also the
WITH_TEST_TRACE_PLUGINoption.Whether to include debugging support.
Configuring MySQL with debugging support enables you to use the
--debug="d,parser_debug"option when you start the server. This causes the Bison parser that is used to process SQL statements to dump a parser trace to the server's standard error output. Typically, this output is written to the error log.As of MySQL 5.7.8, sync debug checking for the
InnoDBstorage engine is defined underUNIV_DEBUGand is available when debugging support is compiled in using theWITH_DEBUGoption. When debugging support is compiled in, theinnodb_sync_debugconfiguration option can be used to enable or disableInnoDBsync debug checking.-DWITH_DEFAULT_FEATURE_SET=boolWhether to use the flags from
cmake/build_configurations/feature_set.cmake.Which
libedit/editlinelibrary to use. The permitted values arebundled(the default) andsystem.WITH_EDITLINEwas added in MySQL 5.7.2. It replacesWITH_LIBEDIT, which has been removed.Whether to build the
libmysqldembedded server library.-DWITH_EMBEDDED_SHARED_LIBRARY=boolWhether to build a shared
libmysqldembedded server library. This option was added in MySQL 5.7.4.Which extra character sets to include:
all: All character sets. This is the default.complex: Complex character sets.none: No extra character sets.
-DWITH_INNODB_EXTRA_DEBUG=boolWhether to include extra InnoDB debugging support.
Enabling
WITH_INNODB_EXTRA_DEBUGturns on extra InnoDB debug checks. This option can only be enabled whenWITH_DEBUGis enabled.Whether to generate memcached shared libraries (
libmemcached.soandinnodb_engine.so).Whether to build the test program that accompanies the
keyring_fileplugin. Test file source code is located in theplugin/keyring/keyring-testdirectory.This option was added in MySQL 5.7.11.
Which
libeventlibrary to use. Permitted values arebundled(default),system, andyes. If you specifysystemoryes, the systemlibeventlibrary is used if present. If the system library is not found, the bundledlibeventlibrary is used. Thelibeventlibrary is required byInnoDBmemcached.Whether to include
libwrap(TCP wrappers) support.Whether to enable MemorySanitizer, for compilers that support it. The default is off. This option was added in MySQL 5.7.4.
-DWITH_MECAB={disabled|system|path_name}Use this option to compile the MeCab parser. If you have installed MeCab to its default installation directory, set
-DWITH_MECAB=system. Thesystemoption applies to MeCab installations performed from source or from binaries using a native package management utility. If you installed MeCab to a custom installation directory, specify the path to the MeCab installation. For example,-DWITH_MECAB=/opt/mecab. If thesystemoption does not work, specifying the MeCab installation path should work in all cases.For related information, see Section 12.9.9, “MeCab Full-Text Parser Plugin”.
Whether to enable Visual Studio CRT memory leak tracing. The default is
OFF. This option was added in MySQL 5.7.6.Whether to build the rapid development cycle plugins. When enabled, a
rapiddirectory is created in the build tree containing these plugins. When disabled, norapiddirectory is created in the build tree. The default isON, unless therapiddirectory is removed from the source tree, in which case the default becomesOFF. This option was added in MySQL 5.7.12.-DWITH_SSL={|ssl_typepath_name}The type of SSL support to include or the path name to the OpenSSL installation to use.
ssl_typecan be one of the following values:yes: Use the system SSL library if present, else the library bundled with the distribution.bundled: Use the SSL library bundled with the distribution. This is the default.system: Use the system SSL library.
path_nameis the path name to the OpenSSL installation to use. Using this can be preferable to using thessl_typevalue ofsystem, for it can prevent CMake from detecting and using an older or incorrect OpenSSL version installed on the system. (Another permitted way to do the same thing is to set theCMAKE_PREFIX_PATHoption topath_name.)
For information about using SSL support, see Section 6.3.11, “Using Secure Connections”.
Whether to enable installation of systemd support files. By default, this option is disabled. When enabled, systemd support files are installed, and scripts such as mysqld_safe and the System V initialization script are not installed. On platforms where systemd is not available, enabling
WITH_SYSTEMDresults in an error from CMake.For more information about using systemd, see Section 2.5.10, “Managing MySQL Server with systemd”. That section also includes information about specifying options previously specified in
[mysqld_safe]option groups. Because mysqld_safe is not installed when systemd is used, such options must be specified another way.This option was added in MySQL 5.7.6.
Whether to build the test protocol trace client plugin (see Section 25.2.4.11.1, “Using the Test Protocol Trace Plugin”). By default, this option is disabled. Enabling this option has no effect unless the
WITH_CLIENT_PROTOCOL_TRACINGoption is enabled. If MySQL is configured with both options enabled, thelibmysqlclientclient library is built with the test protocol trace plugin built in, and all the standard MySQL clients load the plugin. However, even when the test plugin is enabled, it has no effect by default. Control over the plugin is afforded using environment variables; see Section 25.2.4.11.1, “Using the Test Protocol Trace Plugin”.This option was added in MySQL 5.7.2.
NoteDo not enable the
WITH_TEST_TRACE_PLUGINoption if you want to use your own protocol trace plugins because only one such plugin can be loaded at a time and an error occurs for attempts to load a second one. If you have already built MySQL with the test protocol trace plugin enabled to see how it works, you must rebuild MySQL without it before you can use your own plugins.For information about writing trace plugins, see Section 25.2.4.11, “Writing Protocol Trace Plugins”.
Whether to enable the Undefined Behavior Sanitizer, for compilers that support it. The default is off. This option was added in MySQL 5.7.6.
Enables unixODBC support, for Connector/ODBC.
Whether to compile in the Valgrind header files, which exposes the Valgrind API to MySQL code. The default is
OFF.To generate a Valgrind-aware debug build,
-DWITH_VALGRIND=1normally is combined with-DWITH_DEBUG=1. See Building Debug Configurations.Some features require that the server be built with compression library support, such as the
COMPRESS()andUNCOMPRESS()functions, and compression of the client/server protocol. TheWITH_ZLIBindicates the source ofzlibsupport:bundled: Use thezliblibrary bundled with the distribution. This is the default.system: Use the systemzliblibrary.
Whether to build without the MySQL server. The default is
OFF, which does build the server.
Compiler Flags
Flags for the C Compiler.
Flags for the C++ Compiler.
-DWITH_DEFAULT_COMPILER_OPTIONS=boolWhether to use the flags from
cmake/build_configurations/compiler_options.cmake.NoteAll optimization flags were carefully chosen and tested by the MySQL build team. Overriding them can lead to unexpected results and is done at your own risk.
-DSUNPRO_CXX_LIBRARY=""lib_nameEnable linking against
libCstdinstead ofstlport4on Solaris 10 or later. This works only for client code because the server depends on C++98. Example usage:cmake -DWITHOUT_SERVER=1 -DSUNPRO_CXX_LIBRARY=Cstd
This option was added in MySQL 5.7.5.
To specify your own C and C++ compiler flags, for flags that do
not affect optimization, use the
CMAKE_C_FLAGS and
CMAKE_CXX_FLAGS CMake options.
When providing your own compiler flags, you might want to specify
CMAKE_BUILD_TYPE as well.
For example, to create a 32-bit release build on a 64-bit Linux machine, do this:
shell>mkdir bldshell>cd bldshell>cmake .. -DCMAKE_C_FLAGS=-m32 \-DCMAKE_CXX_FLAGS=-m32 \-DCMAKE_BUILD_TYPE=RelWithDebInfo
If you set flags that affect optimization
(-O), you must
set the
numberCMAKE_C_FLAGS_
and/or
build_typeCMAKE_CXX_FLAGS_
options, where build_typebuild_type corresponds
to the CMAKE_BUILD_TYPE value. To
specify a different optimization for the default build type
(RelWithDebInfo) set the
CMAKE_C_FLAGS_RELWITHDEBINFO and
CMAKE_CXX_FLAGS_RELWITHDEBINFO options. For
example, to compile on Linux with -O3 and with
debug symbols, do this:
shell>cmake .. -DCMAKE_C_FLAGS_RELWITHDEBINFO="-O3 -g" \-DCMAKE_CXX_FLAGS_RELWITHDEBINFO="-O3 -g"
CMake Options for Compiling MySQL Cluster
The following options are for use when building MySQL Cluster with the MySQL Cluster sources; they are not currently supported when using sources from the MySQL 5.6 Server tree.
Perform the build using the memcached (version 1.6 or later) installed in the system directory indicated by
dir_name. Files from this installation that are used in the build include the memcached binary, header files, and libraries, as well as thememcached_utilitieslibrary and the header fileengine_testapp.h.You must leave this option unset when building
ndbmemcacheusing the bundled memcached sources (WITH_BUNDLED_MEMCACHEDoption); in other words, the bundled sources are used by default).While additional CMake options—such as for SASL authorization and for providing
dtracesupport—are available for use when compiling memcached from external sources, these options are currently not enabled for the memcached sources bundled with MySQL Cluster.-DWITH_BUNDLED_LIBEVENT={ON|OFF}Use the
libeventincluded in the MySQL Cluster sources when building MySQL Cluster withndbmemcachedsupport. Enabled by default.OFFcauses the system'slibeventto be used instead.-DWITH_BUNDLED_MEMCACHED={ON|OFF}Build the memcached sources included in the MySQL Cluster source tree, then use the resulting memcached server when building the
ndbmemcacheengine. In this case, make install places the memcached binary in the installationbindirectory, and thendbmemcacheengine shared object filendb_engine.soin the installationlibdirectory.This option is ON by default.
Sets the classpath for building MySQL Cluster Connector for Java. The default is empty. This option is ignored if
-DWITH_NDB_JAVA=OFFis used.Enables error injection in the
NDBkernel. For testing only; not intended for use in building production binaries. The default isOFF.-DWITH_NDBCLUSTER_STORAGE_ENGINE={ON|OFF}Build and link in support for the
NDB(NDBCLUSTER) storage engine in mysqld. The default isON.This is an alias for
WITH_NDBCLUSTER_STORAGE_ENGINE.Build the multi-threaded data node executable ndbmtd. The default is
ON.Enable binary logging by default in the mysqld built using this option. ON by default.
Enable building the debug versions of the MySQL Cluster binaries. OFF by default.
Enable building MySQL Cluster with Java support, including
ClusterJ.This option is ON by default. If you do not wish to compile MySQL Cluster with Java support, you must disable it explicitly by specifying
-DWITH_NDB_JAVA=OFFwhen running CMake. Otherwise, if Java cannot be found, configuration of the build fails.Causes the MySQL Cluster management server (ndb_mgmd) that is built to use this
portby default. If this option is unset, the resulting management server tries to use port 1186 by default.If enabled, include a set of NDB API test programs. The default is OFF.
The solution to many problems involves reconfiguring. If you do reconfigure, take note of the following:
If CMake is run after it has previously been run, it may use information that was gathered during its previous invocation. This information is stored in
CMakeCache.txt. When CMake starts up, it looks for that file and reads its contents if it exists, on the assumption that the information is still correct. That assumption is invalid when you reconfigure.Each time you run CMake, you must run make again to recompile. However, you may want to remove old object files from previous builds first because they were compiled using different configuration options.
To prevent old object files or configuration information from being used, run the following commands before re-running CMake:
On Unix:
shell>make cleanshell>rm CMakeCache.txt
On Windows:
shell>devenv MySQL.sln /cleanshell>del CMakeCache.txt
If you build outside of the source tree, remove and recreate your build directory before re-running CMake. For instructions on building outside of the source tree, see How to Build MySQL Server with CMake.
On some systems, warnings may occur due to differences in system include files. The following list describes other problems that have been found to occur most often when compiling MySQL:
To define which C and C++ compilers to use, you can define the
CCandCXXenvironment variables. For example:shell>
CC=gccshell>CXX=g++shell>export CC CXXTo specify your own C and C++ compiler flags, use the
CMAKE_C_FLAGSandCMAKE_CXX_FLAGSCMake options. See Compiler Flags.To see what flags you might need to specify, invoke mysql_config with the
--cflagsand--cxxflagsoptions.To see what commands are executed during the compile stage, after using CMake to configure MySQL, run make VERBOSE=1 rather than just make.
If compilation fails, check whether the
MYSQL_MAINTAINER_MODEoption is enabled. This mode causes compiler warnings to become errors, so disabling it may enable compilation to proceed.If your compile fails with errors such as any of the following, you must upgrade your version of make to GNU make:
make: Fatal error in reader: Makefile, line 18: Badly formed macro assignment
Or:
make: file `Makefile' line 18: Must be a separator (:
Or:
pthread.h: No such file or directory
Solaris and FreeBSD are known to have troublesome make programs.
GNU make 3.75 is known to work.
The
sql_yacc.ccfile is generated fromsql_yacc.yy. Normally, the build process does not need to createsql_yacc.ccbecause MySQL comes with a pregenerated copy. However, if you do need to re-create it, you might encounter this error:"sql_yacc.yy", line
xxxfatal: default action causes potential...This is a sign that your version of yacc is deficient. You probably need to install a recent version of bison (the GNU version of yacc) and use that instead.
Versions of bison older than 1.75 may report this error:
sql_yacc.yy:#####: fatal error: maximum table size (32767) exceeded
The maximum table size is not actually exceeded; the error is caused by bugs in older versions of bison.
For information about acquiring or updating tools, see the system requirements in Section 2.9, “Installing MySQL from Source”.
Third-party tools that need to determine the MySQL version from
the MySQL source can read the VERSION file in
the top-level source directory. The file lists the pieces of the
version separately. For example, if the version is MySQL
5.7.4-m14, the file looks like this:
MYSQL_VERSION_MAJOR=5 MYSQL_VERSION_MINOR=7 MYSQL_VERSION_PATCH=4 MYSQL_VERSION_EXTRA=-m14
If the source is not for a General Availablility (GA) release, the
MYSQL_VERSION_EXTRA value will be nonempty. For
the example, the value corresponds to Milestone 14.
To construct a five-digit number from the version components, use this formula:
MYSQL_VERSION_MAJOR*10000 + MYSQL_VERSION_MINOR*100 + MYSQL_VERSION_PATCH
This section discusses tasks that you should perform after installing MySQL:
If necessary, initialize the data directory and create the MySQL grant tables. For some MySQL installation methods, data directory initialization may be done for you automatically:
Windows distributions prior to MySQL 5.7.7 include a data directory with pre-built tables in the
mysqldatabase. As of 5.7.7, Windows installation operations performed by MySQL Installer initialize the data directory automatically.Installation on Linux using a server RPM or Debian distribution from Oracle.
Installation using the native packaging system on many platforms, including Debian Linux, Ubuntu Linux, Gentoo Linux, and others.
Installation on OS X using a DMG distribution.
For other platforms and installation types, including installation from generic binary and source distributions, you must initialize the data directory yourself. For instructions, see Section 2.10.1, “Initializing the Data Directory”.
Start the server and make sure that it can be accessed. For instructions, see Section 2.10.2, “Starting the Server”, and Section 2.10.3, “Testing the Server”.
Assign passwords to the initial
rootaccount in the grant tables, if that was not already done during data directory initialization. Passwords prevent unauthorized access to the MySQL server. For instructions, see Section 2.10.4, “Securing the Initial MySQL Accounts”.Optionally, arrange for the server to start and stop automatically when your system starts and stops. For instructions, see Section 2.10.5, “Starting and Stopping MySQL Automatically”.
Optionally, populate time zone tables to enable recognition of named time zones. For instructions, see Section 10.6, “MySQL Server Time Zone Support”.
When you are ready to create additional user accounts, you can find information on the MySQL access control system and account management in Section 6.2, “The MySQL Access Privilege System”, and Section 6.3, “MySQL User Account Management”.
After installing MySQL, you must initialize the data directory,
including the tables in the mysql system
database. For some MySQL installation methods, data directory
initialization may be done automatically, as described in
Section 2.10, “Postinstallation Setup and Testing”. For other installation
methods, including installation from generic binary and source
distributions, you must initialize the data directory yourself.
This section describes how to initialize the data directory on Unix and Unix-like systems. (For Windows, see Section 2.3.7, “Windows Postinstallation Procedures”.) For some suggested commands that you can use to test whether the server is accessible and working properly, see Section 2.10.3, “Testing the Server”.
In the examples shown here, the server runs under the user ID of
the mysql login account. This assumes that such
an account exists. Either create the account if it does not exist,
or substitute the name of a different existing login account that
you plan to use for running the server. For information about
creating the account, see
Creating a
mysql System User and Group, in
Section 2.2, “Installing MySQL on Unix/Linux Using Generic Binaries”.
Change location into the top-level directory of your MySQL installation, represented here by
BASEDIR:shell>
cdBASEDIRBASEDIRis likely to be something like/usr/local/mysqlor/usr/local. The following steps assume that you have changed location to this directory.You will find several files and subdirectories in the
BASEDIRdirectory. The most important for installation purposes are thebinandscriptssubdirectories, which contain the server as well as client and utility programs.Create a directory that provides a location to use as the value of the
secure_file_privsystem variable that limits import/export operations to a specific directory. See Section 5.1.4, “Server System Variables”.shell>
mkdir mysql-filesshell>chmod 750 mysql-filesIf necessary, ensure that the distribution contents are accessible to
mysql. If you installed the distribution asmysql, no further action is required. If you installed the distribution asroot, its contents will be owned byroot. Change its ownership tomysqlby executing the following commands asrootin the installation directory. The first command changes the owner attribute of the files to themysqluser. The second changes the group attribute to themysqlgroup.shell>
chown -R mysql .shell>chgrp -R mysql .If necessary, initialize the data directory, including the
mysqldatabase containing the initial MySQL grant tables that determine how users are permitted to connect to the server.Typically, data directory initialization need be done only the first time you install MySQL. If you are upgrading an existing installation, you should run mysql_upgrade instead (see Section 4.4.7, “mysql_upgrade — Check and Upgrade MySQL Tables”). However, the command that initializes the data directory does not overwrite any existing privilege tables, so it should be safe to run in any circumstances.
As of MySQL 5.7.6, use the server to initialize the data directory:
shell>
bin/mysqld --initialize --user=mysqlBefore MySQL 5.7.6, use mysql_install_db:
shell>
bin/mysql_install_db --user=mysqlFor more information, see Section 2.10.1.1, “Initializing the Data Directory Manually Using mysqld”, or Section 2.10.1.2, “Initializing the Data Directory Manually Using mysql_install_db”, depending on which command you use.
If you want the server to be able to deploy with automatic support for secure connections, use the mysql_ssl_rsa_setup utility to create default SSL and RSA files:
shell>
mysql_ssl_rsa_setupFor more information, see Section 4.4.5, “mysql_ssl_rsa_setup — Create SSL/RSA Files”.
After initializing the data directory, you can establish the final installation ownership settings. To leave the installation owned by
mysql, no action is required here. Otherwise, most of the MySQL installation can be owned byrootif you like. The exception is that the data directory and themysql-filesdirectory must be owned bymysql. To accomplish this, run the following commands asrootin the installation directory. For some distribution types, the data directory might be namedvarrather thandata; adjust the second command accordingly.shell>
chown -R root .shell>chown -R mysql data mysql-filesIf the plugin directory (the directory named by the
plugin_dirsystem variable) is writable by the server, it may be possible for a user to write executable code to a file in the directory usingSELECT ... INTO DUMPFILE. This can be prevented by making the plugin directory read only to the server or by setting thesecure_file_privsystem variable at server startup to a directory whereSELECTwrites can be performed safely. (For example, set it to themysql-filesdirectory created earlier.)To specify options that the MySQL server should use at startup, put them in a
/etc/my.cnfor/etc/mysql/my.cnffile. You can use such a file, for example, to set thesecure_file_privsystem variable. See Section 5.1.2, “Server Configuration Defaults”. If you do not do this, the server starts with its default settings.If you want MySQL to start automatically when you boot your machine, see Section 2.10.5, “Starting and Stopping MySQL Automatically”.
Data directory initialization creates time zone tables in the
mysql database but does not populate them. To
do so, use the instructions in
Section 10.6, “MySQL Server Time Zone Support”.
This section describes how to initialize the data directory using mysqld, the MySQL server.
The procedure described here is available for all platforms as
of MySQL 5.7.6. Prior to 5.7.6, use
mysql_install_db on Unix and Unix-like
systems (see
Section 2.10.1.2, “Initializing the Data Directory Manually Using mysql_install_db”).
Prior to MySQL 5.7.7, Windows distributions include a data
directory with prebuilt tables in the mysql
database.
The following instructions assume that your current location is
the MySQL installation directory, represented here by
BASEDIR:
shell> cd BASEDIR
To initialize the data directory, invoke
mysqld with the
--initialize or
--initialize-insecure option,
depending on whether you want the server to generate a random
initial password for the 'root'@'localhost'
account.
On Windows, use one of these commands:
C:\>bin\mysqld --initializeC:\>bin\mysqld --initialize-insecure
On Unix and Unix-like systems, it is important to make sure that
the database directories and files are owned by the
mysql login account so that the server has
read and write access to them when you run it later. To ensure
this if you run mysqld as
root, include the
--user option as shown here:
shell>bin/mysqld --initialize --user=mysqlshell>bin/mysqld --initialize-insecure --user=mysql
Otherwise, execute the program while logged in as
mysql, in which case you can omit the
--user option from the command.
Regardless of platform, use
--initialize for “secure by
default” installation (that is, including generation of a
random initial root password). In this case,
the password is marked as expired and you will need to choose a
new one. With the
--initialize-insecure option, no
root password is generated; it is assumed
that you will assign a password to the account in timely fashion
before putting the server into production use.
It might be necessary to specify other options such as
--basedir or
--datadir if
mysqld does not identify the correct
locations for the installation directory or data directory. For
example (enter the command on one line):
shell>bin/mysqld --initialize --user=mysql--basedir=/opt/mysql/mysql--datadir=/opt/mysql/mysql/data
Alternatively, put the relevant option settings in an option
file and pass the name of that file to
mysqld. For Unix and Unix-like systems,
suppose that the option file name is
/opt/mysql/mysql/etc/my.cnf. Put these
lines in the file:
[mysqld] basedir=/opt/mysql/mysql datadir=/opt/mysql/mysql/data
Then invoke mysqld as follows (enter the
command on a single line with the
--defaults-file option first):
shell>bin/mysqld --defaults-file=/opt/mysql/mysql/etc/my.cnf--initialize --user=mysql
On Windows, suppose that C:\my.ini contains
these lines:
[mysqld] basedir=C:\\Program Files\\MySQL\\MySQL Server 5.7 datadir=D:\\MySQLdata
Then invoke mysqld as follows (the
--defaults-file option must be
first):
C:\> bin/mysqld --defaults-file=C:\my.ini --initialize
When invoked with the
--initialize or
--initialize-insecure option,
mysqld performs the following initialization
sequence.
The server writes any messages to its standard error output. This may be redirected to the error log, so look there if you do not see the messages on your screen.
On Windows, use the --console
option to direct messages to the console.
The server checks for the existence of the data directory as follows:
If no data directory exists, the server creates it.
If a data directory exists and is not empty (that is, it contains files or subdirectories), the server exits after producing an error message:
[ERROR] --initialize specified but the data directory exists. Aborting.
In this case, remove or rename the data directory and try again.
As of MySQL 5.7.11, an existing data directory is permitted to be nonempty if every entry either has a name that begins with a period (
.) or is named using an--ignore-db-diroption.
Within the data directory, the server creates the
mysqlsystem database and its tables, including the grant tables, server-side help tables, and time zone tables. For a complete listing and description of the grant tables, see Section 6.2, “The MySQL Access Privilege System”.The server initializes the system tablespace and related data structures needed to manage
InnoDBtables.NoteAfter mysqld sets up the
InnoDBsystem tablespace, changes to some tablespace characteristics require setting up a whole new instance. This includes the file name of the first file in the system tablespace and the number of undo logs. If you do not want to use the default values, make sure that the settings for theinnodb_data_file_pathandinnodb_log_file_sizeconfiguration parameters are in place in the MySQL configuration file before running mysqld. Also make sure to specify as necessary other parameters that affect the creation and location ofInnoDBfiles, such asinnodb_data_home_dirandinnodb_log_group_home_dir.If those options are in your configuration file but that file is not in a location that MySQL reads by default, specify the file location using the
--defaults-extra-fileoption when you run mysqld.The server creates a
'root'@'localhost'superuser account. The server's action with respect to a password for this account depends on how you invoke it:With
--initializebut not--initialize-insecure, the server generates a random password, marks it as expired, and writes a message displaying the password:[Warning] A temporary password is generated for root@localhost: iTag*AfrH5ej
With
--initialize-insecure, (either with or without--initializebecause--initialize-insecureimplies--initialize), the server does not generate a password or mark it expired, and writes a warning message:Warning] root@localhost is created with an empty password ! Please consider switching off the --initialize-insecure option.
The server populates the server-side help tables if content is available (in the
fill_help_tables.sqlfile). The server does not populate the time zone tables; to do so, see Section 10.6, “MySQL Server Time Zone Support”.If the
--init-fileoption was given to name a file of SQL statements, the server executes the statements in the file. This option enables you to perform custom bootstrapping sequences.When the server operates in bootstrap mode, some functionality is unavailable that limits the statements permitted in the file. These include statements that relate to account management (such as
CREATE USERorGRANT), replication, and global transaction identifiers.The server exits.
After you initialize the data directory by starting the server
with --initialize or
--initialize-insecure, start the
server normally (that is, without either of those options) and
assign the 'root'@'localhost' account a new
password:
Start the server. For instructions, see Section 2.10.2, “Starting the Server”.
Connect to the server:
If you used
--initializebut not--initialize-insecureto initialize the data directory, connect to the server asrootusing the random password that the server generated during the initialization sequence:shell>
mysql -u root -pEnter password:(enter the random root password here)Look in the server error log if you do not know this password.
If you used
--initialize-insecureto initialize the data directory, connect to the server asrootwithout a password:shell>
mysql -u root --skip-password
After connecting, assign a new
rootpassword:mysql>
ALTER USER 'root'@'localhost' IDENTIFIED BY 'new_password';
The data directory initialization sequence performed by the server does not substitute for the actions performed by mysql_secure_installation or mysql_ssl_rsa_setup. See Section 4.4.4, “mysql_secure_installation — Improve MySQL Installation Security”, and Section 4.4.5, “mysql_ssl_rsa_setup — Create SSL/RSA Files”.
This section describes how to initialize the data directory using mysql_install_db.
The procedure described here is used on Unix and Unix-like
systems prior to MySQL 5.7.6. (For Windows, MySQL
distributions include a data directory with prebuilt tables in
the mysql database.) As of MySQL 5.7.6,
mysql_install_db is deprecated. To
initialize the data directory, use the procedure described at
Section 2.10.1.1, “Initializing the Data Directory Manually Using mysqld”.
The following instructions assume that your current location is
the MySQL installation directory, represented here by
BASEDIR:
shell> cd BASEDIR
To initialize the data directory, invoke
mysql_install_db. This program might be
located under the base directory in either
bin or scripts,
depending on your version of MySQL. If it is in
scripts, adjust the following commands
appropriately.
shell> bin/mysql_install_db --user=mysql
It is important to make sure that the database directories and
files are owned by the mysql login account so
that the server has read and write access to them when you run
it later. To ensure this if you run
mysql_install_db as root,
include the --user
option as shown. Otherwise, execute the program while logged in
as mysql, in which case you can omit the
--user option from the
command.
The mysql_install_db command creates the
server's data directory. Under the data directory, it creates
directories for the mysql database that holds
the grant tables and (prior to MySQL 5.7.4) a
test database that you can use to test MySQL.
The program also creates privilege table entries for the initial
account or accounts. For a complete listing and description of
the grant tables, see Section 6.2, “The MySQL Access Privilege System”.
It might be necessary to specify other options such as
--basedir or
--datadir if
mysql_install_db does not identify the
correct locations for the installation directory or data
directory. For example:
shell>bin/mysql_install_db --user=mysql \--basedir=/opt/mysql/mysql \--datadir=/opt/mysql/mysql/data
If mysql_install_db generates a random
password for the root account, start the
server and assign a new password:
Start the server (use the first command if your installation includes mysqld_safe, the second it if includes systemd support):
shell>
bin/mysqld_safe --user=mysql &shell>systemctl start mysqldSubstitute the appropriate service name if it differs from
mysqld; for example,mysqlon SLES systems.Look in the
$HOME/file to find the random password that mysql_install_db wrote there. Then connect to the server as.mysql_secretrootusing that password:shell>
mysql -u root -h 127.0.0.1 -pEnter password:(enter the random password here)After connecting, assign a new
rootpassword:mysql>
SET PASSWORD FOR 'root'@'localhost' = PASSWORD('new_password');After resetting the password, remove the
.mysql_secretfile; otherwise, if you run mysql_secure_installation, that command may see the file and expire therootpassword again as part of ensuring secure deployment.
If mysql_install_db did not generate a random
password, you should still assign one. For instructions, see
Section 2.10.4, “Securing the Initial MySQL Accounts”. That section also
describes how to remove the test database, if
mysql_install_db created one and you do not
want it.
If you have trouble with mysql_install_db at this point, see Section 2.10.1.3, “Problems Running mysql_install_db”.
The purpose of the mysql_install_db program
is to initialize the data directory, including the tables in the
mysql system database. It does not overwrite
existing MySQL privilege tables, and it does not affect any
other data.
To re-create your privilege tables, first stop the
mysqld server if it is running. Then rename
the mysql directory under the data
directory to save it, and run
mysql_install_db. Suppose that your current
directory is the MySQL installation directory and that
mysql_install_db is located in the
bin directory and the data directory is
named data. To rename the
mysql database and re-run
mysql_install_db, use these commands.
shell>mv data/mysql data/mysql.oldshell>bin/mysql_install_db --user=mysql
When you run mysql_install_db, you might encounter the following problems:
mysql_install_db fails to install the grant tables
You may find that mysql_install_db fails to install the grant tables and terminates after displaying the following messages:
Starting mysqld daemon with databases from XXXXXX mysqld ended
In this case, you should examine the error log file very carefully. The log should be located in the directory
XXXXXXnamed by the error message and should indicate why mysqld did not start. If you do not understand what happened, include the log when you post a bug report. See Section 1.7, “How to Report Bugs or Problems”.There is a mysqld process running
This indicates that the server is running, in which case the grant tables have probably been created already. If so, there is no need to run mysql_install_db at all because it needs to be run only once, when you first install MySQL.
Installing a second mysqld server does not work when one server is running
This can happen when you have an existing MySQL installation, but want to put a new installation in a different location. For example, you might have a production installation, but you want to create a second installation for testing purposes. Generally the problem that occurs when you try to run a second server is that it tries to use a network interface that is in use by the first server. In this case, you should see one of the following error messages:
Can't start server: Bind on TCP/IP port: Address already in use Can't start server: Bind on unix socket...
For instructions on setting up multiple servers, see Section 5.3, “Running Multiple MySQL Instances on One Machine”.
You do not have write access to the
/tmpdirectoryIf you do not have write access to create temporary files or a Unix socket file in the default location (the
/tmpdirectory) or theTMPDIRenvironment variable, if it has been set, an error occurs when you run mysql_install_db or the mysqld server.You can specify different locations for the temporary directory and Unix socket file by executing these commands prior to starting mysql_install_db or mysqld, where
some_tmp_diris the full path name to some directory for which you have write permission:shell>
TMPDIR=/shell>some_tmp_dir/MYSQL_UNIX_PORT=/shell>some_tmp_dir/mysql.sockexport TMPDIR MYSQL_UNIX_PORTThen you should be able to run mysql_install_db and start the server with these commands:
shell>
bin/mysql_install_db --user=mysqlshell>bin/mysqld_safe --user=mysql &See Section B.5.3.6, “How to Protect or Change the MySQL Unix Socket File”, and Section 2.12, “Environment Variables”.
There are some alternatives to running the mysql_install_db program provided in the MySQL distribution:
If you want the initial privileges to be different from the standard defaults, use account-management statements such as
CREATE USER,GRANT, andREVOKEto change the privileges after the grant tables have been set up. In other words, run mysql_install_db, and then usemysql -u root mysqlto connect to the server as the MySQLrootuser so that you can issue the necessary statements. (See Section 13.7.1, “Account Management Statements”.)To install MySQL on several machines with the same privileges, put the
CREATE USER,GRANT, andREVOKEstatements in a file and execute the file as a script usingmysqlafter running mysql_install_db. For example:shell>
bin/mysql_install_db --user=mysqlshell>bin/mysql -u root < your_script_fileThis enables you to avoid issuing the statements manually on each machine.
It is possible to re-create the grant tables completely after they have previously been created. You might want to do this if you are just learning how to use
CREATE USER,GRANT, andREVOKEand have made so many modifications after running mysql_install_db that you want to wipe out the tables and start over.To re-create the grant tables, stop the server if it is running and remove the
mysqldatabase directory. Then run mysql_install_db again.
This section describes how start the server on Unix and Unix-like systems. (For Windows, see Section 2.3.5.5, “Starting the Server for the First Time”.) For some suggested commands that you can use to test whether the server is accessible and working properly, see Section 2.10.3, “Testing the Server”.
Start the MySQL server like this if your installation includes mysqld_safe:
shell> bin/mysqld_safe --user=mysql &
Start the server like this if your installation includes systemd support:
shell> systemctl start mysqld
Substitute the appropriate service name if it differs from
mysqld; for example, mysql
on SLES systems.
It is important that the MySQL server be run using an unprivileged
(non-root) login account. To ensure this if you
run mysqld_safe as root,
include the --user option as
shown. Otherwise, you should execute the program while logged in
as mysql, in which case you can omit the
--user option from the
command.
For further instructions for running MySQL as an unprivileged user, see Section 6.1.5, “How to Run MySQL as a Normal User”.
If the command fails immediately and prints mysqld
ended, look for information in the error log (which by
default is the
host_name.err
If the server is unable to access the data directory it starts or
read the grant tables in the mysql database, it
writes a message to its error log. Such problems can occur if you
neglected to create the grant tables by initializing the data
directory before proceeding to this step, or if you ran the
command that initializes the data directory without the
--user option. Remove the
data directory and run the command with the
--user option.
If you have other problems starting the server, see Section 2.10.2.1, “Troubleshooting Problems Starting the MySQL Server”. For more information about mysqld_safe, see Section 4.3.2, “mysqld_safe — MySQL Server Startup Script”. For more information about systemd support, see Section 2.5.10, “Managing MySQL Server with systemd”.
This section provides troubleshooting suggestions for problems starting the server. For additional suggestions for Windows systems, see Section 2.3.6, “Troubleshooting a Microsoft Windows MySQL Server Installation”.
If you have problems starting the server, here are some things to try:
Check the error log to see why the server does not start. Log files are located in the data directory (typically
C:\Program Files\MySQL\MySQL Server 5.7\dataon Windows,/usr/local/mysql/datafor a Unix/Linux binary distribution, and/usr/local/varfor a Unix/Linux source distribution). Look in the data directory for files with names of the formhost_name.errhost_name.loghost_nameis the name of your server host. Then examine the last few lines of these files. Usetailto display them:shell>
tailshell>host_name.errtailhost_name.logSpecify any special options needed by the storage engines you are using. You can create a
my.cnffile and specify startup options for the engines that you plan to use. If you are going to use storage engines that support transactional tables (InnoDB,NDB), be sure that you have them configured the way you want before starting the server. If you are usingInnoDBtables, see Section 14.4, “InnoDB Configuration” for guidelines and Section 14.12, “InnoDB Startup Options and System Variables” for option syntax.Although storage engines use default values for options that you omit, Oracle recommends that you review the available options and specify explicit values for any options whose defaults are not appropriate for your installation.
Make sure that the server knows where to find the data directory. The mysqld server uses this directory as its current directory. This is where it expects to find databases and where it expects to write log files. The server also writes the pid (process ID) file in the data directory.
The default data directory location is hardcoded when the server is compiled. To determine what the default path settings are, invoke mysqld with the
--verboseand--helpoptions. If the data directory is located somewhere else on your system, specify that location with the--datadiroption to mysqld or mysqld_safe, on the command line or in an option file. Otherwise, the server will not work properly. As an alternative to the--datadiroption, you can specify mysqld the location of the base directory under which MySQL is installed with the--basedir, and mysqld looks for thedatadirectory there.To check the effect of specifying path options, invoke mysqld with those options followed by the
--verboseand--helpoptions. For example, if you change location into the directory where mysqld is installed and then run the following command, it shows the effect of starting the server with a base directory of/usr/local:shell>
./mysqld --basedir=/usr/local --verbose --helpYou can specify other options such as
--datadiras well, but--verboseand--helpmust be the last options.Once you determine the path settings you want, start the server without
--verboseand--help.If mysqld is currently running, you can find out what path settings it is using by executing this command:
shell>
mysqladmin variablesOr:
shell>
mysqladmin -hhost_namevariableshost_nameis the name of the MySQL server host.Make sure that the server can access the data directory. The ownership and permissions of the data directory and its contents must allow the server to read and modify them.
If you get
Errcode 13(which meansPermission denied) when starting mysqld, this means that the privileges of the data directory or its contents do not permit server access. In this case, you change the permissions for the involved files and directories so that the server has the right to use them. You can also start the server asroot, but this raises security issues and should be avoided.Change location into the data directory and check the ownership of the data directory and its contents to make sure the server has access. For example, if the data directory is
/usr/local/mysql/var, use this command:shell>
ls -la /usr/local/mysql/varIf the data directory or its files or subdirectories are not owned by the login account that you use for running the server, change their ownership to that account. If the account is named
mysql, use these commands:shell>
chown -R mysql /usr/local/mysql/varshell>chgrp -R mysql /usr/local/mysql/varEven with correct ownership, MySQL might fail to start up if there is other security software running on your system that manages application access to various parts of the file system. In this case, reconfigure that software to enable mysqld to access the directories it uses during normal operation.
Verify that the network interfaces the server wants to use are available.
If either of the following errors occur, it means that some other program (perhaps another mysqld server) is using the TCP/IP port or Unix socket file that mysqld is trying to use:
Can't start server: Bind on TCP/IP port:
Address already in use
Can't start server: Bind on unix socket...
Use ps to determine whether you have another mysqld server running. If so, shut down the server before starting mysqld again. (If another server is running, and you really want to run multiple servers, you can find information about how to do so in Section 5.3, “Running Multiple MySQL Instances on One Machine”.)
If no other server is running, execute the command
telnet. (The default MySQL port number is 3306.) Then press Enter a couple of times. If you do not get an error message likeyour_host_nametcp_ip_port_numbertelnet: Unable to connect to remote host: Connection refused, some other program is using the TCP/IP port that mysqld is trying to use. Track down what program this is and disable it, or tell mysqld to listen to a different port with the--portoption. In this case, specify the same non-default port number for client programs when connecting to the server using TCP/IP.Another reason the port might be inaccessible is that you have a firewall running that blocks connections to it. If so, modify the firewall settings to permit access to the port.
If the server starts but you cannot connect to it, make sure that you have an entry in
/etc/hoststhat looks like this:127.0.0.1 localhost
If you cannot get mysqld to start, try to make a trace file to find the problem by using the
--debugoption. See Section 25.5.3, “The DBUG Package”.
After the data directory is initialized and you have started the
server, perform some simple tests to make sure that it works
satisfactorily. This section assumes that your current location is
the MySQL installation directory and that it has a
bin subdirectory containing the MySQL
programs used here. If that is not true, adjust the command path
names accordingly.
Alternatively, add the bin directory to your
PATH environment variable setting. That enables
your shell (command interpreter) to find MySQL programs properly,
so that you can run a program by typing only its name, not its
path name. See Section 4.2.10, “Setting Environment Variables”.
Use mysqladmin to verify that the server is running. The following commands provide simple tests to check whether the server is up and responding to connections:
shell>bin/mysqladmin versionshell>bin/mysqladmin variables
If you cannot connect to the server, specify a -u
root option to connect as root. If you
have assigned a password for the root account
already, you'll also need to specify -p on the
command line and enter the password when prompted. For example:
shell>bin/mysqladmin -u root -p versionEnter password:(enter root password here)
The output from mysqladmin version varies slightly depending on your platform and version of MySQL, but should be similar to that shown here:
shell> bin/mysqladmin version
mysqladmin  Ver 14.12 Distrib 5.7.13, for pc-linux-gnu on i686
...

Server version          5.7.13
Protocol version        10
Connection              Localhost via UNIX socket
UNIX socket             /var/lib/mysql/mysql.sock
Uptime:                 14 days 5 hours 5 min 21 sec

Threads: 1  Questions: 366  Slow queries: 0
Opens: 0  Flush tables: 1  Open tables: 19
Queries per second avg: 0.000
To see what else you can do with mysqladmin,
invoke it with the --help
option.
Verify that you can shut down the server (include a
-p option if the root account
has a password already):
shell> bin/mysqladmin -u root shutdown
Verify that you can start the server again. Do this by using mysqld_safe or by invoking mysqld directly. For example:
shell> bin/mysqld_safe --user=mysql &
If mysqld_safe fails, see Section 2.10.2.1, “Troubleshooting Problems Starting the MySQL Server”.
Run some simple tests to verify that you can retrieve information from the server. The output should be similar to that shown here.
Use mysqlshow to see what databases exist:
shell> bin/mysqlshow
+--------------------+
|     Databases      |
+--------------------+
| information_schema |
| mysql              |
| performance_schema |
| sys                |
+--------------------+
The list of installed databases may vary, but will always include
the minimum of mysql and
information_schema.
If you specify a database name, mysqlshow displays a list of the tables within the database:
shell> bin/mysqlshow mysql
Database: mysql
+---------------------------+
|          Tables           |
+---------------------------+
| columns_priv              |
| db                        |
| engine_cost               |
| event                     |
| func                      |
| general_log               |
| gtid_executed             |
| help_category             |
| help_keyword              |
| help_relation             |
| help_topic                |
| innodb_index_stats        |
| innodb_table_stats        |
| ndb_binlog_index          |
| plugin                    |
| proc                      |
| procs_priv                |
| proxies_priv              |
| server_cost               |
| servers                   |
| slave_master_info         |
| slave_relay_log_info      |
| slave_worker_info         |
| slow_log                  |
| tables_priv               |
| time_zone                 |
| time_zone_leap_second     |
| time_zone_name            |
| time_zone_transition      |
| time_zone_transition_type |
| user                      |
+---------------------------+
Use the mysql program to select information
from a table in the mysql database:
shell> bin/mysql -e "SELECT User, Host, plugin FROM mysql.user" mysql
+------+-----------+-----------------------+
| User | Host      | plugin                |
+------+-----------+-----------------------+
| root | localhost | mysql_native_password |
+------+-----------+-----------------------+
At this point, your server is running and you can access it. To tighten security if you have not yet assigned a password to the initial account, follow the instructions in Section 2.10.4, “Securing the Initial MySQL Accounts”.
For more information about mysql, mysqladmin, and mysqlshow, see Section 4.5.1, “mysql — The MySQL Command-Line Tool”, Section 4.5.2, “mysqladmin — Client for Administering a MySQL Server”, and Section 4.5.7, “mysqlshow — Display Database, Table, and Column Information”.
The MySQL installation process involves initializing the data
directory, including the mysql database
containing the grant tables that define MySQL accounts. For
details, see Section 2.10, “Postinstallation Setup and Testing”.
This section describes how to assign passwords to the initial accounts created during the MySQL installation procedure, if you have not already done so.
On Windows, you can also perform the process described in this section during installation with MySQL Installer (see Section 2.3.3, “Installing MySQL on Microsoft Windows Using MySQL Installer”). On all platforms, the MySQL distribution includes mysql_secure_installation, a command-line utility that automates much of the process of securing a MySQL installation. MySQL Workbench is available on all platforms, and also offers the ability to manage user accounts (see Chapter 27, MySQL Workbench ).
Passwords may have already been assigned under these circumstances:
Installation On Windows performed using MySQL Installer give you the option of assigning passwords.
Installation on Linux using a server RPM or Debian distribution from Oracle, if you have followed the instructions given in Section 2.5.5, “Installing MySQL on Linux Using RPM Packages from Oracle”, Section 2.5.1, “Installing MySQL on Linux Using the MySQL Yum Repository”, Section 2.5.6, “Installing MySQL on Linux Using Debian Packages from Oracle”, or Section 2.5.3, “Installing MySQL on Linux Using the MySQL APT Repository”.
As of MySQL 5.7.6, if you initialized the data directory manually using mysqld --initialize and followed the instructions in Section 2.10.1.1, “Initializing the Data Directory Manually Using mysqld”, you should have assigned a password to the initial account.
The mysql.user grant table defines the initial
MySQL user accounts and their access privileges. Current versions
of MySQL 5.7 create only a
'root'@'localhost' account, but for earlier
versions, there might be multiple accounts such as described here:
Some accounts have the user name
root. These are superuser accounts that have all privileges and can do anything. If theserootaccounts have empty passwords, anyone can connect to the MySQL server asrootwithout a password and be granted all privileges.On Windows,
rootaccounts are created that permit connections from the local host only. Connections can be made by specifying the host namelocalhost, the IP address127.0.0.1, or the IPv6 address::1. If the user selects the Enable root access from remote machines option during installation, the Windows installer creates anotherrootaccount that permits connections from any host.On Unix, each
rootaccount permits connections from the local host. Connections can be made by specifying the host namelocalhost, the IP address127.0.0.1, the IPv6 address::1, or the actual host name or IP address.The
'root'@'localhost'account also has a row in themysql.proxies_privtable that enables granting thePROXYprivilege for''@'', that is, for all users and all hosts. This enablesrootto set up proxy users, as well as to delegate to other accounts the authority to set up proxy users. See Section 6.3.9, “Proxy Users”.
If accounts for anonymous users were created, these have an empty user name. The anonymous accounts have no password, so anyone can use them to connect to the MySQL server.
On Windows, there is one anonymous account that permits connections from the local host. Connections can be made by specifying a host name of
localhost.On Unix, each anonymous account permits connections from the local host. Connections can be made by specifying a host name of
localhostfor one of the accounts, or the actual host name or IP address for the other.
Checking Which Accounts Exist
Start the server if it is not running. For instructions, see Section 2.10.2, “Starting the Server”.
Assuming that no root password has been
assigned, you should be able to connect to the server as
root without one:
shell> mysql -u root
Once connected, determine which accounts exist in the
mysql.user table and whether their passwords
are empty:
As of MySQL 5.7.6, use this statement:
mysql>
SELECT User, Host, HEX(authentication_string) FROM mysql.user;The statement uses
HEX()because passwords stored in theauthentication_stringcolumn might contain binary data that does not display well.Before MySQL 5.7.6, use this statement:
mysql>
SELECT User, Host, Password FROM mysql.user;
The SELECT statement results can
vary depending on your version of MySQL and installation method.
The following example output includes several
root and anonymous-user accounts, none of which
have passwords:
+------+--------------------+----------+
| User | Host               | Password |
+------+--------------------+----------+
| root | localhost          |          |
| root | myhost.example.com |          |
| root | 127.0.0.1          |          |
| root | ::1                |          |
|      | localhost          |          |
|      | myhost.example.com |          |
+------+--------------------+----------+
If the output on your system shows any accounts with empty passwords, your MySQL installation is unprotected until you do something about it:
Assign a password to each MySQL
rootaccount that does not have one.To prevent clients from connecting as anonymous users without a password, either assign a password to each anonymous account or remove the accounts.
In addition, some installation methods create a
test database and add rows to the
mysql.db table that permit all accounts to
access that database and other databases with names that start
with test_. This is true even for accounts that
otherwise have no special privileges such as the default anonymous
accounts. This is convenient for testing but inadvisable on
production servers. Administrators who want database access
restricted only to accounts that have permissions granted
explicitly for that purpose should remove these
mysql.db table rows.
The following instructions describe how to set up passwords for
the initial MySQL accounts, first for any root
accounts, then for anonymous accounts. The instructions also cover
how to remove anonymous accounts, should you prefer not to permit
anonymous access at all, and describe how to remove permissive
access to test databases.
Replace new_password in the examples
with the password that you want to use. Replace
host_name with the name of the server
host. You can determine this name from the output of the
SELECT statement shown earlier. For
the output shown, host_name is
myhost.example.com.
For additional information about setting passwords, see
Section 6.3.5, “Assigning Account Passwords”. If you forget your
root password after setting it, see
Section B.5.3.2, “How to Reset the Root Password”.
To set up additional accounts, see Section 6.3.2, “Adding User Accounts”.
You might want to defer setting the passwords until later, to avoid the need to specify them while you perform additional setup or testing. However, be sure to set them before using your installation for production purposes.
Assigning root Account Passwords
To assign a password to an account, connect to the server as
root using the mysql client
and issue the appropriate SQL statement:
As of MySQL 5.7.6, use
ALTER USER:mysql>
ALTER USERuserIDENTIFIED BY 'new_password';Before 5.7.6, use
SET PASSWORD:mysql>
SET PASSWORD FORuser= PASSWORD('new_password');
The following instructions use ALTER
USER. If your version of MySQL is older than 5.7.6,
substitute equivalent SET PASSWORD
statements.
To assign the 'root'@'localhost' account a
password, connect to the server as root:
shell> mysql -u root
Then issue an ALTER USER statement:
mysql> ALTER USER 'root'@'localhost' IDENTIFIED BY 'new_password';
Issue a similar ALTER USER
statement for any other root account present in
your mysql.user table that has no password.
(Vary the host name appropriately.)
After an account has been assigned a password, you must supply that password whenever you connect to the server using the account. For example, to shut down the server with mysqladmin, use this command:
shell>mysqladmin -u root -p shutdownEnter password:(enter root password here)
The mysql commands in the following
instructions include a -p option based on the
assumption that you have assigned the root
account password using the preceding instructions and must specify
that password when connecting to the server.
Assigning Anonymous Account Passwords
In MySQL 5.7, installation methods that create
anonymous accounts tend to be for early versions for which
ALTER USER cannot be used to assign
passwords. Consequently, the instructions in this section use
SET PASSWORD.
To assign the ''@'localhost' anonymous account
a password, connect to the server as root:
shell>mysql -u root -pEnter password:(enter root password here)
Then issue a SET PASSWORD
statement:
mysql> SET PASSWORD FOR ''@'localhost' = PASSWORD('new_password');
Issue a similar SET PASSWORD
statement for any other anonymous account present in your
mysql.user table that has no password. (Vary
the host name appropriately.)
Removing Anonymous Accounts
If you prefer to remove any anonymous accounts rather than
assigning them passwords, use DROP
USER. To drop the ''@'localhost'
account, connect to the server as root:
shell>mysql -u root -pEnter password:(enter root password here)
Then issue a DROP USER statement:
mysql> DROP USER ''@'localhost';
Issue a similar DROP USER statement
for any other anonymous account that you want to drop. (Vary the
host name appropriately.)
Securing Test Databases
Some installation methods create a test
database and set up privileges for accessing it. If that is true
on your system, the mysql.db table will contain
rows that permit access by any user to the test
database and other databases with names that start with
test_. (These rows have an empty
User column value, which for access-checking
purposes matches any user name.) This means that such databases
can be used even by accounts that otherwise possess no privileges.
If you want to remove any-user access to test databases, do so as
follows:
shell>mysql -u root -pEnter password:(enter root password here)mysql>DELETE FROM mysql.db WHERE Db LIKE 'test%';mysql>FLUSH PRIVILEGES;
The FLUSH statement causes the
server to reread the grant tables. Without it, the privilege
change remains unnoticed by the server until you restart it.
With the preceding change, only users who have global database
privileges or privileges granted explicitly for the
test database can use it. However, if you
prefer that the database not exist at all, drop it:
mysql> DROP DATABASE test;
This section discusses methods for starting and stopping the MySQL server.
Generally, you start the mysqld server in one of these ways:
Invoke mysqld directly. This works on any platform.
On Windows, you can set up a MySQL service that runs automatically when Windows starts. See Section 2.3.5.8, “Starting MySQL as a Windows Service”.
On Unix and Unix-like systems, you can invoke mysqld_safe, which tries to determine the proper options for mysqld and then runs it with those options. See Section 4.3.2, “mysqld_safe — MySQL Server Startup Script”.
On Linux systems that support systemd, you can use it to control the server. See Section 2.5.10, “Managing MySQL Server with systemd”.
On systems that use System V-style run directories (that is,
/etc/init.dand run-level specific directories), invoke mysql.server. This script is used primarily at system startup and shutdown. It usually is installed under the namemysql. The mysql.server script starts the server by invoking mysqld_safe. See Section 4.3.3, “mysql.server — MySQL Server Startup Script”.On OS X, install a launchd daemon to enable automatic MySQL startup at system startup. The daemon starts the server by invoking mysqld_safe. For details, see Section 2.4.3, “Installing a MySQL Launch Daemon”. A MySQL Preference Pane also provides control for starting and stopping MySQL through the System Preferences. See Section 2.4.4, “Installing and Using the MySQL Preference Pane”.
On Solaris/OpenSolaris, use the service management framework (SMF) system to initiate and control MySQL startup. For more information, see Section 2.7.2, “Installing MySQL on OpenSolaris Using IPS”.
systemd, the mysqld_safe and mysql.server scripts, Solaris/OpenSolaris SMF, and the OS X Startup Item (or MySQL Preference Pane) can be used to start the server manually, or automatically at system startup time. systemd, mysql.server, and the Startup Item also can be used to stop the server.
The following table shows which option groups the server and startup scripts read from option files.
Table 2.12 MySQL Startup Scripts and Supported Server Option Groups
| Script | Option Groups |
|---|---|
| mysqld | [mysqld], [server],
[mysqld- |
| mysqld_safe | [mysqld], [server],
[mysqld_safe] |
| mysql.server | [mysqld], [mysql.server],
[server] |
[mysqld-
means that groups with names like
major_version][mysqld-5.6] and
[mysqld-5.7] are read by servers
having versions 5.6.x, 5.7.x, and so
forth. This feature can be used to specify options that can be
read only by servers within a given release series.
For backward compatibility, mysql.server also
reads the [mysql_server] group and
mysqld_safe also reads the
[safe_mysqld] group. To be current, you should
update your option files to use the
[mysql.server] and
[mysqld_safe] groups instead.
For more information on MySQL configuration files and their structure and contents, see Section 4.2.6, “Using Option Files”.
This section describes the steps to upgrade or downgrade a MySQL installation.
Upgrading is a common procedure, as you pick up bug fixes within the same MySQL release series or significant features between major MySQL releases. You perform this procedure first on some test systems to make sure everything works smoothly, and then on the production systems.
Downgrading is less common. Typically, you undo an upgrade because of some compatibility or performance issue that occurs on a production system, and was not uncovered during initial upgrade verification on the test systems. As with the upgrade procedure, perform and verify the downgrade procedure on some test systems first, before using it on a production system.
This section describes how to upgrade to a new MySQL version.
Supported Upgrade Methods
Supported upgrade methods include:
In-place Upgrade: Involves shutting down the old MySQL version, replacing the old MySQL binaries or packages with the new ones, restarting MySQL on the existing data directory, and running mysql_upgrade.
Logical Upgrade: Involves exporting existing data from the old MySQL version using mysqldump, installing the new MySQL version, loading the dump file into the new MySQL version, and running mysql_upgrade.
For in-place and logical upgrade procedures, see Performing an In-place Upgrade, and Performing a Logical Upgrade.
If you run MySQL Server on Windows, refer to the upgrade procedure described in Section 2.3.8, “Upgrading MySQL on Windows”.
If your current MySQL installation was installed on an Enterprise Linux platform or Fedora using the MySQL Yum Repository, see Section 2.11.1.2, “Upgrading MySQL with the MySQL Yum Repository”.
If your current MySQL installation was installed on Ubuntu using the MySQL APT repository, see Section 2.11.1.3, “Upgrading MySQL with the MySQL APT Repository”.
Supported Upgrade Paths
Unless otherwise documented, the following upgrade paths are supported:
Upgrading from a release series version to a newer release series version is supported. For example, upgrading from 5.7.9 to 5.7.10 is supported. Skipping release series versions is also supported. For example, upgrading from 5.7.9 to 5.7.11 is supported.
Upgrading one release level is supported. For example, upgrading from 5.6 to 5.7 is supported. Upgrading to the latest release series version is recommended before upgrading to the next release level. For example, upgrade to the latest 5.6 release before upgrading to 5.7.
Upgrading more than one release level is supported, but only if you upgrade one release level at a time. For example, if you currently are running MySQL 5.5 and wish to upgrade to a newer series, upgrade to MySQL 5.6 first before upgrading to MySQL 5.7, and so forth. For information on upgrading to MySQL 5.6 see the MySQL 5.6 Reference Manual.
Direct upgrades that skip a release level (for example, upgrading directly from MySQL 5.5 to 5.7) are not recommended or supported.
The following conditions apply to all upgrade paths:
Upgrades between General Availability (GA) status releases are supported.
Upgrades between milestone releases (or from a milestone release to a GA release) are not supported. For example, upgrading from 5.7.7 to 5.7.8 is not supported, as neither are GA status releases.
For upgrades between versions of a MySQL release series that has reached GA status, you can move the MySQL format files and data files between different versions on systems with the same architecture. This is not necessarily true for upgrades between milestone releases. Use of milestone releases is at your own risk.
Before You Begin
Before upgrading, review the following information and perform the recommended steps:
Before upgrading, protect your data by creating a backup of your current databases and log files. The backup should include the
mysqldatabase, which contains the MySQL system tables. See Section 7.2, “Database Backup Methods”.Review the Release Notes which provide information about features that are new in the MySQL 5.7 or differ from those found in earlier MySQL releases. Some of these changes may result in incompatibilities.
For listings of MySQL server variables and options that have been added, deprecated, or removed in MySQL 5.7, see Section 1.5, “Server and Status Variables and Options Added, Deprecated, or Removed in MySQL 5.7”.
Review Section 2.11.1.1, “Changes Affecting Upgrades to MySQL 5.7”. This section describes changes that may require action before or after upgrading.
Check Section 2.11.3, “Checking Whether Tables or Indexes Must Be Rebuilt”, to see whether changes to table formats or to character sets or collations were made between your current version of MySQL and the version to which you are upgrading. If such changes have resulted in an incompatibility between MySQL versions, you will need to upgrade the affected tables using the instructions in Section 2.11.4, “Rebuilding or Repairing Tables or Indexes”.
If you use replication, review Section 17.4.3, “Upgrading a Replication Setup”.
If you use XA transactions with
InnoDB, runXA RECOVERbefore upgrading to check for uncommitted XA transactions. If results are returned, either commit or rollback the XA transactions by issuing anXA COMMITorXA ROLLBACKstatement.If your MySQL installation contains a large amount of data that might take a long time to convert after an in-place upgrade, you might find it useful to create a “dummy” database instance for assessing what conversions might be needed and the work involved to perform them. Make a copy of your MySQL instance that contains a full copy of the
mysqldatabase, plus all other databases without data. Run your upgrade procedure on this dummy instance to see what actions might be needed so that you can better evaluate the work involved when performing actual data conversion on your original database instance.Rebuilding and reinstalling the Perl
DBD::mysqlmodule whenever you install or upgrade to a new release of MySQL is recommended. The same applies to other MySQL interfaces as well, such as PHPmysqlextensions and the PythonMySQLdbmodule.
Performing an In-place Upgrade
This section describes how to perform an in-place upgrade. Review Before you Begin before proceeding.
If you upgrade an installation originally produced by installing multiple RPM packages, upgrade all the packages, not just some. For example, if you previously installed the server and client RPMs, do not upgrade just the server RPM.
To perform an in-place upgrade:
Review the changes described in Section 2.11.1.1, “Changes Affecting Upgrades to MySQL 5.7” for steps to be performed before upgrading.
Configure MySQL to perform a slow shutdown by setting
innodb_fast_shutdownto0. For example:shell>
bin/mysql -u root -ppassword--execute="set global innodb_fast_shutdown=0"With a slow shutdown,
InnoDBperforms a full purge and change buffer merge before shutting down, which ensures that data files are fully prepared in case of file format differences between releases.Shut down the old MySQL server. For example:
shell>
bin/mysqladmin -u root -ppasswordshutdownUpgrade the MySQL binaries or packages in place, replacing the old binaries or packages with the new ones.
NoteFor supported Linux distributions, the preferred method for replacing the MySQL packages is to use the MySQL software repositories; see Section 2.11.1.2, “Upgrading MySQL with the MySQL Yum Repository”, Section 2.11.1.3, “Upgrading MySQL with the MySQL APT Repository”, or Upgrading MySQL with the MySQL SLES Repository for instructions.
Start the MySQL 5.7 server, using the existing data directory. For example:
shell>
bin/mysqld_safe --user=mysql --datadir=/path/to/existing-datadirRun mysql_upgrade. For example:
shell>
bin/mysql_upgrade -u root -ppasswordmysql_upgrade examines all tables in all databases for incompatibilities with the current version of MySQL. mysql_upgrade also upgrades the system tables so that you can take advantage of new privileges or capabilities.
Notemysql_upgrade should not be used when the server is running with
--gtid-mode=ON. See GTID mode and mysql_upgrade for more information.mysql_upgrade does not upgrade the contents of the help tables. For upgrade instructions, see Section 5.1.10, “Server-Side Help”.
Performing a Logical Upgrade
This section describes how to perform a logical upgrade. Review Before you Begin before proceeding.
To perform a logical upgrade:
Review the changes described in Section 2.11.1.1, “Changes Affecting Upgrades to MySQL 5.7” for steps to be performed before upgrading.
Export your existing data from the previous MySQL version:
shell>
mysqldump --add-drop-table --routines --events->--all-databases --force > data-for-upgrade.sqlNoteUse the
--routinesand--eventsoptions with mysqldump (as shown above) if your databases include stored programs. The--all-databasesoption includes all databases in the dump, including themysqldatabase that holds the system tables.ImportantIf you have tables that contain generated columns, use the mysqldump utility provided with MySQL 5.7.9 or higher to create your dump files. The mysqldump utility provided in earlier releases uses incorrect syntax for generated column definitions (Bug #20769542). You can use the
INFORMATION_SCHEMA.COLUMNStable to identify tables with generated columns.Shut down the old MySQL server. For example:
shell>
bin/mysqladmin -u root -ppasswordshutdownInstall MySQL 5.7. For installation instructions, see Chapter 2, Installing and Upgrading MySQL.
Initialize a new data directory:
shell>
mysqld --initialize --datadir=/path/to/5.7-datadirCopy the temporary
'root'@'localhost'password printed to your screen or written to your error log for later use.Start the MySQL 5.7 server, using the new data directory. For example:
shell>
bin/mysqld_safe --user=mysql --datadir=/path/to/5.7-datadirReset the
rootpassword:shell>
mysql -u root -pEnter password:****<- enter temporary root password mysql>ALTER USER USER() IDENTIFIED BY 'your new password';Load the previously created dump file into the new MySQL server. For example:
shell>
bin/mysql -u root -ppassword--execute="source data-for-upgrade.sql" --forceRun mysql_upgrade. For example:
shell>
bin/mysql_upgrade -u root -ppasswordmysql_upgrade examines all tables in all databases for incompatibilities with the current version of MySQL. mysql_upgrade also upgrades the system tables so that you can take advantage of new privileges or capabilities.
Notemysql_upgrade should not be used when the server is running with
--gtid-mode=ON. See GTID mode and mysql_upgrade for more information.mysql_upgrade does not upgrade the contents of the help tables. For upgrade instructions, see Section 5.1.10, “Server-Side Help”.
Configure MySQL to perform a slow shutdown by setting
innodb_fast_shutdownto0. For example:shell>
bin/mysql -u root -ppassword--execute="set global innodb_fast_shutdown=0"Shut down and restart the MySQL server to ensure a clean shutdown and startup. For example:
shell>
bin/mysqladmin -u root -pshell>passwordshutdownbin/mysqld_safe --user=mysql --datadir=/path/to/5.7-datadir
Upgrade Troubleshooting
If problems occur, such as that the new mysqld server does not start or that you cannot connect without a password, verify that you do not have an old
my.cnffile from your previous installation. You can check this with the--print-defaultsoption (for example, mysqld --print-defaults). If this command displays anything other than the program name, you have an activemy.cnffile that affects server or client operation.If, after an upgrade, you experience problems with compiled client programs, such as
Commands out of
          sync
or unexpected core dumps, you probably have used old header or library files when compiling your programs. In this case, check the date for yourmysql.hfile andlibmysqlclient.alibrary to verify that they are from the new MySQL distribution. If not, recompile your programs with the new headers and libraries. Recompilation might also be necessary for programs compiled against the shared client library if the library major version number has changed (for example fromlibmysqlclient.so.15tolibmysqlclient.so.16.If you have created a user-defined function (UDF) with a given name and upgrade MySQL to a version that implements a new built-in function with the same name, the UDF becomes inaccessible. To correct this, use
DROP
          FUNCTION
to drop the UDF, and then useCREATE FUNCTIONto re-create the UDF with a different nonconflicting name. The same is true if the new version of MySQL implements a built-in function with the same name as an existing stored function. See Section 9.2.4, “Function Name Parsing and Resolution”, for the rules describing how the server interprets references to different kinds of functions.
Before upgrading to MySQL 5.7, review the changes described in this section to identify upgrade issues that apply to your current MySQL installation and applications.
In addition to the changes outlined in this section, review the Release Notes and other important information outlined in Before You Begin.
Changes marked as either Known
issue or Incompatible
change are incompatibilities with earlier versions of
MySQL, and may require your attention before you
upgrade. Our aim is to avoid these changes, but
occasionally they are necessary to correct problems that would
be worse than an incompatibility between releases. If any
upgrade issue applicable to your installation involves an
incompatibility that requires special handling, follow the
instructions given in the incompatibility description. Sometimes
this involves dumping and reloading tables, or use of a
statement such as CHECK TABLE or
REPAIR TABLE.
For dump and reload instructions, see
Section 2.11.4, “Rebuilding or Repairing Tables or Indexes”. Any procedure that involves
REPAIR TABLE with the
USE_FRM option must be
done before upgrading. Use of this statement with a version of
MySQL different from the one used to create the table (that is,
using it after upgrading) may damage the table. See
Section 13.7.2.5, “REPAIR TABLE Syntax”.
Configuration Changes
Incompatible change: As of MySQL 5.7.12, the default
--early-plugin-loadvalue is empty. To load thekeyring_fileplugin, you must use an explicit--early-plugin-loadoption with a nonempty value.In MySQL 5.7.11, the default
--early-plugin-loadvalue was the name of thekeyring_fileplugin library file, so that plugin was loaded by default.InnoDBtablespace encryption requires thekeyring_fileplugin to be loaded prior toInnoDBinitialization, so this change of default value introduces an incompatibility for upgrades from 5.7.11 to 5.7.12 or higher. Administrators who have encryptedInnoDBtablespaces must take explicit action to ensure continued loading of thekeyring_fileplugin: Start the server with an--early-plugin-loadoption that names the plugin library file. For additional information, see Section 6.4.3, “The MySQL Keyring”.Incompatible change: The
INFORMATION_SCHEMAhas tables that contain system and status variable information (see Section 21.10, “The INFORMATION_SCHEMA GLOBAL_VARIABLES and SESSION_VARIABLES Tables”, and Section 21.9, “The INFORMATION_SCHEMA GLOBAL_STATUS and SESSION_STATUS Tables”). As of MySQL 5.7.6, the Performance Schema also contains system and status variable tables (see Section 22.9.12, “Performance Schema System Variable Tables”, and Section 22.9.13, “Performance Schema Status Variable Tables”). The Performance Schema tables are intended to replace theINFORMATION_SCHEMAtables, which are deprecated as of MySQL 5.7.6 and will be removed in a future MySQL release.For advice on migrating away from the
INFORMATION_SCHEMAtables to the Performance Schema tables, see Section 22.17, “Migrating to Performance Schema System and Status Variable Tables”. To assist in the migration, you can use theshow_compatibility_56system variable, which affects how system and status variable information is provided by theINFORMATION_SCHEMAand Performance Schema tables, and also by theSHOW VARIABLESandSHOW STATUSstatements.show_compatibility_56is enabled by default in 5.7.6 and 5.7.7, and disabled by default in MySQL 5.7.8.For details about the effects of
show_compatibility_56, see Section 5.1.4, “Server System Variables” For better understanding, it is strongly recommended that you read also these sections:Incompatible change: As of MySQL 5.7.6, for Linux systems on which MySQL is installed using RPM packages, server startup and shutdown now is managed using systemd rather than mysqld_safe, and mysqld_safe is no longer installed. This may require some adjustment to the manner in which you specify server options. For details, see Section 2.5.10, “Managing MySQL Server with systemd”.
Incompatible change: In MySQL 5.7.5, the executable binary version of mysql_install_db is located in the
bininstallation directory, whereas the Perl version is located in thescriptsinstallation directory. For upgrades from an older version of MySQL, you may find a version in both directories. To avoid confusion, remove the version in thescriptsdirectory. Applications that expect to find mysql_install_db in thescriptsdirectory should be updated to look in thebindirectory instead.The location of mysql_install_db becomes less material as of MySQL 5.7.6 because as of that version it is deprecated in favor of mysqld --initialize (or mysqld --initialize-insecure). See Section 2.10.1.1, “Initializing the Data Directory Manually Using mysqld”
Incompatible change: In MySQL 5.7.5, these SQL mode changes were made:
Strict SQL mode for transactional storage engines (
STRICT_TRANS_TABLES) is now enabled by default.Implementation of the
ONLY_FULL_GROUP_BYSQL mode has been made more sophisticated, to no longer reject deterministic queries that previously were rejected. In consequence,ONLY_FULL_GROUP_BYis now enabled by default, to prohibit nondeterministic queries containing expressions not guaranteed to be uniquely determined within a group.The changes to the default SQL mode result in a default
sql_modesystem variable value with these modes enabled:ONLY_FULL_GROUP_BY,STRICT_TRANS_TABLES,NO_ENGINE_SUBSTITUTION.The
ONLY_FULL_GROUP_BYmode is also now included in the modes comprised by theANSISQL mode.
If you find that having
ONLY_FULL_GROUP_BYenabled causes queries for existing applications to be rejected, either of these actions should restore operation:If it is possible to modify an offending query, do so, either so that nondeterministic nonaggregated columns are functionally dependent on
GROUP
                BY
columns, or by referring to nonaggregated columns usingANY_VALUE().If it is not possible to modify an offending query (for example, if it is generated by a third-party application), set the
sql_modesystem variable at server startup to not enableONLY_FULL_GROUP_BY.
For more information about SQL modes and
GROUP
            BY
queries, see Section 5.1.7, “Server SQL Modes”, and Section 12.20.3, “MySQL Handling of GROUP BY”.
System Table Changes
Incompatible change: The
Passwordcolumn of themysql.usertable was removed in MySQL 5.7.6. All credentials are stored in theauthentication_stringcolumn, including those formerly stored in thePasswordcolumn. If performing an in-place upgrade to MySQL 5.7.6 or later, run mysql_upgrade as directed by the in-place upgrade procedure to migrate thePasswordcolumn contents to theauthentication_stringcolumn.If performing a logical upgrade using a mysqldump dump file from a pre-5.7.6 MySQL installation, you must observe these conditions for the mysqldump command used to generate the dump file:
You must include the
--add-drop-tableoptionYou must not include the
--flush-privilegesoption
As outlined in the logical upgrade procedure, load the pre-5.7.6 dump file into the 5.7.6 (or later) server before running mysql_upgrade.
Server Changes
Incompatible change: As of MySQL 5.7.5, support for passwords that use the older pre-4.1 password hashing format is removed, which involves the following changes. Applications that use any feature no longer supported must be modified.
The
mysql_old_passwordauthentication plugin is removed. Accounts that use this plugin are disabled at startup and the server writes an “unknown plugin” message to the error log. For instructions on upgrading accounts that use this plugin, see Section 6.4.1.3, “Migrating Away from Pre-4.1 Password Hashing and the mysql_old_password Plugin”.The
--secure-authoption to the server and client programs is the default, but is now a no-op. It is deprecated and will be removed in a future MySQL release.The
--skip-secure-authoption to the server and client programs is no longer supported and using it produces an error.The
secure_authsystem variable permits only a value of 1; a value of 0 is no longer permitted.For the
old_passwordssystem variable, a value of 1 (produce pre-4.1 hashes) is no longer permitted.The
OLD_PASSWORD()function is removed.
Incompatible change: In MySQL 5.6.6, the
YEAR(2)data type was deprecated. In MySQL 5.7.5, support forYEAR(2)is removed. Once you upgrade to MySQL 5.7.5 or newer, any remainingYEAR(2)columns must be converted toYEAR(4)to become usable again. For conversion strategies, see Section 11.3.4, “YEAR(2) Limitations and Migrating to YEAR(4)”. Running mysql_upgrade after upgrading is one of the possible conversion strategies.Incompatible change: As of MySQL 5.7.2, the server requires account rows in the
mysql.usertable to have a nonemptyplugincolumn value and disables accounts with an empty value. This requires that you upgrade yourmysql.usertable to fill in allpluginvalues. As of MySQL 5.7.6, use this procedure:If you plan to upgrade using the data directory from your existing MySQL installation:
Stop the old (MySQL 5.6) server
Upgrade the MySQL binaries in place by replacing the old binaries with the new ones
Start the MySQL 5.7 server normally (no special options)
Run mysql_upgrade to upgrade the system tables
Restart the MySQL 5.7 server
If you plan to upgrade by reloading a dump file generated from your existing MySQL installation:
To generate the dump file, run mysqldump with the
--add-drop-tableoption and without the--flush-privilegesoptionStop the old (MySQL 5.6) server
Upgrade the MySQL binaries in place (replace the old binaries with the new ones)
Start the MySQL 5.7 server normally (no special options)
Reload the dump file (mysql <
dump_file)Run mysql_upgrade to upgrade the system tables
Restart the MySQL 5.7 server
Before MySQL 5.7.6, the procedure is more involved:
If you plan to upgrade using the data directory from your existing MySQL installation:
Stop the old (MySQL 5.6) server
Upgrade the MySQL binaries in place (replace the old binaries with the new ones)
Restart the server with the
--skip-grant-tablesoption to disable privilege checkingRun mysql_upgrade to upgrade the system tables
Restart the server normally (without
--skip-grant-tables)
If you plan to upgrade by reloading a dump file generated from your existing MySQL installation:
To generate the dump file, run mysqldump without the
--flush-privilegesoptionStop the old (MySQL 5.6) server
Upgrade the MySQL binaries in place (replace the old binaries with the new ones)
Restart the server with the
--skip-grant-tablesoption to disable privilege checkingReload the dump file (mysql <
dump_file)Run mysql_upgrade to upgrade the system tables
Restart the server normally (without
--skip-grant-tables)
mysql_upgrade runs by default as the MySQL
rootuser. For the preceding procedures, if therootpassword is expired when you run mysql_upgrade, you will see a message that your password is expired and that mysql_upgrade failed as a result. To correct this, reset therootpassword to unexpire it and run mysql_upgrade again:shell>
mysql -u root -pEnter password:****<- enter root password here mysql>ALTER USER USER() IDENTIFIED BY 'root-password';# MySQL 5.7.6 and up mysql>SET PASSWORD = PASSWORD('root-password');# Before MySQL 5.7.6 mysql>quitshell>mysql_upgrade -pEnter password:****<- enter root password hereThe password-resetting statement normally does not work if the server is started with
--skip-grant-tables, but the first invocation of mysql_upgrade flushes the privileges, so when you run mysql, the statement is accepted.If mysql_upgrade itself expires the
rootpassword, you will need to reset it password again in the same manner.After following the preceding instructions, DBAs are advised also to convert accounts that use the
mysql_old_passwordauthentication plugin to usemysql_native_passwordinstead, because support formysql_old_passwordhas been removed. For account upgrade instructions, see Section 6.4.1.3, “Migrating Away from Pre-4.1 Password Hashing and the mysql_old_password Plugin”.Incompatible change: It is possible for a column
DEFAULTvalue to be valid for thesql_modevalue at table-creation time but invalid for thesql_modevalue when rows are inserted or updated. Example:SET sql_mode = ''; CREATE TABLE t (d DATE DEFAULT 0); SET sql_mode = 'NO_ZERO_DATE,STRICT_ALL_TABLES'; INSERT INTO t (d) VALUES(DEFAULT);
In this case, 0 should be accepted for the
CREATE TABLEbut rejected for theINSERT. However, previously the server did not evaluateDEFAULTvalues used for inserts or updates against the currentsql_mode. In the example, theINSERTsucceeds and inserts'0000-00-00'into theDATEcolumn.As of MySQL 5.7.2, the server applies the proper
sql_modechecks to generate a warning or error at insert or update time.A resulting incompatibility for replication if you use statement-based logging (
binlog_format=STATEMENT) is that if a slave is upgraded, a nonupgraded master will execute the preceding example without error, whereas theINSERTwill fail on the slave and replication will stop.To deal with this, stop all new statements on the master and wait until the slaves catch up. Then upgrade the slaves followed by the master. Alternatively, if you cannot stop new statements, temporarily change to row-based logging on the master (
binlog_format=ROW) and wait until all slaves have processed all binary logs produced up to the point of this change. Then upgrade the slaves followed by the master and change the master back to statement-based logging.Incompatible change: Several changes were made to the audit log plugin for better compatibility with Oracle Audit Vault. For upgrading purpose, the main issue is that the default format of the audit log file has changed: Information within
<AUDIT_RECORD>elements previously written using attributes now is written using subelements.Example of old
<AUDIT_RECORD>format:<AUDIT_RECORD TIMESTAMP="2013-04-15T15:27:27" NAME="Query" CONNECTION_ID="3" STATUS="0" SQLTEXT="SELECT 1" />
Example of new format:
<AUDIT_RECORD>
 <TIMESTAMP>2013-04-15T15:27:27 UTC</TIMESTAMP>
 <RECORD_ID>3998_2013-04-15T15:27:27</RECORD_ID>
 <NAME>Query</NAME>
 <CONNECTION_ID>3</CONNECTION_ID>
 <STATUS>0</STATUS>
 <STATUS_CODE>0</STATUS_CODE>
 <USER>root[root] @ localhost [127.0.0.1]</USER>
 <OS_LOGIN></OS_LOGIN>
 <HOST>localhost</HOST>
 <IP>127.0.0.1</IP>
 <COMMAND_CLASS>select</COMMAND_CLASS>
 <SQLTEXT>SELECT 1</SQLTEXT>
</AUDIT_RECORD>
If you previously used an older version of the audit log plugin, use this procedure to avoid writing new-format log entries to an existing log file that contains old-format entries:
Stop the server.
Rename the current audit log file manually. This file will contain only old-format log entries.
Update the server and restart it. The audit log plugin will create a new log file, which will contain only new-format log entries.
For information about the audit log plugin, see Section 6.4.4, “MySQL Enterprise Audit Log Plugin”.
InnoDB Changes
Incompatible change: To simplify
InnoDBtablespace discovery during crash recovery, new redo log record types were introduced in MySQL 5.7.5. This enhancement changes the redo log format. Before performing an in-place upgrade, perform a clean shutdown using aninnodb_fast_shutdownsetting of0or1. A slow shutdown usinginnodb_fast_shutdown=0is a recommended step in Performing an In-place Upgrade.Incompatible change: MySQL 5.7.8 and 5.7.9 undo logs may contain insufficient information about spatial columns, which could result in a upgrade failure (Bug #21508582). Before performing an in-place upgrade from MySQL 5.7.8 or 5.7.9 to 5.7.10 or higher, perform a slow shutdown using
innodb_fast_shutdown=0to clear the undo logs. A slow shutdown usinginnodb_fast_shutdown=0is a recommended step in Performing an In-place Upgrade.Incompatible change: MySQL 5.7.8 undo logs may contain insufficient information about virtual columns and virtual column indexes, which could result in a upgrade failure (Bug #21869656). Before performing an in-place upgrade from MySQL 5.7.8 to MySQL 5.7.9 or higher, perform a slow shutdown using
innodb_fast_shutdown=0to clear the undo logs. A slow shutdown usinginnodb_fast_shutdown=0is a recommended step in Performing an In-place Upgrade.Incompatible change: As of MySQL 5.7.9, the redo log header of the first redo log file (
ib_logfile0) includes a format version identifier and a text string that identifies the MySQL version that created the redo log files. This enhancement changes the redo log format, requiring that MySQL be shutdown cleanly using aninnodb_fast_shutdownsetting of0or1before performing an in-place upgrade to MySQL 5.7.9 or higher. A slow shutdown usinginnodb_fast_shutdown=0is a recommended step in Performing an In-place Upgrade.In MySQL 5.7.9,
DYNAMICreplacesCOMPACTas the implicit default row format forInnoDBtables. A new configuration option,innodb_default_row_format, specifies the defaultInnoDBrow format. Permitted values includeDYNAMIC(the default),COMPACT, andREDUNDANT.After upgrading to 5.7.9, any new tables that you create will use the row format defined by
innodb_default_row_formatunless you explicitly define a row format (ROW_FORMAT).For existing tables that do not explicitly define a
ROW_FORMAToption or that useROW_FORMAT=DEFAULT, any operation that rebuilds a table also silently changes the row format of the table to the format defined byinnodb_default_row_format. Otherwise, existing tables retain their current row format setting. For more information, see Section 14.9.2, “Specifying the Row Format for a Table”.
SQL Changes
Incompatible change: The
GET_LOCK()function was reimplemented in MySQL 5.7.5 using the metadata locking (MDL) subsystem and its capabilities have been extended:Previously,
GET_LOCK()permitted acquisition of only one named lock at a time, and a secondGET_LOCK()call released any existing lock. NowGET_LOCK()permits acquisition of more than one simultaneous named lock and does not release existing locks.Applications that rely on the behavior of
GET_LOCK()releasing any previous lock must be modified for the new behavior.The capability of acquiring multiple locks introduces the possibility of deadlock among clients. The MDL subsystem detects deadlock and returns an
ER_USER_LOCK_DEADLOCKerror when this occurs.The MDL subsystem imposes a limit of 64 characters on lock names, so this limit now also applies to named locks. Previously, no length limit was enforced.
Locks acquired with
GET_LOCK()now appear in the Performance Schemametadata_lockstable. TheOBJECT_TYPEcolumn saysUSER LEVEL LOCKand theOBJECT_NAMEcolumn indicates the lock name.A new function,
RELEASE_ALL_LOCKS()permits release of all acquired named locks at once.
For more information, see Section 12.19, “Miscellaneous Functions”.
The optimizer now handles derived tables and views in the
FROMclause in consistent fashion to better avoid unnecessary materialization and to enable use of pushed-down conditions that produce more efficient execution plans. However, for statements such asDELETEorUPDATEthat modify tables, using the merge strategy for a derived table that previously was materialized can result in anER_UPDATE_TABLE_USEDerror:mysql>
DELETE FROM t1->WHERE id IN (SELECT id->FROM (SELECT t1.id->FROM t1 INNER JOIN t2 USING (id)->WHERE t2.status = 0) AS t);ERROR 1093 (HY000): You can't specify target table 't1' for update in FROM clauseThe error occurs when merging a derived table into the outer query block results in a statement that both selects from and modifies a table. (Materialization does not cause the problem because, in effect, it converts the derived table to a separate table.) To avoid this error, disable the
derived_mergeflag of theoptimizer_switchsystem variable before executing the statement:mysql>
SET optimizer_switch = 'derived_merge=off';The
derived_mergeflag controls whether the optimizer attempts to merge subqueries and views in theFROMclause into the outer query block, assuming that no other rule prevents merging. By default, the flag isonto enable merging. Setting the flag tooffprevents merging and avoids the error just described. For more information, see Section 8.2.1.18.3, “Optimizing Derived Tables and View References”.Some keywords may be reserved in MySQL 5.7 that were not reserved in MySQL 5.6. See Section 9.3, “Keywords and Reserved Words”.
For supported Yum-based platforms (see Section 2.5.1, “Installing MySQL on Linux Using the MySQL Yum Repository”, for a list), you can perform an in-place upgrade for MySQL (that is, replacing the old version and then running the new version off the old data files) with the MySQL Yum repository.
Before performing any update to MySQL, follow carefully the instructions in Section 2.11.1, “Upgrading MySQL”. Among other instructions discussed there, it is especially important to back up your database before the update.
The following instructions assume you have installed MySQL with the MySQL Yum repository or with an RPM package directly downloaded from MySQL Developer Zone's MySQL Download page; if that is not the case, following the instructions in Section 2.5.2, “Replacing a Third-Party Distribution of MySQL Using the MySQL Yum Repository”.
-
Selecting a Target Series
By default, the MySQL Yum repository updates MySQL to the latest version in the release series you have chosen during installation (see Selecting a Release Series for details), which means, for example, a 5.6.x installation will NOT be updated to a 5.7.x release automatically. To update to another release series, you need to first disable the subrepository for the series that has been selected (by default, or by yourself) and enable the subrepository for your target series. To do that, see the general instructions given in Selecting a Release Series. For upgrading from MySQL 5.6 to 5.7, perform the reverse of the steps illustrated in Selecting a Release Series, disabling the subrepository for the MySQL 5.6 series and enabling that for the MySQL 5.7 series.
As a general rule, to upgrade from one release series to another, go to the next series rather than skipping a series. For example, if you are currently running MySQL 5.6 and wish to upgrade to 5.7, upgrade to MySQL 5.6 first before upgrading to 5.7.
ImportantFor important information about upgrading from MySQL 5.6 to 5.7, see Upgrading from MySQL 5.6 to 5.7.
-
Upgrading MySQL
Upgrade MySQL and its components by the following command, for platforms that are not dnf-enabled:
shell>
sudo yum update mysql-serverFor platforms that are dnf-enabled:
shell>
sudo dnf upgrade mysql-serverAlternatively, you can update MySQL by telling Yum to update everything on your system, which might take considerably more time; for platforms that are not dnf-enabled:
shell>
sudo yum updateFor platforms that are dnf-enabled:
shell>
sudo dnf upgrade -
Restarting MySQL
The MySQL server always restarts after an update by Yum. Once the server restarts, run mysql_upgrade to check and possibly resolve any incompatibilities between the old data and the upgraded software. mysql_upgrade also performs other functions; see Section 4.4.7, “mysql_upgrade — Check and Upgrade MySQL Tables” for details.
You can also update only a specific component. Use the following command to list all the installed packages for the MySQL components (for dnf-enabled systems, replace yum in the command with dnf):
shell> sudo yum list installed | grep "^mysql"
After identifying the package name of the component of your
choice, for platforms that are not dnf-enabled, update the
package with the following command, replacing
package-name with the name of the
package:
shell> sudo yum update package-nameFor dnf-enabled platforms:
shell> sudo dnf upgrade package-name
Upgrading the Shared Client Libraries
After updating MySQL using the Yum repository, applications compiled with older versions of the shared client libraries should continue to work.
If you recompile applications and dynamically link them with the updated libraries: As typical with new versions of shared libraries where there are differences or additions in symbol versioning between the newer and older libraries (for example, between the newer, standard 5.7 shared client libraries and some older—prior or variant—versions of the shared libraries shipped natively by the Linux distributions' software repositories, or from some other sources), any applications compiled using the updated, newer shared libraries will require those updated libraries on systems where the applications are deployed. And, as expected, if those libraries are not in place, the applications requiring the shared libraries will fail. So, be sure to deploy the packages for the shared libraries from MySQL on those systems. You can do this by adding the MySQL Yum repository to the systems (see Adding the MySQL Yum Repository) and install the latest shared libraries using the instructions given in Installing Additional MySQL Products and Components with Yum.
On Debian 7 or 8 and Ubuntu 12, 14, or 15, you can perform an in-place upgrade of MySQL and its components with the MySQL APT repository. See Upgrading MySQL with the MySQL APT Repository in A Quick Guide to Using the MySQL APT Repository.
It is preferable to use the MySQL Yum repository or MySQL SLES Repository to upgrade MySQL on RPM-based platforms. However, if you have to upgrade MySQL using the RPM packages downloaded directly from the MySQL Developer Zone (see Section 2.5.5, “Installing MySQL on Linux Using RPM Packages from Oracle” for information on the packages), go to the folder that contains all the downloaded packages (and, preferably, no other RPM packages with similar names), and issue the following command for platforms other than Red Hat Enterprise Linux/Oracle Linux/CentOS 5:
shell> yum install mysql-community-{server,client,common,libs}-*
For Red Hat Enterprise Linux/Oracle Linux/CentOS 5 systems,
there is an extra package
(mysql-)
to be installed; use the following command:
version-el5-arch.rpm
shell> yum install mysql-community-{server,client,common,libs}-* mysql-5.*
Replace yum with zypper for SLES systems, and with dnf for dnf-enabled systems.
While it is much preferable to use a high-level package management tool like yum to install the packages, users who preferred direct rpm commands can replace the yum install command with the rpm -Uvh command; however, using rpm -Uvh instead makes the installation process more prone to failure, due to potential dependency issues the installation process might run into.
For an upgrade installation using RPM packages, the MySQL server is automatically restarted at the end of the installation if it was running when the upgrade installation began. If the server was not running when the upgrade installation began, you have to restart the server yourself after the upgrade installation is completed; do that with, for example, the follow command:
shell> service mysqld start
Once the server restarts, run mysql_upgrade to check and possibly resolve any incompatibilities between the old data and the upgraded software. mysql_upgrade also performs other functions; see Section 4.4.7, “mysql_upgrade — Check and Upgrade MySQL Tables” for details.
Because of the dependency relationships among the RPM packages, all of the installed packages must be of the same version. Therefore, always update all your installed packages for MySQL. For example, do not just update the server without also upgrading the client, the common files for server and client libraries, and so on.
Migration and Upgrade from installations by older RPM packages. Some older versions of MySQL Server RPM packages have names in the form of MySQL-* (for example, MySQL-server-* and MySQL-client-*). The latest versions of RPMs, when installed using the standard package management tool (yum, dnf, or zypper), seamlessly upgrade those older installations, making it unnecessary to uninstall those old packages before installing the new ones. Here are some differences in behavior between the older and the current RPM packages:
Table 2.13 Differences Between the Previous and the Current RPM Packages for Installing MySQL
| Feature | Behavior of Previous Packages | Behavior of Current Packages |
|---|---|---|
| Service starts after installation is finished | Yes | No, unless it is an upgrade installation, and the server was running when the upgrade began. |
| Service name | mysql | For RHEL, Oracle Linux, CentOS, and Fedora: mysqld For SLES: mysql |
| Error log file | At
/var/lib/mysql/ |
For RHEL, Oracle Linux, CentOS, and Fedora: at
For SLES: at
|
Shipped with the /etc/my.cnf file | No | Yes |
| Multilib support | No | Yes |
Installation of previous versions of MySQL using the older
packages might have created a configuration file named
/usr/my.cnf. It is highly recommended
that you examine the contents of the file and migrate the
desired settings inside to the file
/etc/my.cnf file, then remove
/usr/my.cnf.
Upgrading to MySQL Enterprise Server.
It is not necessary to remove the MySQL Community Server
before upgrading to the MySQL Enterprise Server. Follow the
steps given in the README file included
with the MySQL Enterprise RPMs.
Interoperability with operating system native MySQL packages.
Many Linux distributions ship MySQL as an integrated part of
the operating system. The latest versions of RPMs from Oracle,
when installed using the standard package management tool
(yum, dnf, or
zypper), will seamlessly upgrade and
replace the MySQL version that comes with the operating
system, and the package manager will automatically replace
system compatibility packages such as
mysql-community-libs-compat with relevant
new versions.
Upgrading from non-native MySQL packages. If you have installed MySQL with third-party packages NOT from your Linux distribution's native software repository (for example, packages directly downloaded from the vendor), you will need to uninstall all those packages before you can upgrade using the packages from Oracle.
This section describes how to downgrade to an older MySQL version.
Supported Downgrade Methods
Supported downgrade methods include:
In-place Downgrade: Involves shutting down the new MySQL version, replacing the new MySQL binaries or packages with the old ones, and restarting the old MySQL version on the existing data directory. In-place downgrades are supported for downgrades between GA versions within the same release series. For example, in-place downgrades are supported for downgrades from 5.7.10 to 5.7.9.
Logical Downgrade: Involves using mysqldump to dump all tables from the new MySQL version, and then loading the dump file into the old MySQL version. Logical downgrades are supported for downgrades between GA versions within the same release series and for downgrades between release levels. For example, logical downgrades are supported for downgrades from 5.7.10 to 5.7.9 and for downgrades from 5.7 to 5.6.
For procedures, see Performing an In-place Downgrade, and Performing a Logical Downgrade.
Supported Downgrade Paths
Unless otherwise documented, the following downgrade paths are supported:
Downgrading from a release series version to an older release series version is supported using all downgrade methods. For example, downgrading from 5.7.10 to 5.7.9 is supported. Skipping release series versions is also supported. For example, downgrading from 5.7.11 to 5.7.9 is supported.
Downgrading one release level is supported using the logical downgrade method. For example, downgrading from 5.7 to 5.6 is supported.
Downgrading more than one release level is supported using the logical downgrade method, but only if you downgrade one release level at a time. For example, you can downgrade from 5.7 to 5.6, and then to 5.5.
The following conditions apply to all downgrade paths:
Downgrades between General Availability (GA) status releases are supported.
Downgrades between milestone releases (or from a GA release to a milestone release) are not supported. For example, downgrading from MySQL 5.7.9 to MySQL 5.7.8 is not supported, as 5.7.8 is not a GA status release.
Before You Begin
Before downgrading, the following steps are recommended:
Review the Release Notes for the MySQL version you are downgrading from to ensure that there are no features or fixes that you really need.
Review Section 2.11.2.1, “Changes Affecting Downgrades from MySQL 5.7”. This section describes changes that may require action before or after downgrading.
NoteThe downgrade procedures described in the following sections assume you are downgrading with data files created or modified by the newer MySQL version. However, if you did not modify your data after upgrading, downgrading using backups taken before upgrading to the new MySQL version is recommended. Many of the changes described in Section 2.11.2.1, “Changes Affecting Downgrades from MySQL 5.7” that require action before or after downgrading are not applicable when downgrading using backups taken before upgrading to the new MySQL version.
Always back up your current databases and log files before downgrading. The backup should include the
mysqldatabase, which contains the MySQL system tables. See Section 7.2, “Database Backup Methods”.Use of new features, new configuration options, or new configuration option values that are not supported by a previous release may cause downgrade errors or failures. Before downgrading, it is recommended that you reverse changes resulting from the use of new features and remove configuration settings that are not supported by the release you are downgrading to.
Check Section 2.11.3, “Checking Whether Tables or Indexes Must Be Rebuilt”, to see whether changes to table formats or to character sets or collations were made between your current version of MySQL and the version to which you are downgrading. If such changes have resulted in an incompatibility between MySQL versions, downgrade the affected tables using the instructions in Section 2.11.4, “Rebuilding or Repairing Tables or Indexes”.
If you use XA transactions with
InnoDB, runXA RECOVERbefore downgrading to check for uncommitted XA transactions. If results are returned, either commit or rollback the XA transactions by issuing anXA COMMITorXA ROLLBACKstatement.
Performing an In-place Downgrade
In-place downgrades are supported for downgrades between GA status releases within the same release series. Review Before you Begin before proceeding.
For a supported downgrade path within the MySQL 5.7 release series, there must be at least two MySQL 5.7 GA status versions available.
To perform an in-place downgrade:
Review the changes described in Section 2.11.2.1, “Changes Affecting Downgrades from MySQL 5.7” for steps to be performed before downgrading.
Configure MySQL to perform a slow shutdown by setting
innodb_fast_shutdownto0. For example:shell>
bin/mysql -u root -ppassword--execute="set global innodb_fast_shutdown=0"With a slow shutdown,
InnoDBperforms a full purge and change buffer merge before shutting down, which ensures that data files are fully prepared in case of file format differences between releases.Shut down the newer MySQL server. For example:
shell>
bin/mysqladmin -u root -ppasswordshutdownAfter the slow shutdown, remove the
InnoDBredo log files (theib_logfile*files) from thedatadirectory to avoid downgrade issues related to redo log file format changes that may have occurred between releases.shell>
rm ib_logfile*Downgrade the MySQL binaries or packages in-place by replacing the newer binaries or packages with the older ones.
Start the older (downgraded) MySQL server, using the existing data directory. For example:
shell>
bin/mysqld_safe --user=mysql --datadir=/path/to/existing-datadirRun mysql_upgrade. For example:
shell>
bin/mysql_upgrade -u root -ppasswordmysql_upgrade examines all tables in all databases for incompatibilities with the current version of MySQL, and attempts to repair the tables if problems are found.
Performing a Logical Downgrade
Logical downgrades are supported for downgrades between releases within the same release series and for downgrades to the previous release level. Only downgrades between General Availability (GA) status releases are supported. Review Before you Begin before proceeding.
To perform a logical downgrade:
Review the changes described in Section 2.11.2.1, “Changes Affecting Downgrades from MySQL 5.7” for steps to be performed before downgrading.
Dump all databases. For example:
shell>
bin/mysqldump --add-drop-table --events -u root -ppassword--all-databases --force > all_5_7_databases_dump.sqlShut down the newer MySQL server. For example:
shell>
bin/mysqladmin -u root -ppasswordshutdownInitialize an older MySQL instance, with a new data directory. For example, to initialize a MySQL 5.6 instance, use mysql_install_db:
shell>
scripts/mysql_install_db --user=mysqlNotemysql_install_db is deprecated as of MySQL 5.7.6 because its functionality has been integrated into mysqld.
To initialize a MySQL 5.7 instance, use mysqld with the
--initializeor--initialize-insecureoption.shell>
bin/mysqld --initialize --user=mysqlStart the older MySQL server, using the new data directory. For example:
shell>
bin/mysqld_safe --user=mysql --datadir=/path/to/new-datadirLoad the dump file into the older MySQL server. For example:
shell>
bin/mysql -u root -ppassword--execute="source all_5_7_databases_dump.sql" --forceRun mysql_upgrade. For example:
shell>
bin/mysql_upgrade -u root -ppasswordmysql_upgrade examines all tables in all databases for incompatibilities with the current version of MySQL, and attempts to repair the tables if problems are found.
Configure MySQL to perform a slow shutdown by setting
innodb_fast_shutdownto0. For example:shell>
bin/mysql -u root -ppassword--execute="set global innodb_fast_shutdown=0"Shut down and restart the MySQL server to ensure a clean shutdown and startup. For example:
shell>
bin/mysqladmin -u root -pshell>passwordshutdownbin/mysqld_safe --user=mysql --datadir=/path/to/new-datadir
Downgrade Troubleshooting
If you downgrade from one release series to another, there may be incompatibilities in table storage formats. In this case, use mysqldump to dump your tables before downgrading. After downgrading, reload the dump file using mysql or mysqlimport to re-create your tables. For examples, see Section 2.11.5, “Copying MySQL Databases to Another Machine”.
A typical symptom of a downward-incompatible table format change when you downgrade is that you cannot open tables. In that case, use the following procedure:
Stop the older MySQL server that you are downgrading to.
Restart the newer MySQL server you are downgrading from.
Dump any tables that were inaccessible to the older server by using mysqldump to create a dump file.
Stop the newer MySQL server and restart the older one.
Reload the dump file into the older server. Your tables should be accessible.
Before downgrading from MySQL 5.7, review the changes described in this section. Some changes may require action before or after downgrading.
System Table Changes
The maximum length of MySQL user names was increased from 16 characters to 32 characters in MySQL 5.7.8. Before downgrading to a previous release, ensure that there are no user names greater than 16 characters in length, and perform the following
mysqlsystem table alterations:mysql>
ALTER TABLE mysql.tables_priv MODIFY User char(16) NOT NULL default '';mysql>ALTER TABLE mysql.columns_priv MODIFY User char(16) NOT NULL default '';mysql>ALTER TABLE mysql.user MODIFY User char(16) NOT NULL default '';mysql>ALTER TABLE mysql.db MODIFY User char(16) NOT NULL default '';mysql>ALTER TABLE mysql.procs_priv MODIFY User char(16) binary DEFAULT '' NOT NULL;The
Passwordcolumn of themysql.usertable was removed in MySQL 5.7.6. All credentials are stored in theauthentication_stringcolumn, including those formerly stored in thePasswordcolumn. To make themysql.usertable compatible with previous releases, perform the following alterations before downgrading:mysql>
ALTER TABLE mysql.user ADD Password char(41) character set latin1->collate latin1_bin NOT NULL default '' AFTER user;mysql>UPDATE mysql.user SET password = authentication_string where->LENGTH(authentication_string) = 41 and plugin = 'mysql_native_password';mysql>UPDATE mysql.user SET authentication_string = '' where->LENGTH(authentication_string) = 41 and plugin = 'mysql_native_password';The
help_*andtime_zone*system tables changed fromMyISAMtoInnoDBin MySQL 5.7.5. Before downgrading to a previous release, change each affected table back toMyISAMby running the following statements:mysql>
ALTER TABLE mysql.help_category ENGINE='MyISAM' STATS_PERSISTENT=DEFAULT;mysql>ALTER TABLE mysql.help_keyword ENGINE='MyISAM' STATS_PERSISTENT=DEFAULT;mysql>ALTER TABLE mysql.help_relation ENGINE='MyISAM' STATS_PERSISTENT=DEFAULT;mysql>ALTER TABLE mysql.help_topic ENGINE='MyISAM' STATS_PERSISTENT=DEFAULT;mysql>ALTER TABLE mysql.time_zone ENGINE='MyISAM' STATS_PERSISTENT=DEFAULT;mysql>ALTER TABLE mysql.time_zone_leap_second ENGINE='MyISAM' STATS_PERSISTENT=DEFAULT;mysql>ALTER TABLE mysql.time_zone_name ENGINE='MyISAM' STATS_PERSISTENT=DEFAULT;mysql>ALTER TABLE mysql.time_zone_transition ENGINE='MyISAM' STATS_PERSISTENT=DEFAULT;mysql>ALTER TABLE mysql.time_zone_transition_type ENGINE='MyISAM' STATS_PERSISTENT=DEFAULT;The
pluginandserverssystem tables changed fromMyISAMtoInnoDBin MySQL 5.7.6. Before downgrading to a previous release, change each affected table back toMyISAMby running the following statements:mysql>
ALTER TABLE mysql.plugin ENGINE='MyISAM' STATS_PERSISTENT=DEFAULT;mysql>ALTER TABLE mysql.servers ENGINE='MyISAM' STATS_PERSISTENT=DEFAULT;The definition of the
plugincolumn in themysql.usertable differs in MySQL 5.7. Before downgrading to a MySQL 5.6 server for versions 5.6.23 and higher, alter theplugincolumn definition using this statement:mysql>
ALTER TABLE mysql.user MODIFY plugin CHAR(64) COLLATE utf8_bin->DEFAULT 'mysql_native_password';Before downgrading to a MySQL 5.6.22 server or older, alter the
plugincolumn definition using this statement:mysql>
ALTER TABLE mysql.user MODIFY plugin CHAR(64) COLLATE utf8_bin DEFAULT '';As of MySQL 5.7.7, the
sysschema is installed by default during data directory installation. Before downgrading to a previous version, it is recommended that you drop thesysschema:mysql>
DROP DATABASE sys;If you are downgrading to a release that includes the
sysschema, mysql_upgrade recreates thesysschema in a compatible form. Thesysschema is not included in MySQL 5.6.
InnoDB Changes
As of MySQL 5.7.5, the
FIL_PAGE_FLUSH_LSNfield, written to the first page of eachInnoDBsystem tablespace file and toInnoDBundo tablespace files, is only written to the first file of theInnoDBsystem tablespace (page number 0:0). As a result, if you have a multiple-file system tablespace and decide to downgrade from MySQL 5.7 to MySQL 5.6, you may encounter an invalid message on MySQL 5.6 startup stating that the log sequence numbersxandyin ibdata files do not match the log sequence numberyin the ib_logfiles. If you encounter this message, restart MySQL 5.6. The invalid message should no longer appear.To simplify
InnoDBtablespace discovery during crash recovery, new redo log record types were introduced in MySQL 5.7.5. This enhancement changes the redo log format. Before performing an in-place downgrade from MySQL 5.7.5 or later, perform a clean shutdown using aninnodb_fast_shutdownsetting of0or1. A slow shutdown usinginnodb_fast_shutdown=0is a recommended step in Performing an In-place Downgrade.MySQL 5.7.8 and 5.7.9 undo logs could contain insufficient information about spatial columns (Bug #21508582). Before performing an in-place downgrade from MySQL 5.7.10 or higher to MySQL 5.7.9 or earlier, perform a slow shutdown using
innodb_fast_shutdown=0to clear the undo logs. A slow shutdown usinginnodb_fast_shutdown=0is a recommended step in Performing an In-place Downgrade.MySQL 5.7.8 undo logs could contain insufficient information about virtual columns and virtual column indexes (Bug #21869656). Before performing an in-place downgrade from MySQL 5.7.9 or later to MySQL 5.7.8 or earlier, perform a slow shutdown using
innodb_fast_shutdown=0to clear the undo logs. A slow shutdown usinginnodb_fast_shutdown=0is a recommended step in Performing an In-place Downgrade.As of MySQL 5.7.9, the redo log header of the first redo log file (
ib_logfile0) includes a format version identifier and a text string that identifies the MySQL version that created the redo log files. This enhancement changes the redo log format. To prevent older versions of MySQL from starting on redo log files created in MySQL 5.7.9 or later, the checksum for redo log checkpoint pages was changed. As a result, you must perform a slow shutdown of MySQL (using innodb_fast_shutdown=0) and remove the redo log files (theib_logfile*files) before performing an in-place downgrade. A slow shutdown usinginnodb_fast_shutdown=0and removing the redo log files are recommended steps in Performing an In-place Downgrade.
Logging Changes
Support for sending the server error log to
syslogin MySQL 5.7.5 and up differs from older versions. If you usesyslogand downgrade to a version older than 5.7.5, you must stop using the relevant mysqld system variables and use the corresponding mysqld_safe command options instead. Suppose that you usesyslogby setting these system variables in the[mysqld]group of an option file:[mysqld] log_syslog=ON log_syslog_tag=mytag
To downgrade, remove those settings and add option settings in the
[mysqld_safe]option file group:[mysqld_safe] syslog syslog-tag=mytag
syslog-related system variables that have no corresponding mysqld_safe option cannot be used after a downgrade.
SQL Changes
A trigger can have triggers for different combinations of trigger event (
INSERT,UPDATE,DELETE) and action time (BEFORE,AFTER), but before MySQL 5.7.2 cannot have multiple triggers that have the same trigger event and action time. MySQL 5.7.2 lifts this limitation and multiple triggers are permitted. This change has implications for downgrades.If you downgrade a server that supports multiple triggers to an older version that does not, the downgrade has these effects:
For each table that has triggers, all trigger definitions remain in the
.TRGfile for the table. However, if there are multiple triggers with the same trigger event and action time, the server executes only one of them when the trigger event occurs. For information about.TRGfiles, see Table Trigger Storage.If triggers for the table are added or dropped subsequent to the downgrade, the server rewrites the table's
.TRGfile. The rewritten file retains only one trigger per combination of trigger event and action time; the others are lost.
To avoid these problems, modify your triggers before downgrading. For each table that has multiple triggers per combination of trigger event and action time, convert each such set of triggers to a single trigger as follows:
For each trigger, create a stored routine that contains all the code in the trigger. Values accessed using
NEWandOLDcan be passed to the routine using parameters. If the trigger needs a single result value from the code, you can put the code in a stored function and have the function return the value. If the trigger needs multiple result values from the code, you can put the code in a stored procedure and return the values usingOUTparameters.Drop all triggers for the table.
Create one new trigger for the table that invokes the stored routines just created. The effect for this trigger is thus the same as the multiple triggers it replaces.
A binary upgrade or downgrade is one that installs one version of MySQL “in place” over an existing version, without dumping and reloading tables:
Stop the server for the existing version if it is running.
Install a different version of MySQL. This is an upgrade if the new version is higher than the original version, a downgrade if the version is lower.
Start the server for the new version.
In many cases, the tables from the previous version of MySQL can be used without problem by the new version. However, sometimes changes occur that require tables or table indexes to be rebuilt, as described in this section. If you have tables that are affected by any of the issues described here, rebuild the tables or indexes as necessary using the instructions given in Section 2.11.4, “Rebuilding or Repairing Tables or Indexes”.
Index Incompatibilities
Modifications to the handling of character sets or collations might change the character sort order, which causes the ordering of entries in any index that uses an affected character set or collation to be incorrect. Such changes result in several possible problems:
Comparison results that differ from previous results
Inability to find some index values due to misordered index entries
Misordered
ORDER BYresultsTables that
CHECK TABLEreports as being in need of repair
The solution to these problems is to rebuild any indexes that use an affected character set or collation, either by dropping and re-creating the indexes, or by dumping and reloading the entire table. In some cases, it is possible to alter affected columns to use a different collation. For information about rebuilding indexes, see Section 2.11.4, “Rebuilding or Repairing Tables or Indexes”.
In many cases, you can use
CHECK TABLE ... FOR
UPGRADE to identify tables for which index rebuilding is
required. It will report this message:
Table upgrade required. Please do "REPAIR TABLE `tbl_name`" or dump/reload to fix it!
In these cases, you can also use mysqlcheck
--check-upgrade or mysql_upgrade,
which execute CHECK TABLE. However,
the use of CHECK TABLE applies only
after upgrades, not downgrades. Also, CHECK
TABLE is not applicable to all storage engines. For
details about which storage engines CHECK
TABLE supports, see Section 13.7.2.2, “CHECK TABLE Syntax”.
This section describes how to rebuild a table, following changes
to MySQL such as how data types or character sets are handled. For
example, an error in a collation might have been corrected,
requiring a table rebuild to update the indexes for character
columns that use the collation. (For examples, see
Section 2.11.3, “Checking Whether Tables or Indexes Must Be Rebuilt”.) You might
also need to repair or upgrade a table, as indicated by a table
check operation such as that performed by
CHECK TABLE,
mysqlcheck, or
mysql_upgrade.
Methods for rebuilding a table include dumping and reloading it,
or using ALTER TABLE or
REPAIR TABLE.
REPAIR TABLE only applies to
MyISAM, ARCHIVE, and
CSV tables.
If you are rebuilding tables because a different version of MySQL will not handle them after a binary (in-place) upgrade or downgrade, you must use the dump-and-reload method. Dump the tables before upgrading or downgrading using your original version of MySQL. Then reload the tables after upgrading or downgrading.
If you use the dump-and-reload method of rebuilding tables only for the purpose of rebuilding indexes, you can perform the dump either before or after upgrading or downgrading. Reloading still must be done afterward.
To rebuild a table by dumping and reloading it, use mysqldump to create a dump file and mysql to reload the file:
shell>mysqldumpshell>db_namet1 > dump.sqlmysqldb_name< dump.sql
To rebuild all the tables in a single database, specify the database name without any following table name:
shell>mysqldumpshell>db_name> dump.sqlmysqldb_name< dump.sql
To rebuild all tables in all databases, use the
--all-databases option:
shell>mysqldump --all-databases > dump.sqlshell>mysql < dump.sql
To rebuild a table with ALTER
TABLE, use a “null” alteration; that is, an
ALTER TABLE statement that
“changes” the table to use the storage engine that it
already has. For example, if t1 is an
InnoDB table, use this statement:
mysql> ALTER TABLE t1 ENGINE = InnoDB;
If you are not sure which storage engine to specify in the
ALTER TABLE statement, use
SHOW CREATE TABLE to display the
table definition.
If you need to rebuild an InnoDB table because
a CHECK TABLE operation indicates
that a table upgrade is required, use mysqldump
to create a dump file and mysql to reload the
file, as described earlier. If the CHECK
TABLE operation indicates that there is a corruption or
causes InnoDB to fail, refer to
Section 14.19.2, “Forcing InnoDB Recovery” for information about
using the innodb_force_recovery
option to restart InnoDB. To understand the
type of problem that CHECK TABLE
may be encountering, refer to the InnoDB notes
in Section 13.7.2.2, “CHECK TABLE Syntax”.
For MyISAM, ARCHIVE, or
CSV tables, you can use
REPAIR TABLE if the table checking
operation indicates that there is a corruption or that an upgrade
is required. For example, to repair a MyISAM
table, use this statement:
mysql> REPAIR TABLE t1;
mysqlcheck --repair provides command-line
access to the REPAIR TABLE
statement. This can be a more convenient means of repairing tables
because you can use the
--databases or
--all-databases option to
repair all tables in specific databases or all databases,
respectively:
shell>mysqlcheck --repair --databasesshell>db_name...mysqlcheck --repair --all-databases
In cases where you need to transfer databases between different architectures, you can use mysqldump to create a file containing SQL statements. You can then transfer the file to the other machine and feed it as input to the mysql client.
You can copy the .frm,
.MYI, and .MYD files
for MyISAM tables between different
architectures that support the same floating-point format.
(MySQL takes care of any byte-swapping issues.) See
Section 15.2, “The MyISAM Storage Engine”.
Use mysqldump --help to see what options are available.
The easiest (although not the fastest) way to move a database between two machines is to run the following commands on the machine on which the database is located:
shell>mysqladmin -h 'shell>other_hostname' createdb_namemysqldumpdb_name| mysql -h 'other_hostname'db_name
If you want to copy a database from a remote machine over a slow network, you can use these commands:
shell>mysqladmin createshell>db_namemysqldump -h 'other_hostname' --compressdb_name| mysqldb_name
You can also store the dump in a file, transfer the file to the target machine, and then load the file into the database there. For example, you can dump a database to a compressed file on the source machine like this:
shell> mysqldump --quick db_name | gzip > db_name.gz
Transfer the file containing the database contents to the target machine and run these commands there:
shell>mysqladmin createshell>db_namegunzip <db_name.gz | mysqldb_name
You can also use mysqldump and
mysqlimport to transfer the database. For large
tables, this is much faster than simply using
mysqldump. In the following commands,
DUMPDIR represents the full path name
of the directory you use to store the output from
mysqldump.
First, create the directory for the output files and dump the database:
shell>mkdirshell>DUMPDIRmysqldump --tab=DUMPDIRdb_name
Then transfer the files in the DUMPDIR
directory to some corresponding directory on the target machine
and load the files into MySQL there:
shell>mysqladmin createshell>db_name# create databasecatshell>DUMPDIR/*.sql | mysqldb_name# create tables in databasemysqlimportdb_nameDUMPDIR/*.txt # load data into tables
Do not forget to copy the mysql database
because that is where the grant tables are stored. You might have
to run commands as the MySQL root user on the
new machine until you have the mysql database
in place.
After you import the mysql database on the new
machine, execute mysqladmin flush-privileges so
that the server reloads the grant table information.
This section lists environment variables that are used directly or indirectly by MySQL. Most of these can also be found in other places in this manual.
Options on the command line take precedence over values specified in option files and environment variables, and values in option files take precedence over values in environment variables. In many cases, it is preferable to use an option file instead of environment variables to modify the behavior of MySQL. See Section 4.2.6, “Using Option Files”.
| Variable | Description |
|---|---|
CXX | The name of your C++ compiler (for running CMake). |
CC | The name of your C compiler (for running CMake). |
DBI_USER | The default user name for Perl DBI. |
DBI_TRACE | Trace options for Perl DBI. |
HOME | The default path for the mysql history file is
$HOME/.mysql_history. |
LD_RUN_PATH | Used to specify the location of libmysqlclient.so. |
LIBMYSQL_ENABLE_CLEARTEXT_PLUGIN | Enable mysql_clear_password authentication plugin;
see Section 6.4.1.8, “The Cleartext Client-Side Authentication Plugin”. |
LIBMYSQL_PLUGIN_DIR | Directory in which to look for client plugins. |
LIBMYSQL_PLUGINS | Client plugins to preload. |
MYSQL_DEBUG | Debug trace options when debugging. |
MYSQL_GROUP_SUFFIX | Option group suffix value (like specifying
--defaults-group-suffix). |
MYSQL_HISTFILE | The path to the mysql history file. If this variable
is set, its value overrides the default for
$HOME/.mysql_history. |
MYSQL_HISTIGNORE | Patterns specifying statements that mysql should not
log to $HOME/.mysql_history, or
syslog if
--syslog is given. |
MYSQL_HOME | The path to the directory in which the server-specific
my.cnf file resides. |
MYSQL_HOST | The default host name used by the mysql command-line client. |
MYSQL_PS1 | The command prompt to use in the mysql command-line client. |
MYSQL_PWD | The default password when connecting to mysqld. Using this is insecure. See Section 6.1.2.1, “End-User Guidelines for Password Security”. |
MYSQL_TCP_PORT | The default TCP/IP port number. |
MYSQL_TEST_LOGIN_FILE | The name of the .mylogin.cnf login path file. |
MYSQL_TEST_TRACE_CRASH | Whether the test protocol trace plugin crashes clients. See note following table. |
MYSQL_TEST_TRACE_DEBUG | Whether the test protocol trace plugin produces output. See note following table. |
MYSQL_UNIX_PORT | The default Unix socket file name; used for connections to
localhost. |
PATH | Used by the shell to find MySQL programs. |
PKG_CONFIG_PATH | Location of mysqlclient.pc
pkg-config file. See note following
table. |
TMPDIR | The directory in which temporary files are created. |
TZ | This should be set to your local time zone. See Section B.5.3.7, “Time Zone Problems”. |
UMASK | The user-file creation mode when creating files. See note following table. |
UMASK_DIR | The user-directory creation mode when creating directories. See note following table. |
USER | The default user name on Windows when connecting to mysqld. |
For information about the mysql history file, see Section 4.5.1.3, “mysql Logging”.
MYSQL_TEST_LOGIN_FILE is the path name of the
login path file (the file created by
mysql_config_editor). If not set, the default
value is %APPDATA%\MySQL\.mylogin.cnf directory
on Windows and $HOME/.mylogin.cnf on
non-Windows systems. See Section 4.6.6, “mysql_config_editor — MySQL Configuration Utility”.
The MYSQL_TEST_TRACE_DEBUG and
MYSQL_TEST_TRACE_CRASH variables control the test
protocol trace client plugin, if MySQL is built with that plugin
enabled. For more information, see
Section 25.2.4.11.1, “Using the Test Protocol Trace Plugin”.
The default UMASK and
UMASK_DIR values are 0640 and
0750, respectively (0660 and
0700 prior to MySQL 5.7.6). MySQL assumes that
the value for UMASK or
UMASK_DIR is in octal if it starts with a zero.
For example, setting UMASK=0600 is equivalent to
UMASK=384 because 0600 octal is 384 decimal.
The UMASK and UMASK_DIR
variables, despite their names, are used as modes, not masks:
If
UMASKis set, mysqld uses($UMASK | 0600)as the mode for file creation, so that newly created files have a mode in the range from 0600 to 0666 (all values octal).If
UMASK_DIRis set, mysqld uses($UMASK_DIR | 0700)as the base mode for directory creation, which then is AND-ed with~(~$UMASK & 0666), so that newly created directories have a mode in the range from 0700 to 0777 (all values octal). The AND operation may remove read and write permissions from the directory mode, but not execute permissions.
It may be necessary to set PKG_CONFIG_PATH if you
use pkg-config for building MySQL programs. See
Section 24.8.4.2, “Building C API Client Programs Using pkg-config”.
The Perl DBI module provides a generic interface
for database access. You can write a DBI script
that works with many different database engines without change. To
use DBI, you must install the
DBI module, as well as a DataBase Driver (DBD)
module for each type of database server you want to access. For
MySQL, this driver is the DBD::mysql module.
Perl support is not included with MySQL distributions. You can obtain the necessary modules from http://search.cpan.org for Unix, or by using the ActiveState ppm program on Windows. The following sections describe how to do this.
The DBI/DBD interface requires
Perl 5.6.0, and 5.6.1 or later is preferred. DBI does not
work if you have an older version of Perl. You should use
DBD::mysql 4.009 or higher. Although earlier
versions are available, they do not support the full functionality
of MySQL 5.7.
MySQL Perl support requires that you have installed MySQL client programming support (libraries and header files). Most installation methods install the necessary files. If you install MySQL from RPM files on Linux, be sure to install the developer RPM as well. The client programs are in the client RPM, but client programming support is in the developer RPM.
The files you need for Perl support can be obtained from the CPAN (Comprehensive Perl Archive Network) at http://search.cpan.org.
The easiest way to install Perl modules on Unix is to use the
CPAN module. For example:
shell>perl -MCPAN -e shellcpan>install DBIcpan>install DBD::mysql
The DBD::mysql installation runs a number of
tests. These tests attempt to connect to the local MySQL server
using the default user name and password. (The default user name
is your login name on Unix, and ODBC on
Windows. The default password is “no password.”) If
you cannot connect to the server with those values (for example,
if your account has a password), the tests fail. You can use
force install DBD::mysql to ignore the failed
tests.
DBI requires the
Data::Dumper module. It may be installed; if
not, you should install it before installing
DBI.
It is also possible to download the module distributions in the form of compressed tar archives and build the modules manually. For example, to unpack and build a DBI distribution, use a procedure such as this:
Unpack the distribution into the current directory:
shell>
gunzip < DBI-VERSION.tar.gz | tar xvf -This command creates a directory named
DBI-.VERSIONChange location into the top-level directory of the unpacked distribution:
shell>
cd DBI-VERSIONBuild the distribution and compile everything:
shell>
perl Makefile.PLshell>makeshell>make testshell>make install
The make test command is important because it
verifies that the module is working. Note that when you run that
command during the DBD::mysql installation to
exercise the interface code, the MySQL server must be running or
the test fails.
It is a good idea to rebuild and reinstall the
DBD::mysql distribution whenever you install a
new release of MySQL. This ensures that the latest versions of the
MySQL client libraries are installed correctly.
If you do not have access rights to install Perl modules in the system directory or if you want to install local Perl modules, the following reference may be useful: http://learn.perl.org/faq/perlfaq8.html#How-do-I-keep-my-own-module-library-directory-
On Windows, you should do the following to install the MySQL
DBD module with ActiveState Perl:
Get ActiveState Perl from http://www.activestate.com/Products/ActivePerl/ and install it.
Open a console window.
If necessary, set the
HTTP_proxyvariable. For example, you might try a setting like this:C:\>
set HTTP_proxy=my.proxy.com:3128Start the PPM program:
C:\>
C:\perl\bin\ppm.plIf you have not previously done so, install
DBI:ppm>
install DBIIf this succeeds, run the following command:
ppm>
install DBD-mysql
This procedure should work with ActiveState Perl 5.6 or newer.
If you cannot get the procedure to work, you should install the ODBC driver instead and connect to the MySQL server through ODBC:
use DBI;
$dbh= DBI->connect("DBI:ODBC:$dsn",$user,$password) ||
die "Got error $DBI::errstr when connecting to $dsn\n";
If Perl reports that it cannot find the
../mysql/mysql.so module, the problem is
probably that Perl cannot locate the
libmysqlclient.so shared library. You should
be able to fix this problem by one of the following methods:
Copy
libmysqlclient.soto the directory where your other shared libraries are located (probably/usr/libor/lib).Modify the
-Loptions used to compileDBD::mysqlto reflect the actual location oflibmysqlclient.so.On Linux, you can add the path name of the directory where
libmysqlclient.sois located to the/etc/ld.so.conffile.Add the path name of the directory where
libmysqlclient.sois located to theLD_RUN_PATHenvironment variable. Some systems useLD_LIBRARY_PATHinstead.
Note that you may also need to modify the -L
options if there are other libraries that the linker fails to
find. For example, if the linker cannot find
libc because it is in /lib
and the link command specifies -L/usr/lib, change
the -L option to -L/lib or add
-L/lib to the existing link command.
If you get the following errors from
DBD::mysql, you are probably using
gcc (or using an old binary compiled with
gcc):
/usr/bin/perl: can't resolve symbol '__moddi3' /usr/bin/perl: can't resolve symbol '__divdi3'
Add -L/usr/lib/gcc-lib/... -lgcc to the link
command when the mysql.so library gets built
(check the output from make for
mysql.so when you compile the Perl client).
The -L option should specify the path name of the
directory where libgcc.a is located on your
system.
Another cause of this problem may be that Perl and MySQL are not both compiled with gcc. In this case, you can solve the mismatch by compiling both with gcc.